These no-bake chocolate oat cookies are like a warm hug from childhood, simple and honest, yet packed with flavor. I love how they come together without any fuss—no oven, no complicated steps—just a quick melt, a stir, and spooning onto parchment. They’re the kind of treat that feels both nostalgic and clever, perfect for busy days or those moments when you need a sweet fix without the fuss.
What makes these cookies special isn’t just their ease, but how they remind me of late afternoons in my mom’s kitchen, the smell of melted chocolate mingling with oats and a hint of vanilla. They’re a reminder that sometimes, the best treats are the simplest—truly made with pantry staples, and no extra time needed. It’s that imperfect, homemade quality that makes every bite feel like a small, sweet victory.
Focusing on how these no-bake cookies serve as a nostalgic, no-fuss treat that brings back childhood memories on busy days.
Childhood Comfort in a Cookie
- These cookies remind me of lazy Sunday afternoons, the smell of chocolate and oats filling the air with warmth.
- I get a little thrill every time I whip up a batch; it’s such an instant, no-fuss treat.
- There’s a quiet pride in making something so simple yet so satisfying, especially when sharing with friends.
- Sometimes, I crave these cookies on hectic mornings—they’re a sweet, no-heat escape from the rush.
- Nostalgia hits hard with each bite, taking me straight back to childhood kitchen counters and messy, happy hands.
The story behind this recipe
- This recipe actually came together one chaotic afternoon when I was out of everything but oats and chocolate chips, and I needed something sweet, fast. I remember the smell of melting chocolate, how it was both comforting and a little rebellious—no oven, no fuss, just a spoon and a sheet of parchment. It’s a reminder that sometimes, the best ideas happen in the middle of kitchen chaos.
- Making these cookies has become a kind of ritual for me—quick, honest, a little messy, but always satisfying. They’re like a little rebellion against the fuss of baking, a way to get a treat without waiting around. Plus, I love how versatile they are—no matter what’s in the pantry, they can be your secret sweet fix.
- heading: ‘The story behind this recipe’
Historical and Cultural Tidbits
- These cookies gained popularity during the Great Depression, as they used pantry staples and required no oven, making them accessible for many families.
- The no-bake technique was a clever workaround in times when oven access was limited or unavailable, especially during wartime rationing.
- In the 1950s and 60s, recipes like these circulated widely in community cookbooks, often called ‘lazy cookies’ or ‘quick chocolate treats.’
- They embody a no-fuss, resourceful approach to baking that many home cooks still cherish today.
Ingredient breakdown: key components
- Rolled oats: I love the chewy texture they bring, almost like a little bite of earthiness in each cookie. If you want softer cookies, try quick oats—they’ll blend in more smoothly.
- Unsweetened cocoa powder: The deep, smoky aroma when I add it is just irresistible. For a richer flavor, go for Dutch-processed cocoa, but natural works just fine if that’s what you have.
- Butter: I use salted butter for that hint of savory balance, but if you’re dairy-free, coconut oil adds a lovely mild sweetness—just reduce the amount a bit.
- Sugar: I prefer brown sugar for its molasses note that makes the cookies extra cozy. You can swap in honey or maple syrup, but reduce the liquid a touch to keep the mixture firm.
- Vanilla extract: The splash of vanilla lifts everything—it’s the secret to making the chocolate taste brighter. If you’re out, a pinch of almond extract adds a different kind of warmth.
- Milk (or alternative): I go for whole milk because it melts smoothly and makes the mixture glossy and inviting. Almond or oat milk work well too, especially if you want a nutty undertone.
- Chocolate chips: I toss in semi-sweet for balance, but dark chocolate chips add a more intense punch. For a nutty twist, chopped nuts or coconut flakes can be stirred in at the end.
Spotlight on key ingredients
Rolled oats:
- I love their chewy bite and hearty texture. They soak up flavors while adding a rustic chew.
- They behave predictably, maintaining structure but softening just enough for a satisfying bite. If you want softer cookies, try quick oats—they blend in more smoothly.
Cocoa powder:
- Unsweetened cocoa powder: It brings a deep, smoky aroma that makes the chocolate flavor pop. When heated, it releases a rich scent that’s almost intoxicating.
- Dutch-processed cocoa offers a mellower, smoother chocolate taste, while natural cocoa provides a brighter, tangy punch. Both are essential for that intense chocolate hit.
Notes for ingredient swaps
- Sweetener: Honey or maple syrup can replace sugar, adding a different kind of sweetness and moisture, but reduce the liquid slightly to keep the mixture firm.
- Dairy-Free: Coconut oil in place of butter gives a subtle coconut aroma and softer texture, but may alter the richness slightly.
- Oats: Quick oats blend in more smoothly and create a softer cookie, while steel-cut oats will be chewier and more rustic.
- Cocoa Powder: Dutch-processed cocoa offers a smoother, mellower chocolate flavor, whereas natural cocoa is brighter and more tangy.
- Milk: Almond or oat milk work well if you’re dairy-free; they’ll keep the mixture smooth but may slightly change the flavor profile.
- Chocolate Chips: Swap semi-sweet for dark chocolate for more intensity, or add chopped nuts for extra crunch and flavor.
Equipment & Tools
- Medium saucepan: For melting butter, sugar, and cacao ingredients.
- Mixing spoon: To stir and combine ingredients evenly.
- Parchment paper: Prevent sticking and easy cleanup.
- Baking sheet: To hold the cookies as they set.
Step-by-step guide to no-bake cookies
- Gather your equipment: a medium saucepan, a mixing spoon, parchment paper, and a baking sheet. The saucepan is for melting, the spoon for stirring, parchment for non-stick, and the sheet for setting.
- In your saucepan, combine 1/2 cup (115g) of unsalted butter and 2 cups (150g) of sugar. Heat over medium, stirring constantly, until the mixture just starts to bubble, about 2-3 minutes. The smell of melted butter and sweet sugar should fill the air.
- Add 1/2 cup (45g) of unsweetened cocoa powder to the melted butter mixture. Stir well until fully incorporated and smooth. The mixture will darken and smell rich, with a glossy sheen forming.
- Pour in 1/2 cup (120ml) of milk (or your preferred alternative). Bring the mixture to a gentle boil, stirring continuously. Let it boil for 1 minute, maintaining a gentle crackle sound, then remove from heat.
- Stir in 2 teaspoons of vanilla extract and 3 cups (250g) of rolled oats. Mix until the oats are evenly coated and the mixture is thick but still stirrable. If it feels too runny, add a few more oats.
- Drop spoonfuls of the mixture onto parchment-lined baking sheet, about a tablespoon each. Flatten slightly with the back of the spoon if you prefer a more uniform shape.
- Allow the cookies to set at room temperature for at least 30 minutes. They should firm up and become chewy but hold their shape well.
- For a firmer texture, refrigerate for 15-20 minutes. Once set, gently peel off the parchment and enjoy. These cookies are best enjoyed within 2-3 days for maximum freshness.
Let the cookies rest at room temperature for 30 minutes, or refrigerate for a quicker set. Serve directly from the parchment for a rustic look or transfer to a plate. They’re best enjoyed within a few days, stored in an airtight container.
How to Know It’s Done
- Mixture is glossy and smooth before dropping onto parchment.
- Cookies firm up and hold shape after resting for 30 minutes.
- The edges are slightly crisp, with a chewy center when bitten.
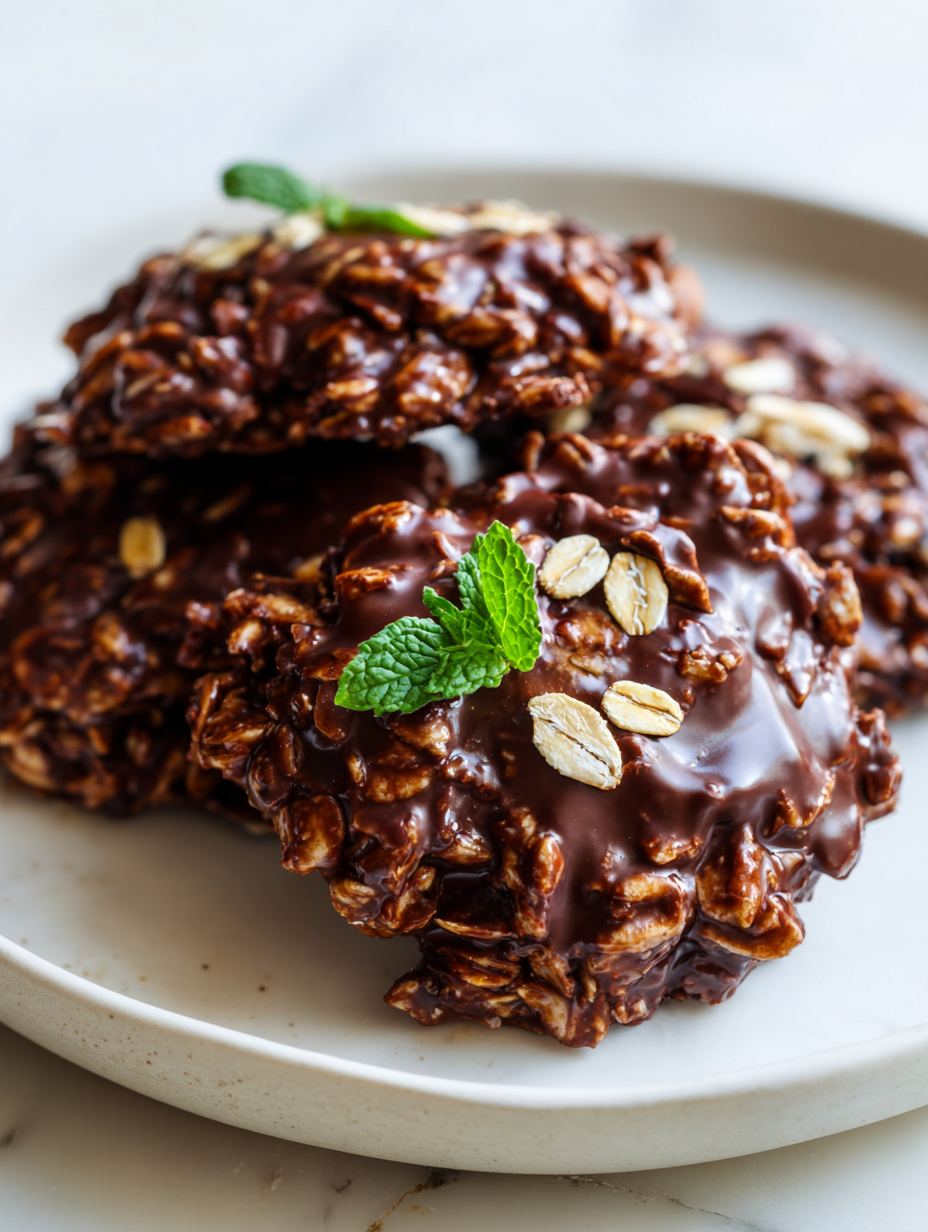
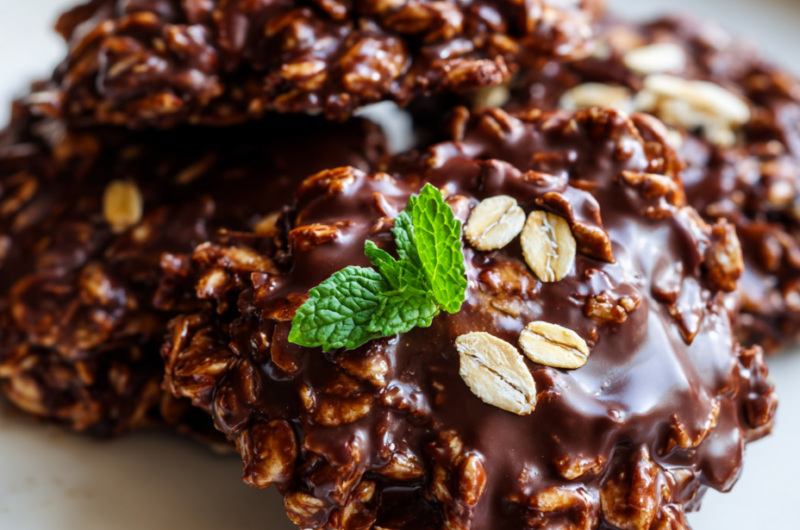
No-Bake Chocolate Oat Cookies
Ingredients
Equipment
Method
- Place your medium saucepan on the stove over medium heat and add the butter and sugar. Stir constantly as they melt together, creating a fragrant, bubbling mixture that turns shiny and smooth within 2-3 minutes.
- Sift the cocoa powder directly into the saucepan and stir vigorously until fully incorporated, resulting in a glossy, dark mixture that smells rich and chocolatey.
- Pour in the milk and bring the mixture to a gentle boil, stirring constantly to prevent sticking. Let it bubble for about 1 minute until it thickens slightly and has a smooth, shiny appearance.
- Remove the saucepan from the heat and stir in the vanilla extract, mixing until fragrant. Then add the rolled oats, folding them in thoroughly until they are evenly coated and the mixture is thick and sticky.
- Using a spoon, drop spoonfuls of the mixture onto a parchment-lined baking sheet. Gently flatten each cookie with the back of the spoon to shape them and encourage even setting.
- Let the cookies rest at room temperature for about 30 minutes, or until they firm up and develop a chewy, fudgy texture. For quicker setting, refrigerate them for 15-20 minutes.
- Once set, peel the cookies away from the parchment paper and enjoy their rich, chocolatey flavor with a chewy, glossy finish. Store any leftovers in an airtight container at room temperature for up to 3 days.
Pro tips for perfect cookies
- Bolded mini-head: Use low heat → Gentle simmer prevents scorching while melting ingredients smoothly.
- Bolded mini-head: Stir constantly → Keeps the mixture uniform and prevents sticking or burning on the bottom.
- Bolded mini-head: Check aroma → A rich chocolate scent signals the mixture is ready for the next step.
- Bolded mini-head: Drop with a spoon → Keeps cookies uniform; slightly flatten for even setting.
- Bolded mini-head: Rest at room temp → Ensures proper firmness; avoid refrigerating immediately to prevent cracking.
- Bolded mini-head: Watch for gloss → Mixture should be shiny and smooth before spooning onto parchment.
- Bolded mini-head: Chill for firmness → Refrigerate for 15-20 mins if you prefer a firmer, chewier cookie texture.
Common mistakes and how to fix them
- FORGOT to remove from heat → The mixture may scorch; immediately remove from heat and stir vigorously.
- DUMPED too much sugar → Use the recommended amount; excess sugar causes overly sticky or hard cookies.
- OVER-TORCHED the mixture → Lower heat and stir constantly to prevent burning and bitterness.
- SKIPPED the resting step → Rest the cookies at room temperature for proper setting and texture development.
Quick fixes and pantry swaps
- If mixture is too thick → Splash in a tiny bit more milk and stir until smooth.
- When cookies crack while cooling → Patch with a dab of melted chocolate or nut butter.
- Splash hot mixture on your hand → Shield with a spoon to test temperature before spooning.
- Dumped in too much sugar → Use a damp cloth to slightly soften the mixture for easier scooping.
- When mixture shimmers but isn’t firm → Chill for 5 minutes to set the perfect texture.
Prep, store, and reheat tips
- You can prepare the cookie mixture a day ahead; keep it covered in the fridge to prevent a skin from forming. The flavors meld overnight, making the cookies even more chocolatey.
- Store the finished cookies in an airtight container at room temperature for up to 3 days. They develop a slightly chewier texture over time, with the cocoa aroma intensifying slightly.
- For longer storage, keep cookies in the fridge for up to a week. The coolness firms them up and keeps the chocolate flavor vibrant, but they might lose a touch of softness.
- Reheat cookies briefly in the microwave—about 10 seconds—until just slightly warm and fragrant. They’re best when the chocolate smell is fresh and the texture is still chewy. Avoid overheating to prevent melting or oil separation.
Top questions about no bake cookies
1. Can I use quick oats instead of rolled oats?
Use quick oats if you want a softer, more uniform cookie; they blend in easier and create a smoother texture.
2. Can I substitute the sugar with honey or syrup?
Yes, you can swap brown sugar for honey or maple syrup, but reduce the liquid slightly to keep the mixture firm.
3. How do I make the cookies more chewy or soft?
Refrigerate the cookies for 15-20 minutes to make them firmer and chewier, or leave at room temp for softer cookies.
4. My mixture is grainy or not sticking together, what do I do?
If the mixture looks grainy or isn’t coming together, warm it slightly over low heat and stir well to smooth it out.
5. Can I add other flavorings or toppings?
Add a pinch of salt or vanilla to enhance the chocolate flavor and balance sweetness.
6. What can I add for more texture or flavor?
Yes, stir in chopped nuts, coconut flakes, or dried fruit at the end for extra texture and flavor.
7. How long do these cookies stay fresh?
Store the cookies in an airtight container at room temperature for up to 3 days or in the fridge for a week.
8. How do I reheat the cookies?
Reheat briefly in the microwave for about 10 seconds until fragrant and just soft enough to bite into.
9. My mixture is too thick, what should I do?
If mixture is too thick, add a splash of milk and stir until smooth before spooning onto parchment.
10. My cookies are cracking after setting, how can I fix it?
When cookies crack while cooling, gently patch with a small dab of melted chocolate or nut butter.
These cookies are a little like a secret weapon for busy days, quick to whip up and satisfying in every bite. There’s something honest about how they come together—just pantry staples and a bit of patience as they set in the fridge.
In the end, it’s the simple pleasures that stick with us, especially when they’re as easy and comforting as these no-bake chocolate oat cookies. They remind me that sometimes, the best treats are right in your pantry, waiting for a moment to be enjoyed.

Hi, I’m Grace Morgan, and welcome to my kitchen. This is a space shaped by family meals, curious hands reaching for snacks, paws under the table, and recipes that come together in the middle of real life. I’m a food blogger, a mother, and a passionate pet keeper. Most days, I’m cooking with one eye on the stove and the other on someone who needs me, whether that’s a child asking for a taste or a dog hoping something might fall.


