In a world where time is often short and patience even shorter, I turn to no-bake cookies. There’s something deeply satisfying about mixing peanut butter, sugar, and oats without the fuss of stovetop boiling or oven heat. It’s a recipe that feels like a secret shared between busy hands and craving mouths, quick enough to make on a whim and comforting enough to keep coming back to.
This recipe has been my go-to during hectic mornings, lazy afternoons, and whenever the sweet tooth strikes without warning. The smell of melting peanut butter mingling with vanilla is enough to make anyone pause, even if just for a moment. It’s imperfect, quick, and honest—just like a good moment in the kitchen should be.
The best part? It’s a little messy, a little chaotic, but always honest. No fancy ingredients, no baking drama—just simple, homemade cookies that come together in minutes and disappear just as fast.
This recipe is a perfect example of how simplicity and nostalgia can come together in a busy kitchen, offering a quick, satisfying treat without turning on the stove. It’s about the little victories—finding joy in imperfect, homemade cookies that come together in just minutes, especially when you’re craving something sweet but short on time.
The Unexpected Joy of No-Bake Cookies
- Making these cookies always reminds me of lazy Sunday afternoons, when the kitchen smells like peanut butter and vanilla, and time slows down just enough to enjoy the moment.
- I love how these cookies turn out a little rustic—each one a tiny, imperfect piece of comfort that somehow feels more honest than store-bought treats.
- There’s a rush of pride when I see the shiny, slightly oily surface of the cookies, knowing I whipped them up in minutes without turning on the oven.
- Sometimes, I get a little nostalgic thinking about childhood summers, when my grandma’s kitchen was filled with the smell of these easy, no-bake bites.
- The chaos of mixing everything in one bowl, then watching the cookies set in the fridge, makes me appreciate simple, honest cooking that doesn’t demand perfection.
The story behind this recipe
- Making these cookies is a bit of an act of rebellion for me—no oven, no fuss, just pure, honest ingredients coming together quickly. I remember the first time I stumbled on this method when I was crunched for time but desperately craving something sweet and peanutty. It’s become my go-to whenever I want a treat that’s simple enough to whip up without a second thought, yet satisfying enough to keep me coming back.
- There’s a certain freedom in not fussing over perfect shapes or baking times. The messy spoonfuls, the slightly uneven edges—these cookies remind me that sometimes, the best sweets are the imperfect ones made with love, speed, and a little bit of chaos.
- heading: ‘The joy in quick, honest baking’
History and trivia of no-bake cookies
- These cookies likely originated during the Great Depression, when resourcefulness meant making do with simple, affordable ingredients.
- No-bake recipes like this became popular in the 20th century as a quick way to satisfy sweet cravings without heating up the kitchen.
- The combination of peanut butter and oats was a clever way to add protein and fiber, making these cookies a modestly nutritious treat.
- In some regions, similar recipes are called ‘lazy cookies,’ because they skip traditional baking steps, emphasizing convenience.
- During wartime rationing, recipes like these helped families stretch ingredients while still enjoying homemade sweets.
Key ingredients and tips
- Creamy peanut butter: I love how it melts smoothly, giving the cookies that rich, nutty flavor. For a lighter twist, try almond butter—just be aware it’s a bit thinner and less sweet.
- Granulated sugar: It’s the sweet backbone, but if you want a softer cookie, swap half for coconut sugar—adds a hint of caramel and a little chew.
- Oats: Old-fashioned rolled oats give the best texture—chewy and substantial. Instant oats make for a softer, less chewy result, so stick with the old-school kind if you can.
- Vanilla extract: A splash brightens everything up—smells divine as it mixes. Or add a dash of cinnamon for a cozy, warm note.
- Milk: Just enough to help everything come together. If you’re dairy-free, almond or oat milk works fine, but it might make the mixture a tad thinner—watch the consistency.
- Chocolate chips (optional): I toss these in at the end for melty pockets of sweetness. Dark chocolate keeps it sophisticated, but semi-sweet or even white chocolate can be fun swaps.
- Salt: Just a pinch enhances all the flavors. If you’re using salted peanut butter, cut back a bit on the added salt to avoid overpowering.
Spotlight on key ingredients
Peanut Butter:
- Creamy peanut butter: I love how it melts smoothly, giving the cookies that rich, nutty flavor. For a lighter twist, try almond butter—just be aware it’s a bit thinner and less sweet.
- Granulated sugar: It’s the sweet backbone, but if you want a softer cookie, swap half for coconut sugar—adds a hint of caramel and a little chew.
- Oats: Old-fashioned rolled oats give the best texture—chewy and substantial. Instant oats make for a softer, less chewy result, so stick with the old-school kind if you can.
Oats & Vanilla:
- Old-fashioned oats: These give a hearty chew and hold the cookie shape well. Quick oats can make the texture softer and less chewy—choose based on your texture preference.
- Vanilla extract: Adds a warm, aromatic note that brightens the whole cookie. A splash of vanilla is a simple way to elevate the flavor without extra fuss.
Notes for ingredient swaps
- Dairy-Free: Swap regular butter for coconut oil or vegan margarine. Keep in mind, it might slightly alter the richness and texture.
- Sweetener: Use honey or maple syrup instead of sugar for a more natural sweetness. Expect a slight change in firmness and flavor complexity.
- Oats: Replace old-fashioned oats with quick oats if you’re in a pinch, but the texture will be a bit softer and less chewy.
- Peanut Butter: Crunchy peanut butter adds texture, while almond or cashew butter offers a different nutty flavor—less oily but still tasty.
- Milk: Coconut milk or oat milk can replace cow’s milk. They might make the mixture slightly thinner or give a different flavor note.
- Chocolate: Swap chocolate chips with chopped nuts or shredded coconut for a different burst of flavor and texture.
- Flavor Boost: Add a pinch of cinnamon or sea salt to enhance the richness, or skip for a purer peanut flavor.
Equipment & Tools
- Medium mixing bowl: Combine and mix ingredients thoroughly.
- Spatula: Mix ingredients and flatten cookies.
- Baking sheet: Hold cookies as they set in fridge.
- Parchment paper: Prevent sticking and make cleanup easier.
- Spoon or hands: Portion and shape cookies.
Quick Guide to No-Bake Cookies
- Gather your equipment: a medium mixing bowl, a spatula, a baking sheet, and parchment paper. The sheet will hold your cookies as they set, and parchment keeps them from sticking.
- In the bowl, combine 1 cup of creamy peanut butter and 1 cup of granulated sugar. Mix well until smooth and slightly fluffy, about 2 minutes.
- Add 1 teaspoon of vanilla extract and 1/2 cup of milk. Stir until the mixture is smooth, shiny, and starts to hold together—about 1-2 minutes. If it’s too stiff, add a tiny splash more milk; if too runny, sprinkle in a bit more oats.
- Stir in 1 1/2 cups of old-fashioned oats. Fold until evenly coated and the mixture is thick but scoopable. It should hold its shape when you form a cookie.
- Using a spoon or your hands, scoop out about 1-tablespoon-sized portions and roll into balls. Place them on the prepared baking sheet, then gently flatten each with the back of a fork or your palm to about 1/2 inch thick.
- Place the tray in the fridge for at least 30 minutes. This helps the cookies firm up and prevents spreading when you handle them later.
- Once chilled and firm, remove from fridge. If you’re adding chocolate chips, press a few into the tops of each cookie now. The cold will help them stick without melting.
- Let the cookies rest at room temperature for 10 minutes before serving. If you want them extra firm, leave them in the fridge for another 10-15 minutes before eating.
- Store in an airtight container in the fridge for up to a week. For longer storage, freeze the cookies for up to 3 months. Thaw at room temperature for 10 minutes before enjoying.
- Enjoy the chewy, nutty richness of these no-bake treats, perfect when you need a quick sweet fix without turning on the oven.
Refrigerate the cookies for at least 30 minutes until firm. Serve directly from fridge or room temp. For best texture, allow to sit at room temperature for 10 minutes before eating.
How to Know It’s Done
- Cookies hold their shape when pressed; avoid overly runny mixture.
- The mixture is shiny and slightly firm, not sticky or too dry.
- Cookies set and firm up after refrigeration, with a slight sheen and chewy texture.
No-Bake Peanut Butter Cookies
Ingredients
Equipment
Method
- In a medium mixing bowl, combine the peanut butter and sugar. Use a spatula to stir until the mixture is smooth, creamy, and slightly fluffy, about 2 minutes. You’ll notice the aroma of peanut and vanilla starting to fill the air.
- Add the milk and vanilla extract to the bowl. Stir everything together until the mixture is shiny and starts to hold together, about 1-2 minutes. If it feels too stiff, add a tiny splash more milk to loosen it up.
- Fold in the oats, stirring gently until they’re evenly coated and the mixture is thick but scoopable. It should be slightly sticky but hold its shape when pressed.
- Using a spoon or your hands, scoop out about a tablespoon of the mixture. Roll it into a ball, then gently flatten it into a disc about half an inch thick on a parchment-lined baking sheet. Repeat with the remaining mixture, leaving space between each cookie.
- Press a few chocolate chips into the tops of each cookie if desired. Place the tray in the fridge and chill for at least 30 minutes, allowing the cookies to set and firm up. The aroma of peanut and vanilla will intensify as they chill.
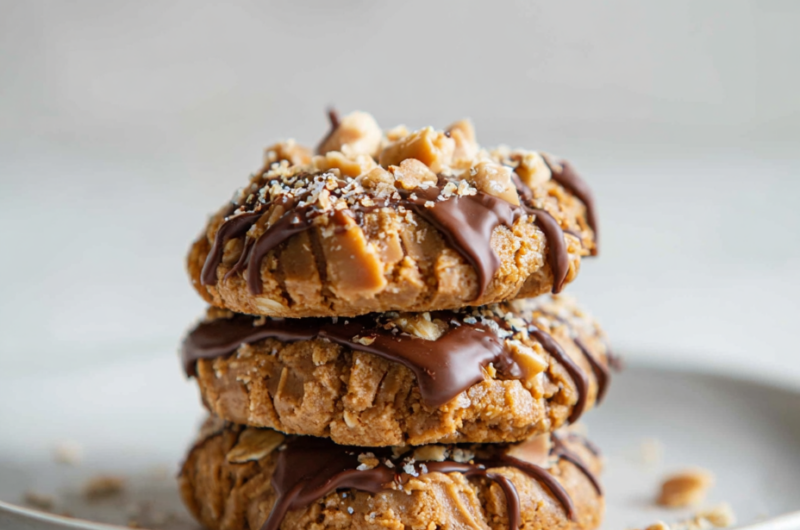
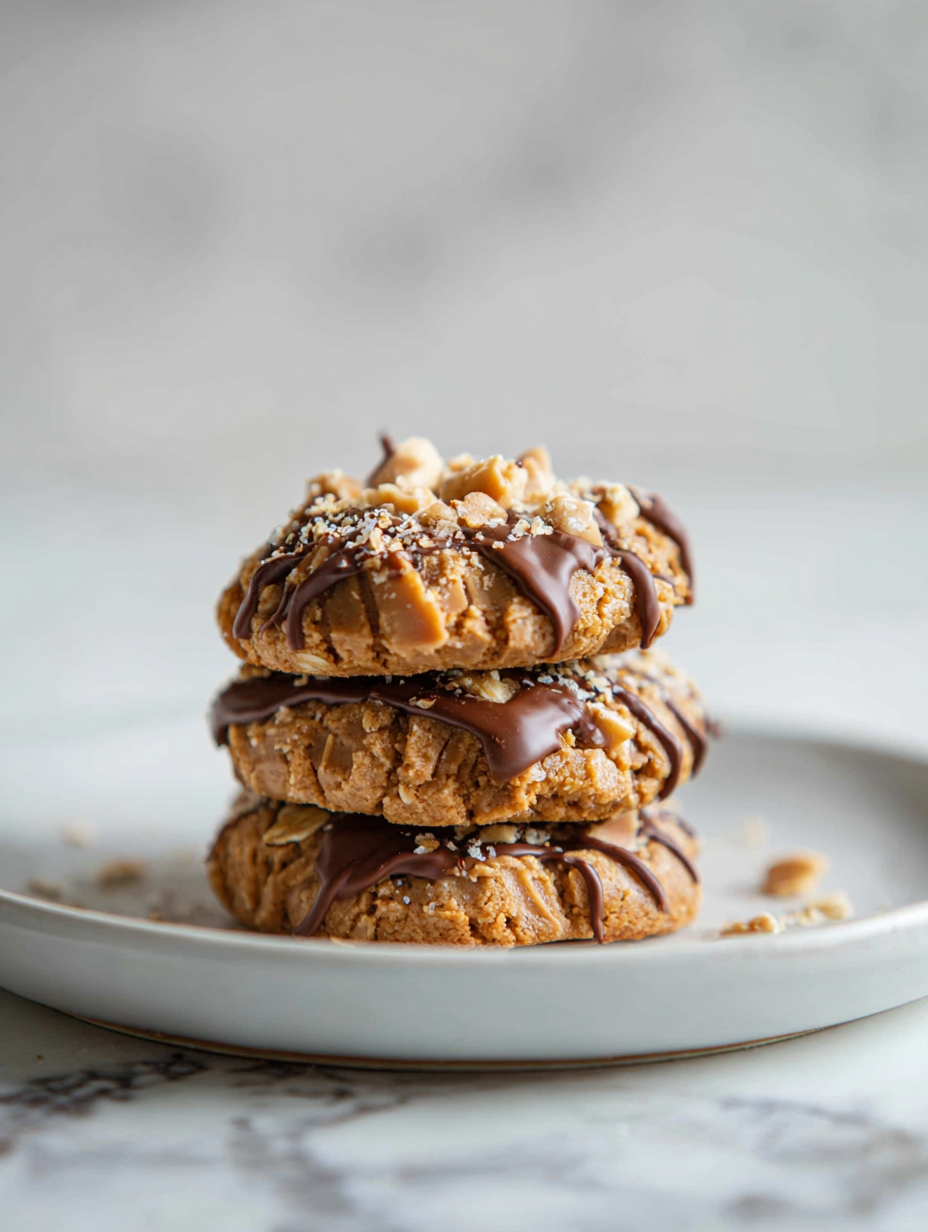
- Once firm, remove the cookies from the fridge. They should be chewy, with a shiny surface and a rustic, slightly oily appearance from the peanut butter. Serve directly or store in an airtight container in the fridge for up to a week.
Notes
Tips for Perfect No-Bake Cookies
- Use room temperature peanut butter for smoother mixing and a creamier texture.
- For even spreading, slightly warm the peanut butter before mixing—just a few seconds in the microwave.
- Chill the mixture for at least 15 minutes if it feels too sticky to scoop easily.
- Flatten cookies with the back of a fork while still slightly pliable for a classic look and even thickness.
- If your mixture is too dry, add a splash more milk; if too sticky, fold in a few extra oats.
- To prevent sticking, use a lightly oiled or dampened spoon when scooping out portions.
- For extra flavor, press a few chocolate chips into the tops before chilling—smells incredible as they set.
Common mistakes and how to fix them
- FORGOT to measure ingredients precisely? Use a scale for accuracy, especially with nuts and oats.
- DUMPED too much sugar? Reduce the sugar by a quarter for a less sweet, more balanced cookie.
- OVER-TORCHED the mixture? Lower the heat and stir constantly to prevent burning and sticking.
- MISSED the fridge time? Chill for at least 30 minutes; warm cookies won’t set properly.
Quick fixes and pantry swaps
- When mixture is too sticky, splash a little more milk and stir gently.
- If cookies crack while flattening, chill the mixture for 10 minutes first.
- Splash hot water on your spatula for easier cookie shaping when mixture is firm.
- Patch a runny batch with extra oats—stir well and refrigerate briefly.
- Shield cookies from humidity by storing in an airtight container, preventing them from softening.
Prep, store, and reheat tips
- You can prepare the cookie mixture ahead of time; keep it in an airtight container in the fridge for up to 24 hours. The flavors meld and the mixture becomes easier to scoop.
- Cookies can be stored in an airtight container at room temperature for up to 5 days, maintaining their chewy texture. Keep them away from direct sunlight to prevent melting or spoilage.
- For longer storage, freeze the cookies in a single layer on a baking sheet, then transfer to a zip-top bag. They’ll stay fresh for up to 3 months. Thaw at room temperature for about 10 minutes for best texture.
- Refrigerated or frozen cookies will firm up more. To reheat, microwave for 10-15 seconds until slightly soft and warm, or enjoy chilled for a dense, chewy bite. The smell of peanut butter and vanilla will be most vivid when just warmed.
Top questions about no bake peanut butter cookies
1. What do no bake peanut butter cookies taste like?
They taste rich, chewy, with a peanutty burst and a hint of vanilla aroma. The texture is dense but tender, with a slightly oily surface from the peanut butter.
2. Can I use different nut butters?
Yes, you can swap almond or cashew butter for peanut butter, but expect a different flavor and slightly different melting texture.
3. Are quick oats okay to use?
Using quick oats will make them softer and less chewy compared to old-fashioned oats, which give more texture and structure.
4. How do I know when they’re set?
Refrigerate the cookies for at least 30 minutes until firm; they should hold shape and have a shiny, chewy appearance.
5. What if the mixture is too sticky or dry?
If mixture is too sticky, add a bit more oats or chill it for 15 minutes. Too dry? Mix in a splash more milk.
6. How long do these cookies last?
Store cookies in an airtight container in the fridge for up to a week, or freeze for 3 months for best freshness.
7. Can I add chocolate chips?
Adding chocolate chips before chilling creates melty pockets of sweetness. Press them in gently to stick while cold.
8. What tools do I need for shaping?
Use parchment paper on your baking sheet to prevent sticking. For shaping, a lightly oiled spoon or your hands work best.
9. How do I fix runny or thick mixture?
If the mixture is too runny, fold in extra oats or refrigerate briefly. Too thick? A splash of milk helps loosen it.
10. Can I make these in advance?
These cookies are great for quick cravings. Make the mixture ahead, keep refrigerated, and shape when ready to chill.
These cookies aren’t just a quick fix—they’re a reminder that some of the best treats come together with minimal fuss and maximum flavor. The smell of peanut butter melting and oats crisping up is pure comfort, especially when you’re short on time but still crave something homemade.
Sharing these in moments of chaos or calm makes me realize that simplicity often carries the most honest satisfaction. No matter how many I make, they somehow disappear faster than I expect, leaving behind a warm, nutty memory and a quiet sense of accomplishment.

Hi, I’m Grace Morgan, and welcome to my kitchen. This is a space shaped by family meals, curious hands reaching for snacks, paws under the table, and recipes that come together in the middle of real life. I’m a food blogger, a mother, and a passionate pet keeper. Most days, I’m cooking with one eye on the stove and the other on someone who needs me, whether that’s a child asking for a taste or a dog hoping something might fall.


