Sometimes, the best desserts are the simplest ones—no fuss, no oven, just quick ingredients coming together for a sweet moment. These no bake chocolate coconut cookies are exactly that kind of treat, perfect for when time is tight but you still crave something rich and satisfying.
I first discovered this recipe during a chaotic weekend when I needed a quick fix that wouldn’t require turning on the oven or hunting down fancy ingredients. The smell of melting chocolate mingling with toasted coconut is pure comfort, and the texture—crisp edges with gooey centers—keeps me coming back.
What I love most is that it’s a no-mess, no-fuss kind of dessert. You can whip these up in minutes, and they store well in the fridge for a few days. It’s a little bit of nostalgia, a touch of indulgence, and a reminder that sometimes, less really is more.
Focusing on how this simple, no-bake recipe can serve as a comforting, nostalgic treat that requires minimal effort, making it perfect for busy days or when you need a quick sweet fix without turning on the oven.
The unexpected joy of simplicity
- I remember sneaking bites of these as a kid, the smell of chocolate and coconut bringing instant comfort.
- Baking isn’t always my thing, but these no-bake cookies remind me that simple can be delicious and satisfying.
- There’s a quiet pride in whipping up something so quick that turns out perfectly every time.
- Sometimes, I make these when I need a small, sweet escape—no oven, no fuss, just pure chocolatey bliss.
The story behind this recipe
- This recipe came from a lazy afternoon spent rummaging through my pantry, hunting for something sweet and quick. I realized that I’d never really appreciated how versatile simple ingredients like shredded coconut and chocolate can be, without any baking involved. It’s funny how a bit of impulsive mixing can turn into a favorite treat, right when you need it most.
- I remember making these during a hectic week when I was overwhelmed with too many things to do. The smell of melting chocolate and toasted coconut filled the kitchen, instantly calming my nerves. That moment of simple joy—no oven, no fuss—made me appreciate how little it takes to make something memorable.
- heading: The story behind this recipe
Trivia and Historical Tidbits
- These cookies likely originated in the mid-20th century as a quick, no-bake treat for busy households.
- During wartime shortages, similar recipes emerged because they required minimal ingredients and no oven.
- The combination of chocolate and coconut became popular in tropical regions, influencing recipes like this one.
- Many families have their own versions, often passed down as nostalgic, comfort-food treats during holidays or gatherings.
Ingredient breakdown
- Coconut flakes: I love the chewy texture and smoky aroma, but if you want more crispness, try toasted coconut. Skip if you’re allergic or prefer a milder flavor.
- Dark chocolate: Rich and bittersweet, it melts smoothly and sets with a glossy finish. For a sweeter taste, swap with semi-sweet or milk chocolate, but watch the melting point.
- Sweetened condensed milk: It binds everything together with a creamy sweetness. You can try coconut cream for a dairy-free version, but it may be less sticky.
- Butter: Adds richness and helps the mixture come together. Use vegan butter or coconut oil if you want a dairy-free option, but expect a slightly different mouthfeel.
- Vanilla extract: A splash enhances the chocolate and coconut, making the flavors pop. Skip if you want a more subdued, straightforward coconut-chocolate flavor.
- Optional add-ins: Think chopped nuts or dried fruit for texture and surprise bites. Be careful not to overload, or the cookies won’t hold together well.
- Pinch of salt: Just a tiny bit heightens the chocolate and coconut sweetness. Don’t skip or the flavors might fall flat or seem dull.
Spotlight on Key Ingredients
Coconut flakes:
- I love their chewy texture and smoky aroma, but try toasted coconut for extra crunch or skip if allergic.
- Dark chocolate: Rich and bittersweet, it melts smoothly and sets with a glossy finish. Swap with semi-sweet or milk chocolate for a sweeter, softer result.
Dark chocolate:
- Melts into a silky, shiny coating that firms up beautifully in the fridge, giving that satisfying snap.
- Sweetened condensed milk: It’s the glue that keeps everything together, with a sticky, sweet richness that’s hard to beat.
Notes for ingredient swaps
- Coconut Flakes: I prefer toasted for extra smoky aroma, but raw flakes keep it light and chewy. Skip if allergic or prefer milder flavor.
- Dark Chocolate: Rich and intense, but semi-sweet or milk chocolate can soften the bitterness. For dairy-free, try carob chips, but expect a different sweetness.
- Sweetened Condensed Milk: I use the classic sweet version, but coconut cream adds a dairy-free, slightly less sticky alternative. It changes the texture a bit.
- Butter: Adds richness, but coconut oil or vegan butter works well if you want dairy-free. Expect a slightly different melt and mouthfeel.
- Vanilla Extract: A splash brightens the chocolate and coconut, but you can omit for a more straightforward, less nuanced flavor.
- Add-ins: Nuts or dried fruit are optional. Chopped almonds add crunch, dried cherries give tart bursts—use what you love.
- Salt: Just a pinch enhances the chocolate and coconut. Skipping it can make the flavor less rounded, but too much can overpower.
Equipment & Tools
- Medium mixing bowl: For combining coconut, condensed milk, butter, and vanilla.
- Saucepan: To melt the chocolate gently over low heat.
- Spoon or spatula: For stirring and mixing ingredients smoothly.
- Parchment paper: To prevent cookies from sticking and for easy cleanup.
- Ice cream scoop or tablespoon: To portion out uniform cookies.
Step-by-step guide to no bake cookies
- Gather your equipment: a medium mixing bowl, a saucepan, a spoon, and parchment paper. The bowl is for mixing, saucepan for melting chocolate, and parchment for cookie setting.
- Chop 1 cup of dark chocolate into small pieces. Place in saucepan over low heat (about 45°C/113°F). Stir constantly until melted and smooth, about 3-4 minutes. If chocolate seizes, add a tiny splash of warm milk and stir until smooth.
- In the mixing bowl, combine 1 1/2 cups shredded coconut, 1/2 cup sweetened condensed milk, 2 tbsp butter, and 1 tsp vanilla. Mix until well combined. The mixture should be sticky but manageable; if too dry, add a drizzle more condensed milk.
- Pour the melted chocolate into the coconut mixture. Stir thoroughly until every bit is coated and glossy. The mixture should hold together when pressed. If it’s too crumbly, add a small spoon of condensed milk.
- Line a baking sheet with parchment paper. Using a spoon or small ice cream scoop, portion out tablespoons of the mixture. Form into compact mounds and place on the sheet, leaving space between each cookie.
- Press gently on each cookie to flatten slightly if desired. Chill in the fridge for at least 30 minutes. During this time, the cookies will firm up and set, developing a shiny, crackled surface.
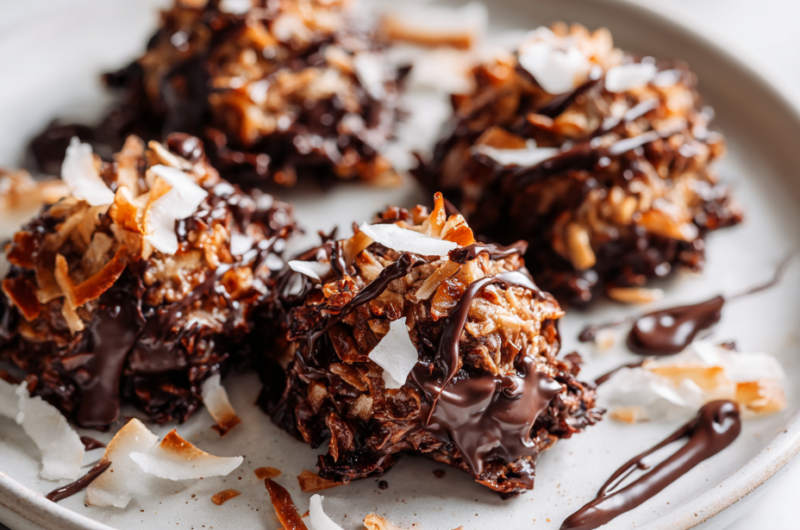
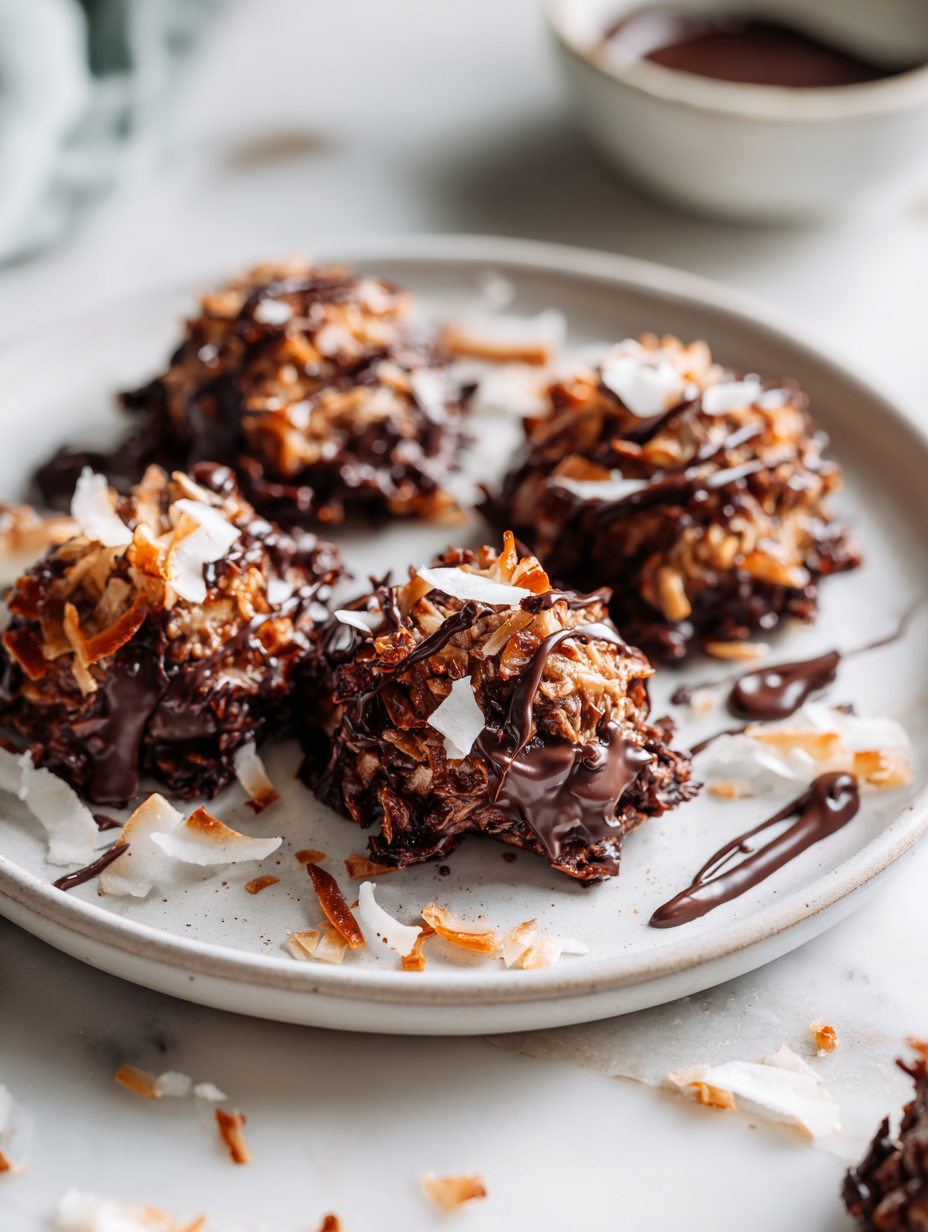
- Check for doneness: the cookies should be firm to the touch, with a glossy, crackled top. The edges may be slightly darker from the chocolate, and they should hold their shape when lifted.
- Remove from fridge. Let sit at room temperature for a few minutes before serving to prevent cracking. For best flavor, enjoy within 3-4 days, stored in an airtight container in the fridge.
Chill the cookies in the fridge for at least 30 minutes until firm. Serve directly from the fridge or at room temperature for softer texture. Arrange on a plate, and enjoy the chewy, chocolatey coconut bites.
How to Know It’s Done
- Chocolate is fully melted and smooth without lumps.
- Cookie mixture is sticky and holds shape when pressed.
- Cookies are firm and crackled after chilling, with a glossy surface.
No Bake Chocolate Coconut Cookies
Ingredients
Equipment
Method
- Chop the dark chocolate into small pieces and place it in a saucepan. Melt over low heat, stirring constantly until smooth and glossy, about 3-4 minutes. The chocolate should be silky and fragrant.
- In a mixing bowl, combine the shredded coconut, sweetened condensed milk, butter, and vanilla extract. Stir until the mixture is evenly combined and sticky, with a slightly shiny appearance.
- Pour the melted chocolate into the coconut mixture. Fold everything together thoroughly until the coconut is evenly coated with the glossy chocolate and the mixture feels sticky and cohesive.
- Line a baking sheet with parchment paper. Using a spoon or ice cream scoop, portion out heaping tablespoons of the mixture and drop them onto the prepared sheet. Gently press each mound to flatten slightly if desired.
- Place the baking sheet in the refrigerator and chill for at least 30 minutes, allowing the cookies to firm up and develop a shiny, crackled surface.
- Once set, remove the cookies from the fridge. They should be firm to the touch with a glossy top and slightly crisp edges, with a chewy interior. Serve immediately or store in an airtight container in the fridge for up to 4 days.
Pro tips for perfect cookies
- Bolded mini-head: Use residual heat → Melt chocolate gently over low heat to avoid seizing or burning.
- Bolded mini-head: Chill for texture → Refrigerate cookies for at least 30 minutes to set perfectly without cracking.
- Bolded mini-head: Mix carefully → Fold ingredients gently to keep cookies chewy and avoid dense texture.
- Bolded mini-head: Toast coconut first → Light toasting enhances aroma and adds crunch, but watch closely to prevent burning.
- Bolded mini-head: Adjust sweetness → Swap dark chocolate with semi-sweet for a milder flavor or milk chocolate for extra sweetness.
- Bolded mini-head: Use parchment paper → Prevent sticking and make cleanup easier by lining your baking sheet.
- Bolded mini-head: Portion evenly → Use an ice cream scoop for uniform cookies and consistent texture.
Common mistakes and how to fix them
- FORGOT to fold ingredients gently → over-mixing can make cookies dense and tough.
- DUMPED hot chocolate directly into mixture → let melted chocolate cool slightly before mixing.
- OVER-TORCHED chocolate → melt over low heat, stir constantly, avoid high temperatures.
- FAILED to chill cookies sufficiently → refrigerate at least 30 minutes for proper setting.
Quick fixes and pantry swaps
- When mixture is too crumbly, splash in a tiny bit more condensed milk to bind.
- If cookies crack when pressing, chill the mixture briefly to firm up before shaping.
- Splash melted chocolate with a pinch of oil if it seizes during melting process.
- Patch soft cookies by refrigerating an extra 15 minutes for firmness.
- Shield delicate cookies from moisture by storing in an airtight container in a cool place.
Prep, store, and reheat tips
- You can prepare the cookie mixture a day in advance; keep it refrigerated in an airtight container to prevent it from drying out.
- Store the finished cookies in an airtight container in the fridge for up to 4 days, where they stay chewy and chocolatey, but their coconut aroma intensifies over time.
- For longer storage, freeze the cookies in a single layer on a baking sheet, then transfer to a freezer bag; they’ll keep for up to a month but may lose some chewiness.
- Reheat chilled or frozen cookies briefly at room temperature or in a low oven (around 150°C/300°F) for a few minutes; they should shimmer slightly and regain their soft, gooey center.
Top questions about no bake cookies
1. Can I make these cookies vegan?
Yes, using dairy-free chocolate and coconut milk makes these cookies completely vegan without sacrificing flavor or texture.
2. Are there dairy-free options?
Absolutely, you can substitute coconut oil for butter and coconut cream for condensed milk for a dairy-free version.
3. My mixture is too sticky or crumbly, what now?
If your mixture feels too sticky, add a bit more shredded coconut; if it’s too crumbly, a splash of condensed milk helps.
4. Why are my cookies too soft or falling apart?
Chill the mixture for about 30 minutes if it’s too soft to handle. Use a spoon or scoop for better shaping.
5. How should I store these cookies?
Store these cookies in an airtight container in the fridge for up to 4 days. For longer, freeze them for up to a month.
6. Can I reheat these cookies?
Refrigerate or freeze the cookies. To reheat, let them sit at room temperature or briefly warm in the oven until they shimmer slightly.
7. What kind of chocolate should I use?
Use high-quality dark chocolate for best melting and glossy set. Mint or orange-flavored chocolates add fun twists.
8. Should I toast the coconut?
Toast the coconut lightly before mixing to boost aroma and crunch. Watch closely to prevent burning.
9. How do I avoid dense cookies?
Over-mixing can make cookies dense, so fold ingredients gently. Also, don’t skip chilling for perfect texture.
10. Can I add other ingredients?
Yes, adding chopped nuts or dried fruit can add texture and flavor, but don’t overload or cookies might not hold together.
These no bake chocolate coconut cookies are more than just a quick treat; they’re a reminder that simplicity can bring real comfort, especially when you don’t want to fuss with an oven. The rich chocolate and toasted coconut aroma fills the kitchen, making every bite feel like a small celebration.
Whenever I need a little pick-me-up, I reach for these. They store well in the fridge and are perfect for spontaneous cravings or sharing with friends. Sometimes, the best desserts are the ones that come together effortlessly—this recipe is proof of that.

Hi, I’m Grace Morgan, and welcome to my kitchen. This is a space shaped by family meals, curious hands reaching for snacks, paws under the table, and recipes that come together in the middle of real life. I’m a food blogger, a mother, and a passionate pet keeper. Most days, I’m cooking with one eye on the stove and the other on someone who needs me, whether that’s a child asking for a taste or a dog hoping something might fall.


