These no bake chocolate chewies are like a secret handshake from childhood, but with a grown-up twist. I remember sneaking bites of my mom’s fudge when I was supposed to be doing homework, the way the chocolate would melt and stick to my fingers. Now I make these when I need a quick hit of nostalgia that doesn’t require turning on the oven or waiting around.
The best part? They come together fast, with ingredients I usually keep around—cocoa, oats, a bit of butter—and a method that’s almost meditative. They’re perfect for when you want something rich and chewy, but don’t want to fuss with complicated recipes or dirty dishes. Just a bowl, a spoon, and a few minutes to craft something that feels like a cozy secret.
This recipe is a nostalgic nod to childhood afternoons, but with a twist—it’s all about the tactile joy of biting into a chewy, fudgy treat that’s surprisingly sophisticated. No bake, no fuss, just pure, unpretentious comfort that feels like a secret shared between friends.
Tactile Joy of Chewy Chocolates
- I love how these bite-sized treats bring back lazy Sunday afternoons, the smell of cocoa filling the room.
- There’s a strange pride in whipping these up in minutes when friends drop by unannounced.
- The first bite always surprises me—chewy, fudgy, and just the right amount of sweet.
- Making these has become my little ritual when I need a quick sugar hit without the clean-up fuss.
- Honestly, sharing these with family feels like passing down a secret recipe of comfort.
The story behind this recipe
- This recipe is a childhood memory wrapped in chocolatey goodness, but I tweak it to be more accessible and a little more indulgent. I remember the rush of sneaking a bite before dessert, feeling the sticky, fudgy texture melt on my tongue. Making these now is like reliving those secret, sweet moments but with a grown-up touch—less guilt, more flavor.
- One day, I was rummaging through my pantry looking for something quick and satisfying. The idea hit me—why not turn those classic ingredients into something no-bake, chewy, and deeply chocolate? The process is simple, but the result feels like a tiny rebellion against the fuss of fancy desserts. It’s just pure, honest comfort, ready in minutes.
- heading
- story_type
Historical & Fun Facts
- These chewy chocolate treats have roots in mid-20th-century no-bake recipes, a clever way to enjoy sweets without ovens during wartime shortages.
- Some say that early versions of no-bake chocolate chews were popular among campers and soldiers, valuing portability and quick prep over elaborate baking.
- The combination of oats and chocolate in this recipe echoes traditional rustic desserts, making it feel both nostalgic and unexpectedly sophisticated.
- A few vintage cookbooks from the 1950s feature similar no-bake fudge-like confections, hinting at their long-standing appeal across generations.
Key Ingredients Breakdown
- Unsweetened cocoa powder: I love the deep, smoky flavor it adds; make sure to sift it to avoid lumps, or your mixture gets gritty.
- Rolled oats: They give the chewiness I crave—use quick oats if you’re in a rush, but the old-fashioned ones hold up better texture-wise.
- Butter: I prefer unsalted, but salted works fine—just watch out for salt content if you’re sensitive or watching sodium.
- Honey or corn syrup: They help everything stick together and add a glossy sheen—skip if you want a less sticky bite, but it won’t be quite as fudgy.
- Vanilla extract: A splash of vanilla brightens the chocolate flavor—don’t skip, or it might taste a bit flat.
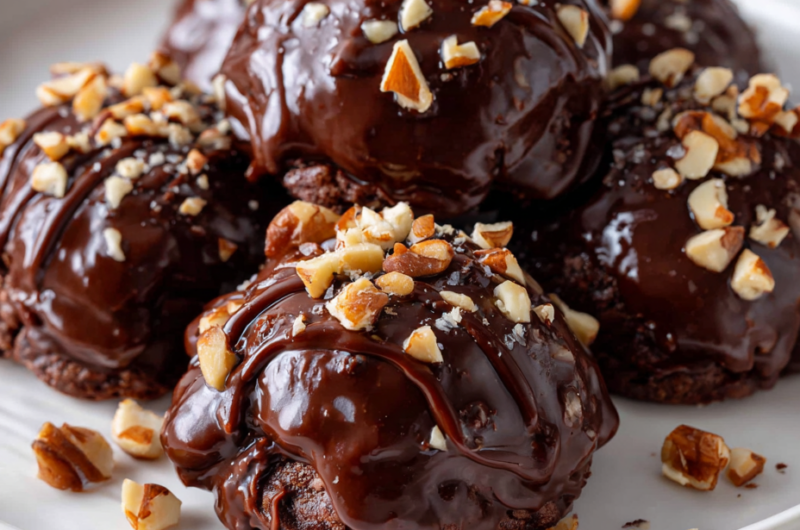
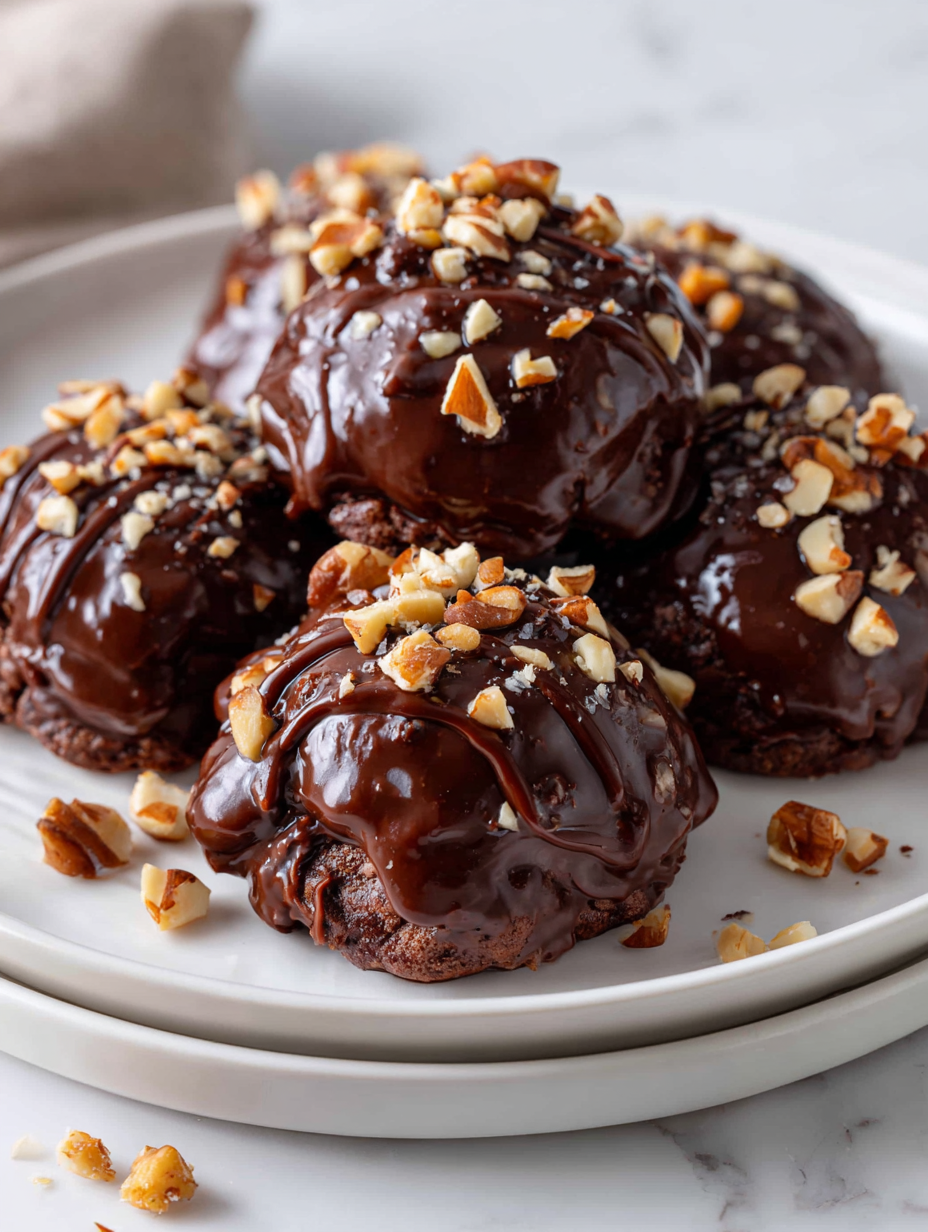
- Chocolate chips (optional): I scatter a few on top before chilling for that melty, gooey burst—skip if you want a cleaner look, but it’s worth the extra gooey goodness.
- Salt: Just a pinch to balance the sweetness—if you’re salt-averse, cut back, but a tiny sprinkle makes a big difference in flavor.
Spotlight on key ingredients
Unsweetened cocoa powder:
- I love the deep, smoky flavor it adds; make sure to sift it to avoid lumps, or your mixture gets gritty.
- Rolled oats: They give the chewiness I crave—use quick oats if you’re in a rush, but the old-fashioned ones hold up better texture-wise.
- Butter: I prefer unsalted, but salted works fine—just watch out for salt content if you’re sensitive or watching sodium.
Rolled oats:
- They provide chew and body—try toasted oats for a nuttier flavor, but skip if you prefer a softer chew.
- Honey or corn syrup: These act as glue, making the mixture sticky and fudgy—use maple syrup for a more nuanced sweetness.
- Chocolate chips: I love scattering a few on top for melty pockets—opt for dark or dairy depending on your mood.
Notes for ingredient swaps
- Dairy-Free: Use coconut oil instead of butter for richness, but expect a slightly different melt and flavor.
- Sweetener Options: Maple syrup or agave nectar can replace honey, adding a unique flavor but maybe a tad softer texture.
- Oats: Swap rolled oats for quick oats if you’re in a rush, though they might make the chews a little softer and less chewy.
- Chocolate: Dark chocolate chips can be replaced with dairy-free or white chocolate for different flavor profiles.
- Add-ins: Nuts or dried fruits can be mixed in; just chop and scatter on top or fold in for bursts of texture and flavor.
Equipment & Tools
- Medium mixing bowl: For mixing ingredients thoroughly.
- Saucepan: To gently melt butter and combine ingredients.
- Silicone spatula: Scraping and mixing without sticking.
- Parchment-lined tray: To set and chill the mixture without sticking.
- Knife: To cut the firm set mixture into squares.
Step-by-step guide to chewies
- Gather all your equipment: a medium mixing bowl, a saucepan, a silicone spatula, a parchment-lined tray, and a knife for cutting. The bowl is for mixing; the saucepan melts ingredients gently.
- In the saucepan over low heat (about 120°C / 250°F), melt 1/2 cup (115g) of unsalted butter, stirring occasionally. Watch for a gentle bubbling—not boiling—to prevent burning.
- Once melted, remove from heat. Add 1 cup (100g) unsweetened cocoa powder, whisking until smooth and glossy. The mixture should smell rich and chocolaty.
- Stir in 1/2 cup (170g) honey or corn syrup, mixing well until everything is evenly combined and sticky. The texture should be thick but spreadable.
- Add 1 teaspoon vanilla extract and a pinch of salt. Mix again. The aroma should brighten with vanilla, and salt enhances the chocolate depth.
- Stir in 2 cups (150g) rolled oats, folding until evenly coated. The mixture will thicken and become chewy-looking. If it feels too stiff, a splash of warm water can loosen it.
- Pour the mixture onto the prepared parchment-lined tray. Use the spatula to spread it into an even layer, about 1-inch thick. Smooth the top for a consistent bite.
- Optional: sprinkle chocolate chips or chopped nuts on top and gently press them in. They’ll add gooey pockets and crunch.
- Let it rest at room temperature for 20 minutes, then transfer to the fridge for at least 1 hour. This helps the mixture firm up and makes slicing easier.
- Once set, use a sharp knife to cut into squares or rectangles. Wipe the knife between cuts for clean lines. The edges should be firm and slightly shiny.
- Serve immediately or store in an airtight container. For best texture, keep at room temp up to 3 days, or refrigerate for up to a week.
Let the mixture cool at room temperature for 20 minutes, then chill in the fridge for at least an hour until firm. Slice into squares with a sharp knife and serve directly or store for later enjoyment.
How to Know It’s Done
- Mixture is glossy and smooth after adding cocoa and vanilla.
- No sticking to the spatula—it’s thick but spreadable.
- Edges are clean and firm when cut, with a shiny top.
No-Bake Chocolate Chewies
Ingredients
Equipment
Method
- Gather all your tools: a saucepan, a mixing bowl, a spatula, parchment paper, and a knife — everything you need for a smooth process.
- In the saucepan over low heat, melt the butter gently until it’s just bubbling, filling the kitchen with a warm, buttery aroma.
- Remove the pan from heat and whisk in the sifted cocoa powder, stirring until the mixture is smooth, glossy, and fragrant with rich chocolate scent.
- Pour in the honey or corn syrup and stir well until everything is combined into a thick, shiny, fudgy-looking mixture.
- Stir in the vanilla extract and a pinch of salt, mixing until the aroma brightens and the mixture is smooth and cohesive.
- Fold in the rolled oats with a spatula, mixing until they are evenly coated and the mixture thickens into a sticky, chewy dough.
- Transfer the mixture onto the parchment-lined tray and spread it evenly with the spatula, pressing gently to about 1-inch thickness.
- If desired, sprinkle chocolate chips or chopped nuts on top and press them lightly into the surface for extra texture and flavor.
- Let the tray sit at room temperature for 20 minutes, then chill in the refrigerator for at least an hour until the mixture is firm and slices easily.
- Once set, use a sharp knife to cut into squares or rectangles, wiping the blade with a warm cloth between cuts for clean edges.
- Serve immediately for a chewy, fudgy treat, or store in an airtight container at room temperature for up to 3 days or refrigerated for longer freshness.
Notes
Pro tips for perfect chewies
- Use high-quality cocoa powder for a richer flavor and smoother texture.
- Toast oats lightly beforehand for a nuttier, more aromatic chew.
- Melt butter gently over low heat to prevent burning and preserve flavor.
- Add honey gradually, tasting as you go, to control sweetness and stickiness.
- Chill the mixture thoroughly until firm to ensure clean, neat cuts.
- Use a sharp knife wiped with a warm cloth between cuts for crisp edges.
- Incorporate add-ins like nuts or dried fruit after mixing for even distribution.
Common mistakes and how to fix them
- FORGOT to pre-measure ingredients → Gather everything before starting.
- DUMPED ingredients too quickly → Add ingredients gradually for better mixing.
- OVER-TORCHED the mixture → Keep heat low, stir constantly, and remove promptly.
- MIXED too vigorously → Fold gently to keep mixture chewy, not tough.
Quick fixes and pantry swaps
- If mixture is too sticky → Splash with a tiny bit of warm water and mix again.
- When chocolate melts unevenly → Ditch the microwave; melt slowly over a double boiler.
- Splash extra salt if sweetness feels dull → It boosts depth and balances flavors.
- Patch over cracks in set chews → Warm the knife slightly before slicing for cleaner edges.
- Shield from moisture in the fridge → Keep in an airtight container to prevent sogginess.
Prep, store, and reheat tips
- You can prepare the mixture a day ahead; keep it covered in the fridge for easy assembly later. The flavors meld better overnight, and the texture stays chewy and rich.
- Store the cut chewies in an airtight container at room temperature for up to 3 days. For longer storage, refrigerate up to a week, where they stay firm but still fudgy.
- The texture and flavor deepen as they sit—expect a more intense chocolate punch after a day or two in the fridge.
- Reheat briefly in the microwave (about 10 seconds) if you prefer a slightly softer bite. Watch for melty chocolate and a warm, inviting aroma.
Top questions about no bake chews
1. Can I use dark chocolate chips instead of semi-sweet?
Yes, using dark chocolate chips instead of semi-sweet works great for a richer, more intense flavor. Just expect a slightly less sweet chew.
2. Can I swap the butter for nut butters?
Absolutely. Almond butter or peanut butter can replace butter for a nutty twist, but it may alter the texture slightly—expect a creamier, softer bite.
3. Can I replace honey with maple syrup or agave?
Yes, you can swap honey for maple syrup or agave nectar. The flavor will be slightly different, but they’ll still hold everything together well.
4. What do I do if the mixture is too sticky or dry?
If the mixture feels too sticky, add a handful of extra oats. If it’s too dry, a tiny splash of warm water or milk helps it come together.
5. How long can I keep these chews fresh?
Store them in an airtight container at room temperature for up to 3 days, or in the fridge for about a week. They stay chewy but might firm up a bit in the fridge.
6. Can I freeze the chews?
Yes, you can freeze these for up to a month. Wrap tightly in plastic wrap or store in a freezer bag, then thaw for a few minutes at room temp before enjoying.
7. How do I get neat, clean cuts?
To get clean cuts, use a warm, sharp knife and wipe it clean between slices. It prevents sticking and gives you tidy edges.
8. My chews aren’t firm enough after chilling—what now?
If the mixture isn’t firm enough after chilling, leave it in the fridge longer—sometimes it needs an extra hour or two to set fully.
9. Can I add other ingredients like nuts or fruit?
Adding chopped nuts or dried fruit after mixing gives bursts of flavor and texture. Fold them in gently to keep the chewy consistency.
10. What if my chocolate isn’t smooth during melting?
If the chocolate isn’t melting smoothly, melt it over a double boiler instead of in the microwave to avoid scorching and ensure glossy smoothness.
These no bake chocolate chewies are a simple reminder that comfort comes in small, chewy bites. They’re perfect for spontaneous cravings or when you want a quick, nostalgic treat without fussing over heat or complicated steps.
Sharing these makes me think of lazy afternoons and secret snacks, the kind that feel like a quiet rebellion against busy days. They’re not just a dessert—they’re a little boost of joy, plain and honest, in every bite.

Hi, I’m Grace Morgan, and welcome to my kitchen. This is a space shaped by family meals, curious hands reaching for snacks, paws under the table, and recipes that come together in the middle of real life. I’m a food blogger, a mother, and a passionate pet keeper. Most days, I’m cooking with one eye on the stove and the other on someone who needs me, whether that’s a child asking for a taste or a dog hoping something might fall.


