There’s something about whipping up these no-bake chocolate peanut bars that feels like a hug in the middle of chaos. When the week’s running wild and I need a quick fix of comfort, this recipe comes to the rescue with its simple ingredients and no-fuss process. It’s like a little secret stash of nostalgia, packed into each chewy, chocolatey bite.
Over the years, I’ve realized these bars aren’t just a treat—they’re a small act of rebellion against the busy, messy life. No oven, no complicated steps, just melting, mixing, and chilling. They remind me that sometimes, the best things happen when you keep it straightforward and let flavors do the talking.
Focusing on how this no-bake bar recipe became my go-to for quick comfort during busy weeknights, blending nostalgia with a touch of chaos in the kitchen.
The story behind this recipe
- This recipe grew out of late-night cravings and a cluttered pantry. I needed something sweet, quick, and satisfying without turning on the oven. The first batch was born out of chaos—melting chocolate while juggling a million things—and somehow, it turned out perfect. Now, it’s my secret weapon for when I want something rich but simple.
- Every time I make these bars, I remember those hectic evenings and how a little sweet escape can turn everything around. It’s funny how a humble combo of peanut butter, chocolate, and oats can bring so much comfort. These bars are more than dessert—they’re a small rebellion against the busy, noisy world outside.
- heading: The story behind this recipe
Ingredient breakdown: key components
- Peanut butter: I prefer a creamy, slightly salty peanut butter that melts smoothly into the mixture. Swap for almond butter if you want a nuttier flavor or skip for a nut-free version—just expect a different texture.
- Chocolate chips: I use semi-sweet chocolate chips because they balance sweetness without overpowering. For a darker, richer flavor, try bittersweet. If you want a milder sweetness, milk chocolate works too, but they melt just as beautifully.
- Oats: Old-fashioned rolled oats give the bars a chewy bite I love. If you only have quick oats, use those—they’ll still hold together but might be a tad softer.
- Honey or syrup: I add a splash of honey for gloss and stickiness. If you’re vegan, maple syrup is a good swap, though it brings a slightly different aroma and sweetness level.
- Butter or coconut oil: I use butter for richness, but coconut oil adds a subtle tropical aroma. If you’re dairy-free, coconut oil works perfectly—just watch it melt quickly and make the mixture glossier.
- Vanilla extract: A teaspoon of vanilla deepens the chocolate and peanut flavor. Skip if you want a more straightforward, less aromatic bar, but I wouldn’t recommend it.
- Salt: Just a pinch enhances all the flavors and balances the sweetness. Don’t skip it—trust me, it makes everything pop.
Spotlight on key ingredients
Peanut butter:
- I prefer a creamy, slightly salty peanut butter that melts smoothly into the mixture. Swap for almond butter if you want a nuttier flavor or skip for a nut-free version—just expect a different texture.
- Chocolate chips: I use semi-sweet chocolate chips because they balance sweetness without overpowering. For a darker, richer flavor, try bittersweet. If you want a milder sweetness, milk chocolate works too, but they melt just as beautifully.
- Oats: Old-fashioned rolled oats give the bars a chewy bite I love. If you only have quick oats, use those—they’ll still hold together but might be a tad softer.
Chocolate chips:
- I use semi-sweet chocolate chips because they balance sweetness without overpowering. For a darker, richer flavor, try bittersweet. If you want a milder sweetness, milk chocolate works too, but they melt just as beautifully.
- Oats: Old-fashioned rolled oats give the bars a chewy bite I love. If you only have quick oats, use those—they’ll still hold together but might be a tad softer.
Notes for ingredient swaps
- Dairy-Free: Swap butter for coconut oil or vegan butter. It keeps the bars rich, but with a subtle coconut aroma instead of buttery depth.
- Nut Butter: Almond or cashew butter can replace peanut butter. They bring a slightly different flavor and texture—less salty, more delicate.
- Sweetener: Maple syrup or agave nectar can stand in for honey. Expect a different aroma and a slightly thinner mixture, but still deliciously sticky.
- Chocolate: Use dark chocolate or vegan chocolate chips if you prefer less sweetness or need dairy-free options. The flavor shifts from sweet to more intense or bitter.
- Oats: Quinoa flakes or crushed graham crackers can replace oats for different textures. Quinoa adds a slight crunch, crackers give a more crumbly base.
- Add-ins: Chopped nuts, dried fruit, or coconut flakes can be mixed in for extra texture. Keep in mind they may slightly change the firmness or appearance.
- Salt: A pinch of sea salt or flavored salts can enhance or change the flavor profile. Less salt keeps it simple, while flavored salts add an unexpected twist.
Equipment & Tools
- 20cm (8-inch) square baking dish: Holds and shapes the bars
- Parchment paper: Prevents sticking and makes removal easy
- Heatproof bowl: Melts the chocolate gently
- Spatula: Folds ingredients and presses mixture into dish
- Sharp knife: Slices the set bars cleanly
Step-by-step guide to no bake bars
- Prepare your pan: Use a 20cm (8-inch) square baking dish and line it with parchment paper for easy removal.
- Melt the chocolate: In a heatproof bowl, melt 200g semi-sweet chocolate chips over a double boiler or in short bursts in the microwave, stirring until smooth. This takes about 1-2 minutes in the microwave, stirring every 30 seconds. Keep an eye on it to prevent burning.
- Mix the base: In a large bowl, combine 1 cup (250g) peanut butter, 1/4 cup honey or maple syrup, and 2 tablespoons melted butter or coconut oil. Stir until smooth and glossy, then fold in 2 cups rolled oats and a pinch of salt. The mixture should be thick but scoopable.
- Combine with chocolate: Pour the melted chocolate into the peanut butter mixture. Fold gently until evenly coated. The mixture will be thick and slightly sticky—this is normal.
- Transfer to pan: Spoon the mixture into your prepared dish. Press down firmly with the back of a spatula or your fingers to create an even layer. Chill in the fridge for at least 2 hours or overnight until set.
- Check for firmness: The bars should be firm to the touch, with a slight crack when pressed. If they wobble, give them more time.
- Cut into bars: Use a sharp knife to slice into squares or rectangles. Wipe the knife clean between cuts for neat edges.
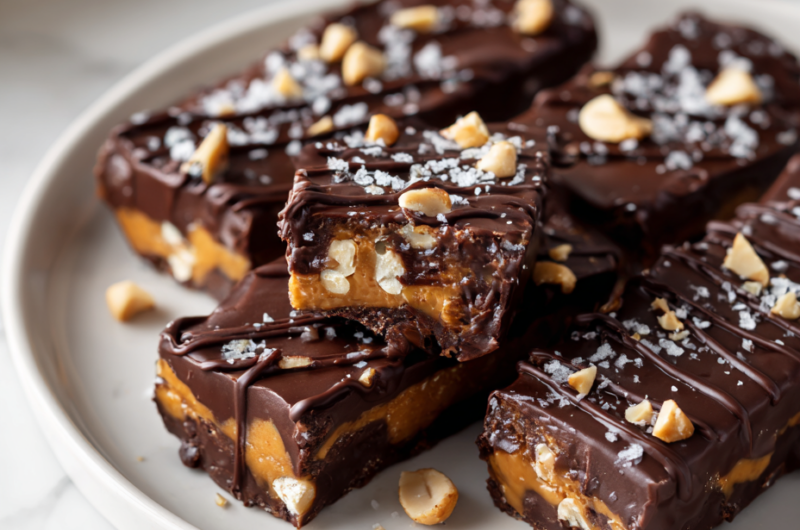
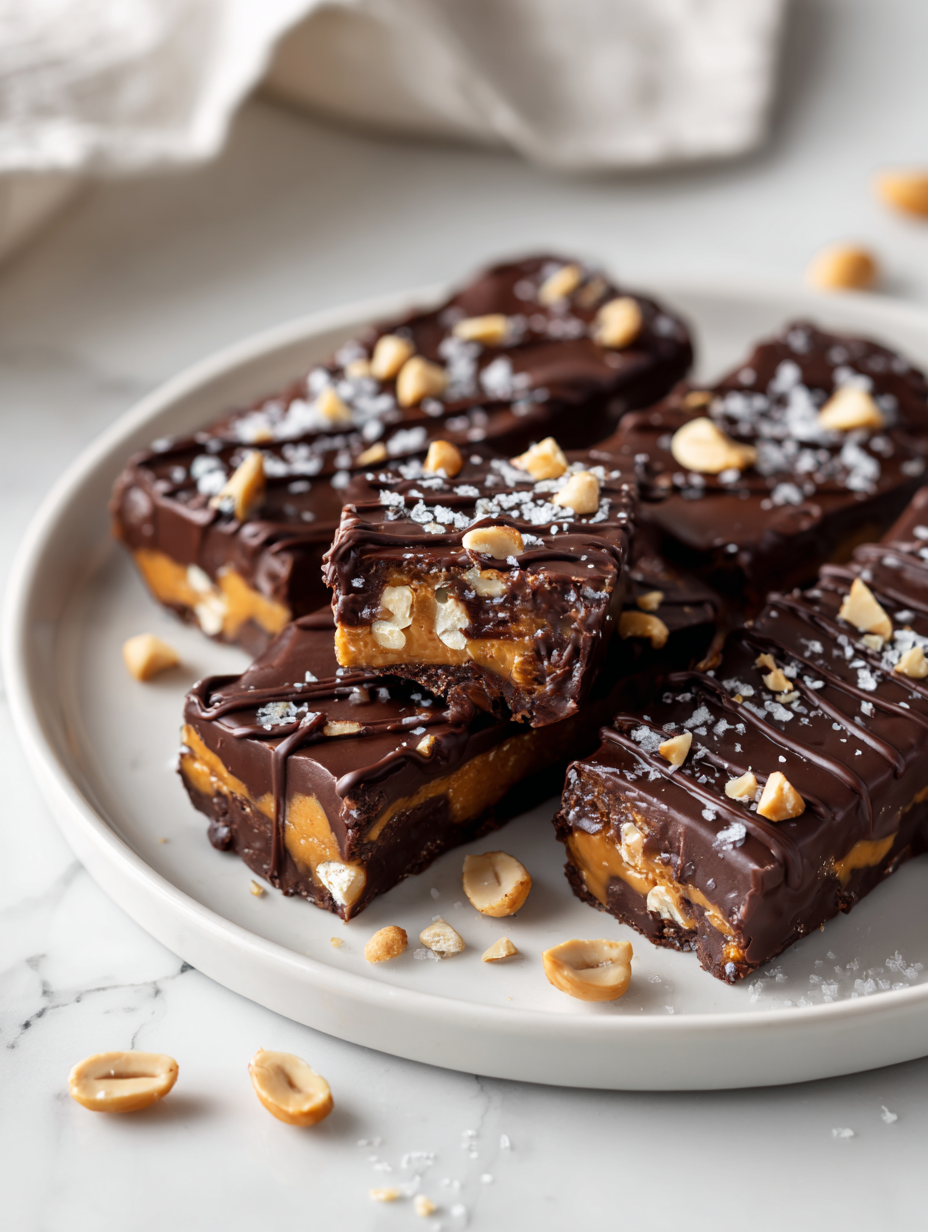
- Optional finishing: For a polished look, drizzle with melted extra chocolate or sprinkle with chopped peanuts before chilling.
- Serve: Keep refrigerated until ready to serve. The bars will stay good for up to a week, or freeze for longer storage.
Chill the bars in the fridge for at least 2 hours until firm. Once set, lift the parchment paper to remove from the dish and cut into squares. Serve straight from the fridge for a firm bite, or let sit at room temperature for 10 minutes for a slightly softer texture.
How to Know It’s Done
- Chocolate is shiny and fully melted without lumps.
- Mixture is thick, holds shape, and is evenly coated with chocolate.
- Bars feel firm and crack when pressed lightly.
No-Bake Chocolate Peanut Bars
Ingredients
Equipment
Method
- Line your square baking dish with parchment paper, leaving some overhang for easy removal.
- Gently melt the chocolate chips in a heatproof bowl over low heat or in short bursts in the microwave, stirring frequently until smooth and glossy.
- In a large mixing bowl, combine the peanut butter, honey, and butter, then stir until the mixture is smooth and shiny, filling the air with a nutty aroma.
- Fold in the rolled oats, vanilla extract, and a pinch of salt, mixing until everything is evenly incorporated and the mixture becomes thick and slightly sticky.
- Pour the melted chocolate into the peanut butter mixture, then gently fold together until the oats are evenly coated with chocolate and the mixture is thick and cohesive.
- Spoon the mixture into the prepared dish and press down firmly with the back of a spatula or your fingers to create an even, compact layer.
- Place the dish in the fridge and chill for at least 2 hours, or until the bars are firm and set with a shiny, smooth surface.
- Once chilled, lift the bars out of the dish using the parchment overhang and place on a cutting board. Slice into even squares or rectangles using a sharp knife.
- Optional: drizzle melted chocolate on top or sprinkle with chopped nuts for an extra touch before serving.
- Serve the bars chilled for a firm bite or let sit at room temperature for 10 minutes for a softer, more melting texture. Enjoy!
Tips for perfect no-bake bars
- Bolded mini-head: Use a gentle melt → Melt chocolate slowly over low heat or short bursts in the microwave to prevent seizing.
- Bolded mini-head: Press firmly → When spreading mixture into the pan, press down with the back of a spatula for an even layer.
- Bolded mini-head: Chill thoroughly → Let the bars chill in the fridge for at least 2 hours until firm and crackle when pressed.
- Bolded mini-head: Wipe between slices → Clean your knife after each cut to keep edges neat and prevent sticking.
- Bolded mini-head: Add a layer of texture → Sprinkle chopped peanuts or coconut flakes on top before chilling for extra crunch.
- Bolded mini-head: Watch the chocolate → Melt just until smooth; overcooking can cause it to seize or burn, ruining the shine.
- Bolded mini-head: Use parchment paper → Line the pan with parchment for easy removal and clean slicing, no sticking.
Common mistakes and how to fix them
- FORGOT to level the chocolate before melting → Use a flat surface for even melting.
- DUMPED in all ingredients at once → Add ingredients gradually for better control and texture.
- OVER-TORCHED the chocolate → Melt gently over low heat or short microwave bursts, stir often.
- MISSED chilling time → Chill at least 2 hours until bars are firm and set properly.
Quick fixes and pantry swaps
- When chocolate seizes, splash in a teaspoon of vegetable oil to restore smoothness.
- If mixture is too sticky, patch with a sprinkle of extra oats or a light dusting of cocoa powder.
- DUMPED in ingredients out of order? Reset by chilling the mixture for 10 minutes before shaping.
- Over-melted chocolate with a burnt smell? Shield with a heatproof bowl and melt on low, stirring often.
- When bars crack or crumble, rescue by letting them sit at room temperature for 5 minutes before slicing.
Prep, store, and reheat tips
- Prepare the mixture and press into the pan the day before. Keeps well in the fridge and saves time later.
- Store the bars in an airtight container in the fridge for up to a week. The cold keeps them firm and fresh.
- You can freeze the bars for up to 3 months. Wrap tightly in plastic wrap, then foil, to prevent freezer burn.
- Reheat slices briefly in the microwave—10 seconds at a time—until just softening. The chocolate will become glossy and inviting again.
- Allow chilled bars to come to room temperature for about 10 minutes before serving for a softer, more melting texture.
Top questions about peanut bars
1. Can I use crunchy peanut butter?
Use smooth peanut butter for easy mixing and creamy texture. Crunchy will add more texture but can make mixing messier.
2. Can I substitute other nut butters?
Absolutely, you can swap in almond or cashew butter, but expect a slightly different flavor and a thinner consistency.
3. Can I use chopped chocolate instead of chips?
Yes, you can replace chocolate chips with chopped chocolate, but chips melt more evenly and hold their shape.
4. Are quick oats okay to use?
Using quick oats works fine, but old-fashioned oats give a chewier texture. Adjust based on what you have.
5. Can I make these vegan or dairy-free?
Yes, maple syrup or agave can replace honey. Expect a slightly different aroma and a thinner mixture.
6. How do I know when the bars are ready to cut?
Chill the bars for at least 2 hours until firm. If they wobble or feel soft, give them more time.
7. How should I store the bars?
Store in an airtight container in the fridge for up to a week or freeze for longer. Keep them cold for best texture.
8. What if the chocolate burns or seizes?
If the chocolate seizes, add a teaspoon of vegetable oil and stir gently to restore smoothness.
9. My mixture is too sticky, what now?
When mixture feels too sticky, add a sprinkle of oats or a light dusting of cocoa powder to help shape it.
10. How can I get clean, even slices?
To prevent sticking, line your pan with parchment paper and wipe your knife clean between cuts for neat slices.
These no-bake chocolate peanut bars are more than just a quick treat—they’re a reminder that simplicity can deliver a rich, satisfying moment. I keep a stash in the fridge for those busy days when a little sweet, crunchy comfort is all I need to get through. They’re honest, messy, and full of flavor, just like the best recipes should be.
Sometimes, it’s the small, unpolished moments in the kitchen that turn into the sweetest memories. No matter how many fancy desserts I try, these bars always come back as my go-to for a little bit of chaos and a whole lot of nostalgia.

Hi, I’m Grace Morgan, and welcome to my kitchen. This is a space shaped by family meals, curious hands reaching for snacks, paws under the table, and recipes that come together in the middle of real life. I’m a food blogger, a mother, and a passionate pet keeper. Most days, I’m cooking with one eye on the stove and the other on someone who needs me, whether that’s a child asking for a taste or a dog hoping something might fall.


