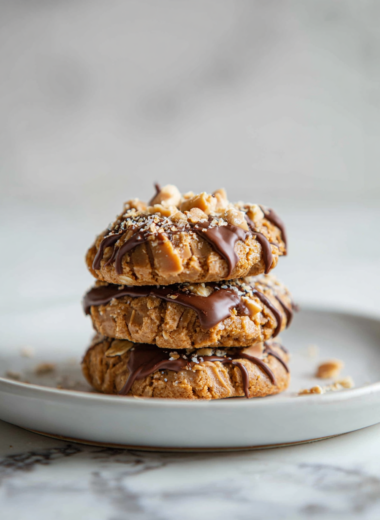
Author: GraceMorgan

  • Halloween Dirt Cake with Gummy Worms: A Spooky Toddler Mischief

    Halloween Dirt Cake with Gummy Worms: A Spooky Toddler Mischief

    Every Halloween, I find myself craving something delightfully chaotic and nostalgic. This Dirt Cake, with its gummy worms wriggling out of chocolatey crumbles, is a mischievous twist on childhood favorites. It’s the perfect treat to not only satisfy sweet tooth cravings but also spark playful giggles among kids and adults alike.

    What sets this recipe apart is its irresistible texture and surprise element. The cool, creamy layers contrast fun, chewy gummy worms, reminding me of those messy, magical Halloween nights of youth. Plus, it’s incredibly simple to assemble, making it ideal for last-minute festive fun.

    WHY I LOVE THIS RECIPE?

    • JOY: Watching kids’ faces light up as gummy worms emerge from the dirt is priceless.
    • NOSTALGIA: This cake transports me back to haunted house parties and neighborhood trick-or-treating.
    • PRIDE: Creating a whimsical, messy dessert that everyone loves keeps my holiday spirits high.
    • RELIEF: It’s quick to prepare and forgiving with ingredients, perfect for busy Halloween evenings.

    AVOID MY DISASTER (You’re Welcome)

    • FORGOT: to chill the cream thoroughly; the whipped topping will be less fluffy—just pop it back in the fridge.
    • DUMPED: all the gummy worms in too early; add them right before serving to prevent sogginess.
    • OVER‑TORCHED: the chocolate layer; gently melt in short bursts and stir continuously for a shiny finish.
    • MISSED: adding a pinch of salt to the cream; enhances sweetness and balances flavors beautifully.

    QUICK FIXES THAT SAVE YOUR DAY

    • When the cream isn’t fluffy enough, splash in a little vanilla extract and beat again.
    • Patch soggy gummy worms by draining them quickly and chilling before placing in the cake.
    • Shield a scorched chocolate layer with a gentle layer of butter or a smear of melted chocolate.
    • When out of crushed cookies, use graham cracker crumbs for that crunchy, dirt-like texture.
    • When short on time, use pre-whipped topping for instant creamy layers—smells like vanilla heaven.

    This Halloween Dirt Cake with Gummy Worms becomes more than just a dessert; it’s a small act of mischief sprinkled with sweet memories. The crunchy, smooth, chewy textures mimic a mini excavation, making every spoonful exciting. It’s a little messy, a little spooky, and totally fun.

    As the season peaks, this treat invites chaos and laughter around the table. It’s a reminder that sometimes, the simplest desserts hold the most stories and smiles. No matter if it’s a party or a quiet night, this cake fits every Halloween mood perfectly.

    Halloween Dirt Cake with Gummy Worms

    This no-bake dessert features layers of crushed cookies resembling dirt, creamy pudding, and whipped topping, topped with gummy worms for a playful and spooky presentation. The textures range from crunchy to smooth and chewy, with a messy, excavated look that adds to its fun appeal.
    Prep Time 20 minutes
    Total Time 20 minutes
    Servings: 8
    Course: Main Course
    Cuisine: American
    Calories: 350

    Ingredients
      

    • 1 1/2 cups crushed chocolate cookies or graham cracker crumbs for dirt-like texture
    • 2 cups vanilla pudding (prepared) chilled for better texture
    • 1 cup milk to prepare instant pudding if using
    • 2 cups heavy whipping cream chilled for whipping
    • 1/4 cup granulated sugar for whipping cream
    • Gummy worms gummy worms for decoration and surprise element

    Equipment

    • Mixing bowls
    • electric mixer or whisk

    Method
     

    1. Measure and crush the chocolate cookies or graham crackers until they resemble dirt, then set aside.
    2. If using instant pudding, whisk the pudding mix with milk until fully combined and thickened, then chill in the fridge for at least 15 minutes.
    3. Add the chilled vanilla pudding and the prepared mixture to a large mixing bowl.
    4. In a separate bowl, beat the heavy whipping cream with sugar until soft peaks form, producing a fluffy texture and light aroma.
    5. Gently fold the whipped cream into the pudding mixture, combining until smooth and airy.
    6. Layer half of the cookie crumbs at the bottom of your serving dish, creating a crumbly, dirt-like base.
    7. Spoon the creamy pudding mixture over the cookie layer, smoothing the top gently with a spatula.
    8. Add the remaining cookie crumbs on top of the pudding layer to resemble freshly turned dirt.
    9. Just before serving, nestle gummy worms into the top layer, allowing some to peek out for a fun, messy look.
    10. Chill the assembled cake for at least 30 minutes to let the layers set and flavors meld.
    11. Serve the Dirt Cake with gummy worms wriggling out, ready for a playful, spooky Halloween treat.

    Amidst the pumpkin spice and spooky decor, this Dirt Cake stands out in its playful simplicity. It’s a reminder to embrace the chaos, enjoy the giggles, and keep the traditions alive in new, silly forms. Especially in October, when even a simple dessert can stir up a little magic and mischief.

    So, next time you need a quick, crowd-pleasing treat, reach for the ingredients to make this fun, spooky dessert. It’s fuss-free, loudly flavorful, and packed with childhood memories. Happy Halloween, and may your desserts be as wild and wonderful as the night itself.

  • Chill Out with a Frozen Margarita Slushie: The Cold Twist You Never Knew You Needed

    Chill Out with a Frozen Margarita Slushie: The Cold Twist You Never Knew You Needed

    One unexpected detail often overlooked in summer refreshment is the aroma of frozen citrus; it brings a brisk, invigorating scent that instantly cools the mind. This recipe for a frozen margarita slushie is not just about beating the heat—it’s a sensory journey that awakens forgotten beach days and late-night laughter. I’ve discovered that blending ripe limes, hints of orange liqueur, and a touch of sweetness creates a nostalgic yet fresh experience.

    Curiously, what makes this slushie stand out is its texture—frozen just right to mimic icy crystals melting on your tongue, delivering bursts of citrus with each sip. It’s as visually appealing as it is palate-pleasing, especially when garnished with a salted rim and a lime wedge. This recipe lets you customize the sweetness and alcohol level, making every glass a personal oasis.

    Frozen Margarita Slushie

    This frozen margarita slushie combines ripe lime juice with orange liqueur and a touch of sweetness, then blends them into a smooth, icy texture reminiscent of crushed ice. The final drink is vibrant, chilled, and slightly frosty, with a refreshing citrus aroma and a visually appealing icy appearance, often garnished with a salted rim and lime wedge.
    Prep Time 10 minutes
    Total Time 10 minutes
    Servings: 2
    Course: Main Course
    Cuisine: Mexican
    Calories: 180

    Ingredients
      

    • 1 cup fresh lime juice preferably freshly squeezed
    • 1/4 cup orange liqueur such as Grand Marnier or Cointreau
    • 2 tablespoons simple syrup or adjust for sweetness
    • 2 cups ice cubes crushed or whole, to be blended

    Equipment

    • Blender
    • Measuring cups and spoons
    • citrus juicer
    • cocktail glass

    Method
     

    1. Pour the freshly squeezed lime juice into your blender, capturing that bright green hue and fresh aroma.
    2. Add the orange liqueur to the blender, which will infuse the mixture with a sweet, citrusy aroma and flavor.
    3. Pour in the simple syrup, adjusting the amount based on your preferred level of sweetness.
    4. Drop in the ice cubes into the blender, filling it close to the top for a frosty finish.
    5. Secure the lid on the blender and blend everything on high until the mixture is smooth and icy, about 30-45 seconds. You should see tiny ice crystals and a frosty texture forming.
    6. Check the consistency; if it’s too thick, add a splash of water or more lime juice and blend briefly again.
    7. Pour the slushie mixture into chilled cocktail glasses, ensuring they look frosty and inviting.
    8. Garnish each glass with a salted rim and a lime wedge for an authentic presentation and extra flavor.
    9. Serve immediately and enjoy the refreshing, icy burst of citrus with each sip.

    Notes

    For an extra kick, add a splash of tequila or your favorite spirit before blending. Adjust sweetness and alcohol to taste.

    Sharing this frozen margarita slushie on a warm afternoon turns any gathering into a breezy escape. Its simplicity means you can whip up a batch in minutes, no fuss needed. As the ice crystals shimmer in the glass, it’s a little reminder that sometimes, the simplest pleasures hit the hardest.

    In a world of complex cocktails, this humble slushie keeps it straightforward—bright, cold, and totally satisfying. It’s perfect for spontaneous rooftop parties or solo moments on the porch, where a sip can instantly cool the chaos. Cheers to more moments that make summer feel just right.

  • Chill Unconventionally: The Hidden Charm of Watermelon Slushie

    Chill Unconventionally: The Hidden Charm of Watermelon Slushie

    When the summer sun blazes so fiercely that it feels like it’s melting your resolve, I turn to an unlikely hero: the watermelon slushie. This isn’t your average frozen drink; it’s a creamy, icy hug that keeps chaos at bay during those sweltering days. The scent of ripe watermelons, combined with a whisper of mint, transports me instantly to a beachside breeze, no matter where I actually am.

    What makes this recipe so special isn’t just the flavor — it’s the ritual. Blending frozen watermelon chunks into a silky, vibrant red reflex that cools the soul is oddly satisfying. It’s like pressing pause on the heat, with a frosty splash of nostalgia and refreshing relief. And frankly, it’s the most playful way I’ve found to enjoy a fruit that often gets overshadowed by its sweeter, more glamorous cousins.

    Watermelon Slushie

    This watermelon slushie is a frozen beverage made primarily from ripe watermelon chunks blended into a smooth, icy consistency. The mixture is finished with a hint of mint, resulting in a vibrant red, creamy-textured drink that is cool and refreshing, perfect for hot days.
    Prep Time 10 minutes
    Total Time 10 minutes
    Servings: 2
    Course: Main Course
    Cuisine: various
    Calories: 85

    Ingredients
      

    • 4 cups ripe watermelon chunks seedless for convenience
    • 1 teaspoon fresh mint leaves optional, for flavor
    • 1 tablespoon honey or agave syrup optional, for sweetness

    Equipment

    • Blender
    • Knife

    Method
     

    1. Place the watermelon chunks into the blender, breaking them into smaller pieces if needed, to help with blending.
    2. Add the fresh mint leaves on top of the watermelon for a refreshing aroma and subtle flavor.
    3. If you like a touch of sweetness, pour in the honey or agave syrup to enhance the natural fruit flavor.
    4. Secure the lid on the blender and blend on high speed until the mixture is completely smooth and has a frosty, slushy texture, about 30-45 seconds.
    5. Stop the blender and check the texture; it should be thick, icy, and vibrant red. If it’s too thick, add a splash of cold water and blend briefly.
    6. Pour the watermelon slushie into chilled glasses, ensuring each serves plenty of icy goodness.
    7. Garnish with a sprig of mint or a small wedge of watermelon if desired for presentation and extra freshness.

    Notes

    For an extra boost of flavor, add a squeeze of lime before blending. Use frozen watermelon for an even frostier texture.

    This watermelon slushie speaks to the heart of summer — simple, spontaneous, and bursting with flavor. It’s perfect for impromptu picnics or just when you need a break from the ordinary. The best part? It’s as easy to make as it is to enjoy, with only a handful of ingredients and a blender.

    As the season stretches on, I know I’ll keep returning to this refreshing concoction. It’s bright, invigorating, and reminds me that pleasure can be served in the coolest, most vibrant ways. No matter the chaos of life, a cold glass of watermelon slushie always makes everything seem just a little more manageable.

  • Eggplant Parmesan Reimagined: A Culinary Nostalgia with a Twist

    Eggplant Parmesan Reimagined: A Culinary Nostalgia with a Twist

    Imagine biting into a crispy, golden crust that gives way to tender, flavorful eggplant slices layered with melting cheese. This dish transports you to family kitchens where every bite sparks memories of comfort and chaos alike. Today, I’m sharing a version that swaps traditional frying for a baked approach, making it lighter without losing the soul of the classic.

    Baking eggplant Parmesan might seem mundane, but it’s packed with surprises. The aroma of roasting garlic and the crunch of seasoned breadcrumbs create a symphony of smells and textures. It’s a dish that balances nostalgia with innovation, perfect for those craving a hearty, satisfying meal that doesn’t weigh heavy.

    Baked Eggplant Parmesan

    This dish features slices of eggplant coated in seasoned breadcrumbs and baked until crispy, layered with marinara sauce and melted cheese. The result is a golden, tender, and flavorful casserole with a satisfying crunchy top and gooey interior.
    Prep Time 20 minutes
    Cook Time 30 minutes
    Total Time 50 minutes
    Servings: 4
    Course: Main Course
    Cuisine: Italian
    Calories: 320

    Ingredients
      

    • 2 medium eggplants sliced into 1/4-inch rounds
    • 1 cup breadcrumbs plain or Italian-seasoned
    • 1/2 cup grated Parmesan cheese
    • 2 cups marinara sauce preferably chunky or smooth
    • 1 cup shredded mozzarella cheese
    • 2 cloves garlic minced
    • to taste salt and pepper
    • 2 tablespoons olive oil for coating and drizzling

    Equipment

    • Baking sheet
    • Shallow dish for breadcrumbs
    • Mixing bowls
    • Kitchen tongs or spatula

    Method
     

    1. Preheat your oven to 400°F (200°C). Line a baking sheet with parchment paper. Slice the eggplants into 1/4-inch rounds and season with salt and pepper on both sides.
    2. Mix the breadcrumbs with grated Parmesan and minced garlic in a shallow dish. Drizzle olive oil over the eggplant slices to help them crisp up during baking.
    3. Dip each eggplant slice into the breadcrumb mixture, pressing lightly to adhere, then place them on the prepared baking sheet.
    4. Bake the eggplant slices in the preheated oven for about 20 minutes, until golden brown and crispy around the edges.
    5. Spread a layer of marinara sauce over the bottom of a baking dish. Arrange the baked eggplant slices in a single layer over the sauce.
    6. Spoon remaining marinara sauce evenly over the eggplant slices, then sprinkle shredded mozzarella cheese on top.
    7. Bake the assembled dish for an additional 10-15 minutes, until the cheese is melted, bubbling, and slightly browned.
    8. Remove from the oven and let it sit for a few minutes. Garnish with fresh basil or herbs if desired, then slice and serve hot.

    Notes

    For a lighter version, skip the cheese or use plant-based alternatives. Pair with a side salad for a complete meal.
    This eggplant Parmesan is more than just a weeknight dinner. It’s a reminder that comfort food can evolve without losing its roots. As the layers meld in the oven, the kitchen fills with a richness that makes the wait worthwhile.

    Sharing this dish feels like carrying forward a kitchen secret—simple, warm, and deeply satisfying. It’s the kind of meal that gathers everyone around the table, inviting stories and laughter to follow each bite.

  • Pumpkin Oatmeal: A Cozy Breakfast Twist You've Never Tried

    Pumpkin Oatmeal: A Cozy Breakfast Twist You've Never Tried

    There’s a secret ingredient in this pumpkin oatmeal that makes it smell like a sweet autumn breeze wafting through an open window. It’s not just the pumpkin purée, but a dash of cinnamon and a splash of maple syrup that turn a simple bowl into a nostalgic morning ritual. This recipe is perfect for those mornings when you crave comfort with a touch of seasonal magic.

    I discovered this twist while rummaging through my pantry, looking for a way to make breakfast feel special on a busy weekday. The creaminess of the oats combined with the earthy sweetness of pumpkin feels like a warm hug on a chilly fall morning. It’s a small act of self-care that starts the day with calm and satisfaction.

    Pumpkin Cinnamon Oatmeal

    This pumpkin cinnamon oatmeal is made by simmering rolled oats with pumpkin puree, cinnamon, and maple syrup until creamy and fragrant. The final dish has a thick, velvety texture with a warm, orange hue and a aroma of fall spices. It’s served hot with optional toppings like nuts or seeds for added crunch.
    Prep Time 5 minutes
    Cook Time 15 minutes
    Total Time 20 minutes
    Servings: 2
    Course: Main Course
    Cuisine: Comfort Food
    Calories: 220

    Ingredients
      

    • 1 cup rolled oats preferably old-fashioned
    • 2 cups milk or water
    • 0.5 cup pumpkin puree unsweetened preferred
    • 1 teaspoon ground cinnamon
    • 1 tablespoon maple syrup pure-grade
    • Pinch salt

    Equipment

    • Medium saucepan
    • Measuring cups and spoons
    • Wooden spoon or spatula

    Method
     

    1. Pour the milk or water into a medium saucepan and bring it to a gentle simmer over medium heat.
    2. Stir in the rolled oats and a pinch of salt, then reduce the heat to low.
    3. Cook the oats, stirring occasionally, for about 5 minutes until they begin to thicken and soften.
    4. Add the pumpkin puree to the oats, stirring well until fully incorporated and the mixture turns a vibrant orange.
    5. Sprinkle in the cinnamon and drizzle in the maple syrup, stirring to evenly distribute the spices and sweetness.
    6. Continue cooking, stirring frequently, for another 5 to 7 minutes until the oats are soft and the mixture is creamy and heated through.
    7. Remove from heat and let the oatmeal rest for a minute to thicken slightly before serving.
    8. Spoon into bowls and add your favorite toppings, such as nuts, seeds, or a dash of extra cinnamon, if desired.

    Notes

    For a creamier texture, substitute half of the milk with canned coconut milk. Adjust sweetness by varying the maple syrup amount.

    As the leaves turn and temperatures dip, this pumpkin oatmeal becomes more than just breakfast—it transforms into a moment of mindfulness. The simple act of stirring pumpkin into warm oats grounds you in seasonal comfort and cozy routines.

    Enjoy it with a sprinkle of toasted pecans or a dollop of Greek yogurt for added texture. This recipe is a gentle reminder that the best mornings often come from the simplest ingredients, stirred up with a little love and a lot of heart.

  • Transform Your Summer with a Rustic Peach Crisp Masterpiece

    Transform Your Summer with a Rustic Peach Crisp Masterpiece

    Imagine a warm, bubbling peach crisp fresh out of the oven, with its fragrant aroma mingling with the sweet summer air. I discovered that baking this dessert in a cast-iron skillet enhances its rustic charm and adds a slightly smoky crust that elevates each bite. This recipe isn’t just about the peaches; it’s about relishing a moment of cozy chaos in the kitchen, especially when stone fruit is abundant.

    Using only the ripest peaches and a crunchy oat topping, this dessert captures the fleeting sweetness of peak season. It’s perfect for lazy afternoons or unexpected guests, turning simple ingredients into a comforting, nostalgic treat. The beauty of this peach crisp lies in its forgiving nature and the joy of improvisation in every step.

    Peach Crisp in Cast-Iron Skillet

    This peach crisp combines ripe, juicy peaches with a crunchy oat topping, baked until bubbling and golden. The dish features a rustic, slightly smoky crust from the cast-iron skillet and a tender, sweet filling, creating a comforting dessert with contrasting textures.
    Prep Time 15 minutes
    Cook Time 40 minutes
    Total Time 55 minutes
    Servings: 6
    Course: Main Course
    Cuisine: American
    Calories: 250

    Ingredients
      

    • 5-6 large ripe peaches peeled, pitted, and sliced
    • 1/4 cup granulated sugar
    • 1 tablespoon lemon juice
    • 1 cup old-fashioned oats
    • 1/2 cup all-purpose flour
    • 1/3 cup brown sugar
    • 1/2 teaspoon ground cinnamon
    • 1/4 teaspoon salt
    • 1/2 cup unsalted butter cold and cubed

    Equipment

    • Cast-iron skillet
    • Mixing bowls
    • Spatula
    • Measuring cups and spoons
    • Oven

    Method
     

    1. Preheat your oven to 375°F (190°C) and set your cast-iron skillet aside.
    2. In a large mixing bowl, toss the sliced peaches with granulated sugar and lemon juice until evenly coated. This helps draw out their juices and enhances the sweetness.
    3. Pour the peach mixture into the skillet, spreading it out into an even layer. You should see the juices starting to pool at the bottom.
    4. In a separate bowl, combine oats, flour, brown sugar, cinnamon, and salt to create the crumble topping. Give it a quick whisk to blend.
    5. Add the cold, cubed butter to the dry ingredients. Use your fingertips or a pastry cutter to work the butter into the mixture until it resembles coarse crumbs. This creates a crispy, buttery topping.
    6. Sprinkle the crumble topping evenly over the peaches in the skillet, covering as much surface as possible for a crunchy crust.
    7. Place the skillet in the preheated oven and bake for about 35-40 minutes, until the topping is golden brown and the filling is bubbling around the edges.
    8. Once done, remove the skillet from the oven and let it cool slightly—just enough to avoid burns but still warm and inviting.
    9. Serve the warm peach crisp with a scoop of vanilla ice cream or a dollop of whipped cream for extra indulgence.

    Notes

    To keep the topping crisp, serve soon after baking. You can also add chopped nuts to the crumble for added crunch.
    As the golden topping crackles and the peaches soften with a tender, jam-like consistency, you’ll realize why this recipe has stuck around through seasons. It’s a celebration of summer’s fleeting bounty, transforming it into a fuss-free dessert that feels indulgent yet cozy.

    Even on the busiest days, a peach crisp offers a moment of pure satisfaction—crisp topping, juicy fruit, and a sprinkle of cinnamon scent filling the air. It’s a reminder that simple ingredients can bring so much warmth and joy, especially when shared with loved ones around a mismatched table.

  • Spooky Delight: Halloween Monster Eyeball Cake Pops with a Ghoulish Twist

    Spooky Delight: Halloween Monster Eyeball Cake Pops with a Ghoulish Twist

    Every October, my neighborhood becomes a playground for mini monsters and ghosts. This year, I wanted to craft something that would turn heads and squeals—an edible nightmare that’s adorable enough for kids but creepy enough for the grown-ups. Enter the Halloween Monster Eyeball Cake Pops: a perfect mix of chaos, color, and sugary glee.

    These cake pops are not your typical sweet treat. They come alive with gooey red centers, weirdly realistic eyeballs, and terrifying swirls. The best part? Creating these means I get to indulge my love for artsy candies while unleashing my inner mad scientist in the kitchen.

    Halloween Monster Eyeball Cake Pops

    These cake pops are made by shaping cake dough into eyeball shapes, coating them in colorful candy melts, and adding realistic eyeball details with icing and edible decorations. They feature gooey centers with a chewy exterior and creepy, detailed eyeball appearances, perfect for Halloween parties.
    Prep Time 30 minutes
    Cook Time 20 minutes
    Total Time 50 minutes
    Servings: 12
    Course: Main Course
    Cuisine: Halloween
    Calories: 150

    Ingredients
      

    • 1 box store-bought cake (vanilla or chocolate) crumbled after baking
    • 1/2 cup butter melted
    • 1 1/2 cups confectioners’ sugar for smooth paste
    • 1 cup vanilla frosting or homemade frosting
    • 200 g candy melts (white, red, and black) for coating and detailing
    • 1 tube red edible gel or icing for bloodshot details
    • 12 brown edible eyes or small round candies for eyeballs
    • Optional food coloring to tint candy melts as needed

    Equipment

    • Mixing bowls
    • Cake pop sticks
    • Microwave-safe bowls
    • Cooling rack
    • Piping bags and tips
    • Food-safe brushes

    Method
     

    1. Start by crumbling the cake into a large mixing bowl, breaking it apart with your hands until fine crumbs form.
    2. Add melted butter and vanilla frosting to the cake crumbs. Mix thoroughly with a spoon or your hands until well combined and the mixture becomes moldable.
    3. Divide the mixture and roll it into 12 equal-sized balls, about the size of a ping pong ball. Slightly flatten each ball to resemble an eyeball shape.
    4. Melt candy melts in a microwave-safe bowl in 30-second intervals, stirring until smooth. Allow to cool slightly if too hot.
    5. Dip each cake ball into the melted candy melts, using a spoon to cover completely. Tap off excess coating and insert a cake pop stick into each eyeball. Place on a cooling rack to set.
    6. Once the coating is firm and dry, melt additional white candy melts for the eyeball whites. Drizzle or brush on small patches of white around the eyeball as desired.
    7. Use black candy melts in a piping bag to add veins and details around the eyeball for a realistic, creepy effect.
    8. Apply small round edible eyes or candies on top of each cake pop to mimic the eyeball’s center.
    9. Use red edible gel or icing to draw bloodshot veins or bloodshot streaks radiating from the centers for extra creepiness.
    10. Allow all decorations to set completely, about 15–20 minutes, until the coating is firm and details are dry.
    11. Serve your spooky eyeball cake pops on a platter, ready to wow guests with their creepy, colorful appearance.

    My neighbors always look forward to my spooky baking projects, and these eyeball cake pops are no exception. The mix of novelty and comfort makes them a highlight on any Halloween table. Plus, the messy fun of decorating is half the adventure and all the chaos I crave this spooky season.

    As the season wears on, these creepy treats remind me why I love Halloween—its perfect blend of nostalgia, creativity, and delightfully gross surprises. Every bite feels like a tiny haunted mystery, hiding a sweet, gooey secret inside. And honestly, that’s what makes these cake pops a wickedly good time for everyone involved.

  • Chilling with a Twist: The Unexpected Charm of Kool Aid Slushie

    Chilling with a Twist: The Unexpected Charm of Kool Aid Slushie

    There’s a certain chaos in a well-made Kool Aid slushie, especially when you discover how it magically balances nostalgia with a burst of unexpected tartness. It’s not just a frozen drink; it’s a tiny rebellion against the ordinary, a reminder of childhood days spent chasing after the perfect icy sip. This recipe transforms a simple powder into a frosty delight that’s perfect for every sunny escape or spontaneous gathering.

    What makes this slushie stand out is its vibrant color and the playful sensory experience—crunchy ice with a punch of fruity flavor that shatters on your tongue. I love how it brings a splash of carefree fun into everyday moments, especially when the weather screams for something chilled and colorful. Plus, it’s so quick to whip up, you’ll be making it again before the first glass even melts.

    Kool Aid Frozen Slushie

    This Kool Aid slushie is a vibrant, icy beverage made by combining flavored drink powder with water and sugar, then freezing and blending it to create a crunchy, frozen treat. The finished product has a bright color and a tart, fruity flavor with a refreshingly icy texture. It’s perfect for hot days and casual gatherings, offering a playful and nostalgic drinking experience.
    Prep Time 10 minutes
    Cook Time 2 hours
    Total Time 2 hours 10 minutes
    Servings: 4
    Course: Main Course
    Cuisine: American
    Calories: 120

    Ingredients
      

    • 1 packet Kool Aid drink mix
    • 1 cup sugar adjust based on sweetness preference
    • 4 cups water cold

    Equipment

    • Freezer
    • Blender
    • Measuring cups and spoons
    • Bowl

    Method
     

    1. Mix the Kool Aid powder, sugar, and water in a bowl until the sugar and powder are fully dissolved and the mixture is vibrant in color.
    2. Pour the mixture into a shallow dish or tray, spreading it evenly to promote quick freezing.
    3. Place the dish in the freezer and let it freeze until firm, about 2-3 hours. Every 30 minutes, stir the mixture with a fork to break up ice crystals and create a smooth, slushy texture.
    4. Once the mixture is fully frozen and has a semi-icy, crystalline texture, break it into chunks and transfer them to a blender.
    5. Blend the frozen chunks on high speed until the mixture becomes a smooth, icy slush with a vibrant color and a slightly granular texture.
    6. Pour the slushie into glasses, garnishing with fruit or a colorful straw for an added fun touch.

    In a world that’s constantly rushing, this Kool Aid slushie offers a nostalgic pause—an easy way to cool down and indulge in childhood delights. It’s that burst of sweet, sour, and icy that makes every sip a tiny celebration. When the heat hits hard, this recipe steps in as the colorful hero of your spontaneous summer plans.

    So, next time you crave a crowd-pleaser or just need a moment of refreshment, reach for your freezer and favorite Kool Aid packet. This little frozen treat is simple, bold, and keeps your cool intact. Sometimes, the best ideas are just a scoop away from chaos.

  • Chill Out with an Unusual Iced Tea Slushie Twist

    Chill Out with an Unusual Iced Tea Slushie Twist

    In the relentless heat of summer, I stumbled upon a secret: blending iced tea with unexpected herbs. It turns a simple refreshment into a fragrant escape, tingling your senses with hints of basil and lemon verbena. This isn’t your typical sweet iced tea; it’s a vibrant, herbal adventure.

    Using fresh herbs not only elevates flavor but also adds a layer of nostalgia, reminding me of old garden afternoons. The icy texture surprises every time, crackling softly against the roof of your mouth. It’s quick to whip up and perfect for those moments when you crave something more than just cold—something alive and surprising.

    Herbal Iced Tea with Lemon Verbena and Basil

    This refreshing iced tea combines brewed tea with fresh herbs like basil and lemon verbena, resulting in a fragrant, cooling beverage. The final drink has a vibrant appearance, with bright green herbs floating in the clear, icy liquid, offering a crisp and aromatic texture.
    Prep Time 10 minutes
    Cook Time 10 minutes
    Total Time 20 minutes
    Servings: 4
    Course: Main Course
    Cuisine: American
    Calories: 50

    Ingredients
      

    • 4 cups water for brewing tea
    • 4 teabags black or green tea choice of flavor
    • 1 bunch fresh basil roughly chopped
    • 1 bunch lemon verbena or lemon balm, roughly chopped
    • to taste honey or simple syrup optional sweetener
    • ice cubes for serving ice

    Equipment

    • Kettle or saucepan
    • Tea infuser or strainer
    • Mixing pitcher
    • Cloth or sieve
    • Tall glasses

    Method
     

    1. Bring the water to a rolling boil in a kettle or saucepan, filling your favorite pot with about four cups of water.
    2. Place the tea bags into a mixing pitcher and pour the hot water over them, allowing the tea to steep for about 5 minutes until the liquid turns rich and fragrant.
    3. While the tea steeps, chop the fresh basil and lemon verbena roughly to release their essential oils and flavors.
    4. Remove the tea bags, then add the chopped herbs into the warm tea, stirring gently to help infuse their aroma.
    5. Let the herbal mixture cool to room temperature, then transfer it to a fridge or keep it in a cool place to chill completely, about 10 minutes.
    6. Once cooled, strain the tea through a cloth or sieve into a clean pitcher, removing the herbs to keep the beverage clear.
    7. If desired, stir in honey or simple syrup to taste, balancing the herbal freshness with a touch of sweetness.
    8. Fill tall glasses with plenty of ice cubes, then pour the chilled herbal tea over the ice, ensuring each glass is filled to the brim.
    9. Garnish each glass with a sprig of fresh basil or lemon verbena if you like, for an aromatic finishing touch.
    10. Serve immediately, listening for the crackle of ice and enjoying the vibrant herbal aroma with each sip.

    Notes

    You can customize the sweetness and herbal intensity according to your preference. For a more vibrant color, add a splash of lemon juice before serving.
    Pouring this iced tea slushie into a tall glass makes me feel like I’ve bottled a fleeting moment of summer sun. It’s a refreshment that captures the season’s vibrancy, perfect for spontaneous gatherings or solo retreats on the porch. Sometimes, the simplest ideas—like herbs and ice—bring the biggest delight.

    This recipe is a small reminder to experiment with flavors, even in the most familiar forms. It’s a celebration of what can happen when you step out of the usual and embrace the chaos of fresh possibilities.

  • Chilling with Caramel Bliss: The Unexpected Charm of Freezing Caramel

    Chilling with Caramel Bliss: The Unexpected Charm of Freezing Caramel

    Imagine turning your favorite caramel sauce into a icy, creamy delight that dances on your taste buds. This caramel slushie isnt just a summer treat; its an adventure in frozen nostalgia. The way caramel5s warm, buttery notes clash with the cold, refreshing texture makes every sip a tiny celebration.

    What makes this recipe truly special is its versatility. It transforms everyday pantry staples into something extraordinary. Whether youre winding down after a busy day or entertaining friends, this sweet, cool concoction sparks joy and satisfaction with every glass.

    Caramel Slushie

    A caramel slushie is a frozen beverage that combines buttery caramel sauce with ice and milk to create a creamy, icy treat. Its smooth, slushy texture and rich caramel flavor make it a refreshing dessert or snack, especially on warm days.
    Prep Time 10 minutes
    Total Time 10 minutes
    Servings: 2
    Course: Main Course
    Cuisine: Modern
    Calories: 180

    Ingredients
      

    • 1/2 cup caramel sauce preferably soft and smooth
    • 2 cups ice cubes
    • 1 cup milk whole or any preferred type

    Equipment

    • Blender
    • Measuring cups and spoons

    Method
     

    1. Pour the caramel sauce into the blender.
    2. Add the ice cubes to the blender, filling until it reaches the marked line for desired thickness.
    3. Pour the milk over the ice and caramel in the blender.
    4. Secure the lid on the blender and blend on high speed until the mixture is smooth and icy, about 30-45 seconds, with a slushy consistency.
    5. Stop the blender and check the texture; if it’s too thick, add a splash more milk and blend briefly to loosen.
    6. Pour the caramel slushie into glasses, watching the creamy, frosty mixture settle and froth slightly at the top.
    7. Serve immediately with a straw or spoon, enjoying the rich caramel flavor and icy texture.

    This caramel slushie taps into that craving for something sweet yet invigorating. It captures the essence of comfort with a twist of icy excitement, perfect for any warm day or cozy night. Its a reminder that the simplest ingredients can unlock a world of flavor if treated with a little creativity.

    As the summer heat lingers, its the perfect pairing for spontaneous gatherings or quiet moments alone. Sharp and smooth, sweet and chilly—this recipe is all about moments of indulgence and ease. Feel free to experiment with toppings or mix-ins to make it truly yours.