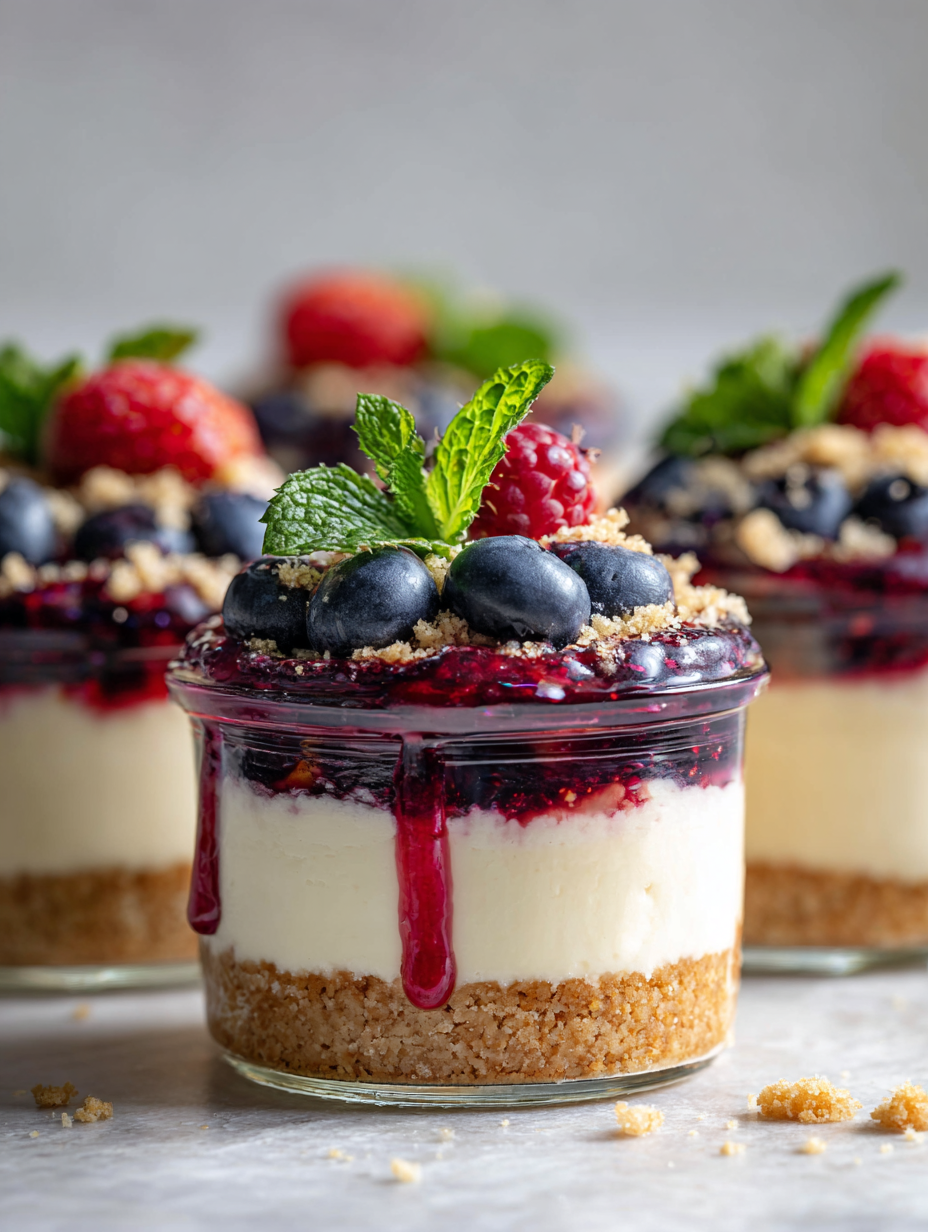
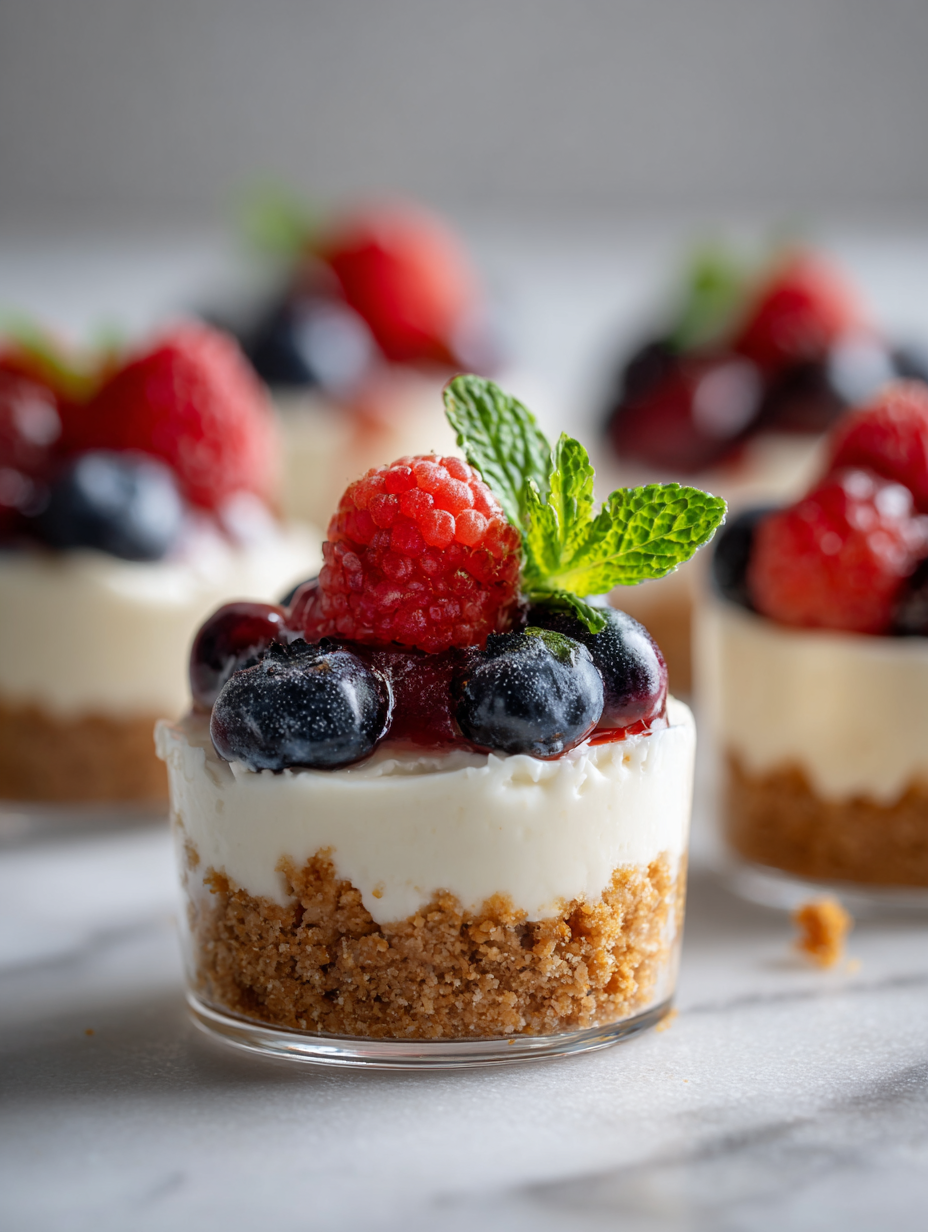
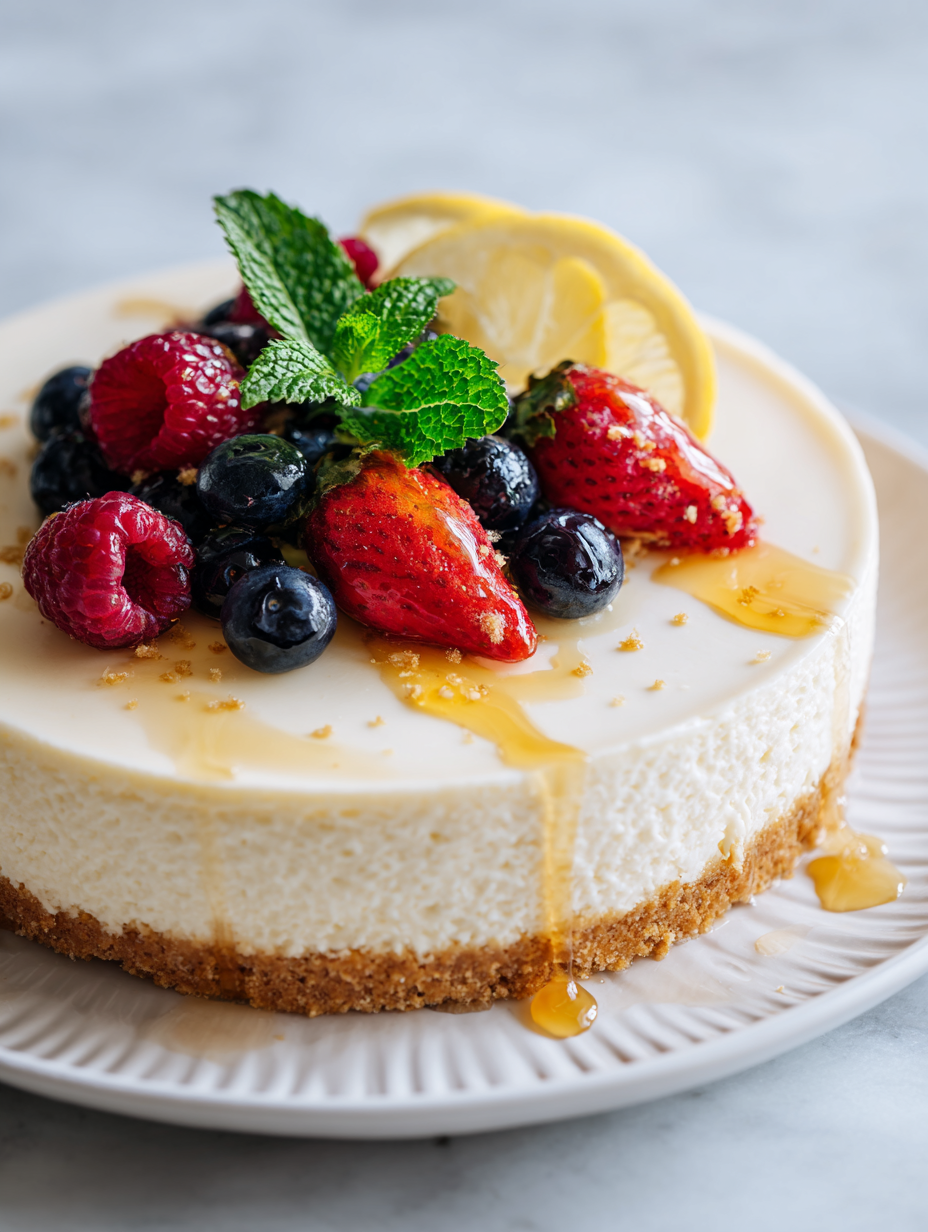
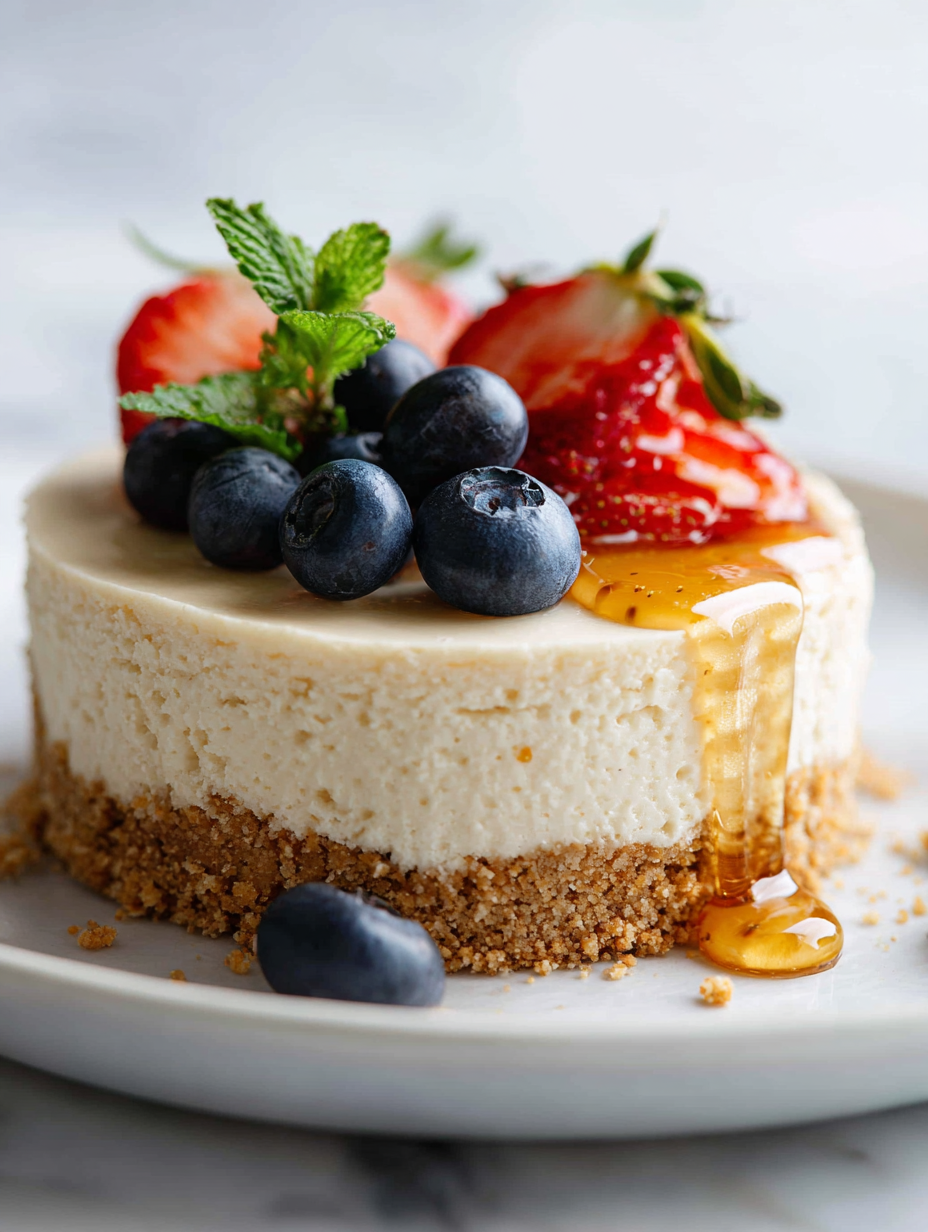
Author: GraceMorgan

  • Chill Out with This Surprising Chocolate Slushie Twist

    Chill Out with This Surprising Chocolate Slushie Twist

    When the summer heat hits, I crave more than just a cold drink; I want something that sparks nostalgia and offers a sleek but playful break. This chocolate slushie isn’t just your average frozen treat—it’s a reminder of carefree days and late-night snack adventures. Plus, it’s surprisingly versatile, adapting effortlessly to a cozy night in or a spontaneous backyard gathering.

    Chocolate Slushie

    A frozen beverage blending rich chocolate flavor with icy texture, made by blending cocoa, milk, and sweeteners until smooth. The final result is a cold, creamy, and slushy drink with a vibrant chocolate hue, perfect for hot days or casual gatherings.
    Prep Time 10 minutes
    Total Time 10 minutes
    Servings: 2
    Course: Main Course
    Cuisine: International
    Calories: 180

    Ingredients
      

    • 1 cup whole milk or any milk of choice
    • 1/4 cup unsweetened cocoa powder for rich chocolate flavor
    • 3 tablespoons granulated sugar adjust to taste
    • 1 teaspoon vanilla extract optional, for depth of flavor
    • 1.5 cups ice cubes adjust for desired thickness

    Equipment

    • Blender
    • Measuring cups and spoons

    Method
     

    1. Measure out the milk, cocoa powder, sugar, vanilla, and ice cubes, placing them nearby for easy access.
    2. Add the milk, cocoa powder, sugar, and vanilla extract into the blender and secure the lid.
    3. Start blending on low speed, gradually increasing to high, and blend until the mixture is smooth and the ice is finely crushed.
    4. Check the consistency; if it’s too thick, add a splash more milk and blend briefly to loosen. If it’s too thin, add a few more ice cubes and blend again.
    5. Stop the blender and observe the creamy, slushy mixture with a glossy chocolate appearance.
    6. Pour the chocolate slushie into glasses using a spoon or spatula, ensuring a generous, frosty portion.
    7. Serve immediately with optional toppings like whipped cream or chocolate shavings for extra indulgence.
    This recipe is quick to assemble and endlessly customizable, making it a perfect pick-me-up on hectic days. The rich chocolate flavor combined with the icy crunch creates a texture that’s both satisfying and fun. No matter the season, it’s an easy way to add a little joy to your day, especially when memories and simple pleasures come together in a single glass.

  • Unexpected Comfort: Reinventing Taco Soup with a Twist

    Unexpected Comfort: Reinventing Taco Soup with a Twist

    As the leaves start turning and the air grows crisper, I find myself craving cozy, hearty dishes that carry a hint of nostalgia. Taco soup, with its vibrant spices and rich textures, is my go-to comfort on demanding days when only bold flavors will do. But today, I want to explore a less conventional take—adding a smoky chipotle kick that transforms this simple dish into an unexpected smoky symphony.

    This recipe isn’t just about filling bellies; it’s about elevating a humble bowl into something memorable with a handful of pantry treasures. The scent of cumin and smoked paprika mingling with simmering tomatoes makes the kitchen feel like a warm hug, perfect for chilly evenings. It’s a celebration of flavors, both familiar and daring, that turns ordinary into extraordinary.

    Smoky Chipotle Taco Soup

    This hearty taco soup combines ground meat, tomatoes, beans, and spices to create a thick, flavorful broth. Incorporating smoky chipotle peppers adds a depth of heat and richness, resulting in a comforting and visually vibrant dish with a slightly spicy, chunky texture.
    Prep Time 15 minutes
    Cook Time 30 minutes
    Total Time 45 minutes
    Servings: 6
    Course: Main Course
    Cuisine: Tex-Mex
    Calories: 350

    Ingredients
      

    • 1 lb ground beef or turkey or preferred ground meat
    • 1 medium onion diced
    • 3 cloves garlic minced
    • 1 can (14 oz) diced tomatoes with juices
    • 1 can (15 oz) black beans drained and rinsed
    • 1 cup corn kernels frozen or canned
    • 2 tbsp olive oil
    • 1 tbsp chili powder
    • 1 tsp smoked paprika ground smoked paprika
    • 1 chipotle pepper in adobo chipotle pepper finely chopped
    • 2 cups beef or chicken broth
    • to taste salt and pepper

    Equipment

    • Large Soup Pot
    • Wooden spoon
    • Chef’s Knife
    • Cutting board

    Method
     

    1. Heat the olive oil in a large soup pot over medium heat until shimmering. Add the diced onion and cook, stirring occasionally, until translucent and fragrant, about 3-5 minutes.
    2. Add the ground meat to the pot and cook, breaking it apart with a wooden spoon, until browned and cooked through, about 5-7 minutes. Drain excess fat if necessary.
    3. Stir in the minced garlic, chili powder, smoked paprika, and chopped chipotle pepper, cooking for another minute until aromatic and the spices coat the meat and onions evenly.
    4. Pour in the diced tomatoes with their juices and the broth. Bring the mixture to a gentle simmer, allowing flavors to meld for about 10 minutes.
    5. Add the drained black beans and corn to the pot, stirring to combine. Continue simmering for another 10 minutes until heated through and slightly thickened.
    6. Taste the soup and season with salt and pepper as needed, adjusting the spice levels to your preference.
    7. Serve the smoky chipotle taco soup hot, garnished with your favorite toppings like shredded cheese, sour cream, or fresh cilantro if desired.
    Once you’ve got your bowl of this smoky taco soup, it’s hard to go back to the original. The blend of spices and the tender beans make it a standout, even among other comfort foods. It’s a reminder that good food doesn’t need to be complicated to be deeply satisfying.

    Gather your ingredients, crank up the spice, and let this soup bring some bold warmth to your table. In the midst of busy days, it’s these simple, flavorful moments that truly hit the spot. The best part? It’s easily customizable, so you can make it your own every time you cook.

  • Chill with a Sparkle: Crafting the Perfect Champagne Slushie

    Chill with a Sparkle: Crafting the Perfect Champagne Slushie

    Imagine a hot summer day, when a regular cold drink just won’t suffice. Instead, you reach for something unexpected: a shimmering champagne slushie that cools and invigorates with every sip. This recipe transforms bubbly into icy perfection, blending elegance with a twist of chaos.

    My favorite part? It’s a celebration of contrast—frosty and fizzy, sweet and tangy. Every spoonful crackles with the memory of bubbles popping on your tongue, yet feels like a chilled escape. It’s surprisingly simple, but each step feels like a little victory in the kitchen.

    Champagne Slushie

    A champagne slushie is a chilled beverage that combines bubbly champagne with crushed ice and sweet fruit flavors, resulting in a sparkling, icy drink. The mixture is blended until smooth, creating a frosty and fizzy texture with a vibrant appearance. It’s perfect for hot summer days or celebratory gatherings, offering a refreshing contrast of cold, bubbly, and slightly tangy flavors.
    Prep Time 10 minutes
    Total Time 10 minutes
    Servings: 4
    Course: Main Course
    Cuisine: Celebration
    Calories: 150

    Ingredients
      

    • 750 ml champagne chilled
    • 2 cups crushed ice preferably fine or medium size
    • 1 cup fruit juice such as peach or raspberry for flavor
    • 2 tbsp sugar syrup optional, adjust to taste

    Equipment

    • Blender
    • Measuring cups and spoons

    Method
     

    1. Pour the chilled champagne into the blender, providing the liquid base for your slushie.
    2. Add the crushed ice to the blender, filling it about halfway to ensure a frosty texture.
    3. Pour in the fruit juice and add the sugar syrup if you prefer a sweeter flavor, then secure the lid tightly.
    4. Blend the mixture on high speed until the ice is fully crushed and the liquid looks smooth and frosty, about 30-40 seconds.
    5. Stop the blender and check the consistency—it should be thick, slushy, and sparkling with tiny ice crystals.
    6. Pour the icy champagne mixture into glasses and garnish with fresh fruit or a sprig of mint if desired.

    Notes

    Serve immediately for the best frosty, fizzy experience.
    This champagne slushie isn’t just a drink; it’s a moment. Whether it’s for a sunny brunch or a spontaneous celebration, it brings a touch of glamour to any occasion. Plus, it’s so easy to whip up, you might find yourself craving it all year round.

    As the ice melts slowly and the flavors mingle, I’m reminded how a simple twist turns ordinary into extraordinary. Cheers to chilly delights and the small joys they bring, especially when topped with a fresh berry or a sprig of mint. Here’s to making every sip a fleeting, sparkling escape.

  • The Surprising Art of Making a Perfect Strawberry Slushie

    The Surprising Art of Making a Perfect Strawberry Slushie

    Ever wonder why some frozen drinks taste like summer in a glass, while others are just icy disappointments?

    Today, I want to take you beyond the usual blender blast and explore how to craft a strawberry slushie that’s silky smooth and bursting with flavor. It’s not just about frozen berries; it’s about balancing acidity, sweetness, and texture to recreate that nostalgic feeling you crave on a hot day.

    Imagine a slushie that crackles with icy freshness, the aroma of ripe strawberries filling your kitchen, and every sip offering a perfectly chilled berry punch. This recipe is my secret weapon for spontaneous backyard gatherings or a quick treat that brightens up any afternoon.

    Strawberry Slushie

    A strawberry slushie is a frozen beverage made by blending ripe strawberries with sweeteners and liquid until smooth and icy. The mixture has a vibrant red color, a silky yet granular texture, and a refreshing, berry-forward flavor that is perfect for hot days.
    Prep Time 10 minutes
    Total Time 10 minutes
    Servings: 2
    Course: Main Course
    Cuisine: American
    Calories: 150

    Ingredients
      

    • 2 cups frozen strawberries preferably hulled
    • 1 cup cold water or strawberry juice adjust for desired consistency
    • 2 tablespoons honey or simple syrup optional, for sweetness
    • 1 tablespoon lemon juice to balance acidity

    Equipment

    • Blender
    • Measuring cups and spoons

    Method
     

    1. Add the frozen strawberries to the blender, ensuring they’re evenly spread.
    2. Pour in the cold water or strawberry juice, covering the berries partly to facilitate blending.
    3. Drizzle in the honey or simple syrup for added sweetness, according to your taste preferences.
    4. Squeeze in the lemon juice to enhance the flavor and brighten the mixture.
    5. Secure the lid on the blender and blend everything on high speed until smooth and uniformly icy, about 30-40 seconds. You should see a vibrant red, slightly frothy mixture.
    6. Pause to check the consistency — it should be thick, slushy, and scoopable. If it’s too thick, add a splash more water and blend briefly again.
    7. Pour the slushie into chilled glasses, letting the icy mixture mound slightly over the rim for a charming presentation.
    8. Optionally, garnish with fresh strawberries or a sprig of mint for visual flair.

    Notes

    For a creamier texture, consider adding a scoop of Greek yogurt or a splash of coconut milk before blending.

    Making the perfect strawberry slushie is about patience and a little bit of experimentation. Once you find your ideal berry-to-ice ratio, it becomes an instant refresher any time the heat ramps up.

    This recipe reminds us that simple ingredients, when treated with care, can turn into something extraordinary. As the seasons shift and strawberries become more plentiful, I’ll be reaching for my blender more often, relishing each frosty, fruity sip.

  • Soul-Warming Vegan Pumpkin Soup with a Twist

    Soul-Warming Vegan Pumpkin Soup with a Twist

    Imagine the gentle aroma of roasted pumpkin mingling with hints of nutmeg and cinnamon, filling your kitchen with cozy promises. This vegan pumpkin soup isn’t just a seasonal delight; it’s a celebration of turning humble ingredients into something truly comforting. I love finding ways to make classic fall staples feel exciting and surprising.

    What makes this recipe special is its unexpected burst of flavor—think a splash of coconut milk blending seamlessly into velvety pumpkin puree, creating a luscious texture. Plus, the addition of a little smoky splash of paprika elevates every sip. It’s a soup that whispers fall nostalgia while inviting you to experiment with textures and spices.

    Whether you’re sharing it with friends on a chilly evening or savoring it solo with a good book, this soup adapts beautifully. It’s a reminder that vegan dishes can be rich, satisfying, and full of flavor—without missing a beat. Warm, nourishing, and just a bit daring, this bowl will have you coming back for more.

    Vegan Roasted Pumpkin Soup

    This vegan pumpkin soup features roasted pumpkin blended into a smooth, velvety base, flavored with nutmeg, cinnamon, and a splash of coconut milk. The final texture is creamy and thick, with a warm, inviting appearance enhanced by spices and smoky paprika.
    Prep Time 15 minutes
    Cook Time 40 minutes
    Total Time 55 minutes
    Servings: 4
    Course: Main Course
    Cuisine: American
    Calories: 180

    Ingredients
      

    • 1 small pumpkin (such as sugar pumpkin or butternut squash) peeled, seeded, and cut into chunks
    • 2 tablespoons olive oil for roasting
    • 1 teaspoon ground nutmeg
    • 1 teaspoon ground cinnamon
    • 1/2 teaspoon smoked paprika
    • 1 cup coconut milk full-fat for creaminess
    • 2 cups vegetable broth
    • 1 small yellow onion roughly chopped
    • 2 cloves garlic minced
    • to taste Salt and freshly ground black pepper

    Equipment

    • Baking sheet
    • Large pot or saucepan
    • Immersion blender or regular blender

    Method
     

    1. Preheat the oven to 400°F (200°C). Spread pumpkin chunks on a baking sheet, drizzle with olive oil, and toss to coat. Roast until tender and slightly caramelized, about 25-30 minutes.
    2. In a large pot, heat a splash of olive oil over medium heat. Add the chopped onion and cook until translucent and fragrant, about 5 minutes, stirring occasionally.
    3. Add the minced garlic to the onions and cook for another 1 minute until fragrant, taking care not to burn it.
    4. Once the pumpkin is roasted and cool enough to handle, add it to the pot with the sautéed onion and garlic.
    5. Pour in the vegetable broth and bring the mixture to a simmer. Let this cook gently for about 10 minutes to blend flavors.
    6. Use an immersion blender or carefully transfer the mixture to a blender. Blend until completely smooth and velvety, then return to the pot if necessary.
    7. Stir in the coconut milk, ground nutmeg, cinnamon, and smoked paprika. Mix well and heat through for another 5 minutes, adjusting seasoning with salt and pepper.
    8. Taste the soup and add more salt, pepper, or spices as desired for flavor balance.
    9. Serve the soup hot, garnished with a drizzle of coconut milk or a sprinkle of additional spices if desired.

    Notes

    You can prepare the roasted pumpkin a day ahead to save time. Adjust the spice levels to taste for a more or less spicy flavor. For extra richness, add a splash more coconut milk just before serving.

    As the season shifts, this vegan pumpkin soup remains a comforting staple that’s easy to toss together. Its balanced flavors and silky texture make it an unbeatable choice for cozy dinners. Plus, it’s incredibly adaptable—feel free to toss in your favorite herbs or a dash of hot sauce for extra kick.

    There’s something about cooking with pumpkin during fall that feels grounding and joyous. This recipe captures that spirit perfectly, offering a bowl of warmth when the days grow shorter. It’s more than just soup; it’s a simple joy that brightens any chilly evening.

  • Spooktacular Jack-o’-Lantern Stuffed Peppers with a Twist

    Spooktacular Jack-o’-Lantern Stuffed Peppers with a Twist

    Every October, I find myself irresistibly drawn to the playful chaos of Halloween. This year, I decided to blend that festive spirit with my love of hearty, healthy food—resulting in these Halloween Jack-o’-Lantern Stuffed Peppers. They look adorable, but what’s better is how surprisingly satisfying they are, with a hint of smoky sweetness from the roasted peppers.

    What makes this recipe stand out is its exquisite balance of visual fun and culinary comfort. Carving the peppers like tiny jack-o’-lanterns is as enjoyable as stuffing and roasting them. Plus, the flavors of seasoned rice, melted cheese, and crisp vegetables bring a warmth that’s perfect for crisp fall evenings.

    Halloween Jack-o’-Lantern Stuffed Peppers

    This dish features bell peppers carved into miniature jack-o’-lanterns, which are then stuffed with a seasoned mixture of rice, vegetables, and melted cheese. After roasting, the peppers develop a smoky sweetness and a tender, flavorful filling with a charming festive appearance.
    Prep Time 20 minutes
    Cook Time 40 minutes
    Total Time 1 hour
    Servings: 4
    Course: Main Course
    Cuisine: American
    Calories: 250

    Ingredients
      

    • 4 large bell peppers preferably orange or yellow for a vibrant effect
    • 1 cup cooked rice preferably long-grain or jasmine rice
    • 1/2 cup shredded cheese cheddar or mozzarella work well
    • 1 cup mixed vegetables diced bell peppers, onions, or corn
    • 2 teaspoons olive oil for brushing and roasting
    • to taste salt and pepper
    • 1 teaspoon paprika optional, adds smoky flavor

    Equipment

    • Chef’s Knife
    • Spoon
    • Baking sheet
    • Small knife or paring knife

    Method
     

    1. Preheat your oven to 375°F (190°C)..
    2. Use a small knife or paring knife to carefully carve faces into the tops of each bell pepper, creating classic jack-o’-lantern expressions. Set aside the carved tops for later use.
    3. Gently scoop out the seeds and membranes from inside each carved pepper, making space for the stuffing while keeping the peppers intact.
    4. In a mixing bowl, combine cooked rice, shredded cheese, mixed vegetables, a drizzle of olive oil, and season with salt, pepper, and paprika. Mix thoroughly until evenly combined.
    5. Use a spoon to fill each hollowed pepper with the rice mixture, pressing gently to pack the filling tightly and fill the peppers completely.
    6. Place the stuffed peppers upright on a baking sheet lined with parchment paper. Brush the outside of each pepper lightly with olive oil for a roasted finish.
    7. Bake the peppers in the preheated oven for about 35-40 minutes, until the peppers are tender and slightly caramelized, and the cheese is melted and bubbly.
    8. Remove the peppers from the oven and let them cool for a few minutes. Place the carved lids back on top or serve as a decorative garnish if desired.
    9. Arrange the finished stuffed peppers on a platter, showcasing their carved faces and vibrant colors. Serve warm and enjoy their festive, hearty flavor.

    These Jack-o’-Lantern Stuffed Peppers are more than just a Halloween gimmick. They serve up cozy, colorful comfort that makes the season special. Their cheerful faces hide a warm filling that’s perfect for chilly nights, filled with familiar flavors and seasonal charm.

    As the days grow shorter and the air turns crisp, dishes like this remind us of the joy in simple, creative cooking. They bring a touch of whimsy to the table while nourishing our bodies and spirits. A perfect way to celebrate fall, one vibrant pepper at a time.

  • The Secret Ingredient in My Applesauce Cake

    The Secret Ingredient in My Applesauce Cake

    Every fall, I rediscover the magic of a homemade apple cake, but I like to shake things up with an unexpected twist. This year, I’ve added a hint of cinnamon infused with orange zest, giving it a bright, festive aroma that makes the kitchen smell like a holiday. It’s a recipe that feels nostalgic yet refreshingly new, perfect for those cozy weekends.

    Baking this cake is a sensory experience — the gentle crunch of apples against the soft crumb, the sweet spiciness filling the air, and the glaze that gives it just the right amount of shine. It’s a rustic, charming dessert that invites everyone to gather around the table. And trust me, once you try this version, your regular apple cake might just get a makeover.

    Spiced Apple Cake with Orange Zest

    This apple cake is baked using a batter that incorporates chopped apples, cinnamon, and orange zest, resulting in a moist and tender crumb with a slightly crunchy apple topping. The cake is finished with a glossy glaze, enhancing its rustic appearance and aromatic flavor profile.
    Prep Time 20 minutes
    Cook Time 50 minutes
    Total Time 1 hour 10 minutes
    Servings: 8
    Course: Main Course
    Cuisine: American
    Calories: 350

    Ingredients
      

    • 2 cups all-purpose flour
    • 1 cup granulated sugar
    • 1/2 cup unsalted butter melted
    • 3 large eggs
    • 1 teaspoon vanilla extract
    • 2 teaspoons ground cinnamon
    • 1 tablespoon orange zest from about 1 orange
    • 2 cups peeled and chopped apples
    • 1 cup powdered sugar for glaze
    • 2 tablespoons milk
    • Fresh orange zest (for decoration, optional)

    Equipment

    • Mixing bowls
    • Whisk
    • Spatula
    • 9-inch round cake pan
    • Oven

    Method
     

    1. Preheat the oven to 350°F (175°C). Grease a 9-inch round cake pan and set aside.
    2. In a large mixing bowl, whisk together the flour, sugar, and ground cinnamon until well combined.
    3. In a separate smaller bowl, beat the eggs with the vanilla extract, then stir in the melted butter, orange zest, until smooth.
    4. Pour the wet mixture into the dry ingredients and fold gently with a spatula until just combined.
    5. Gently fold in the chopped apples, ensuring they are evenly distributed throughout the batter.
    6. Pour the batter into the prepared cake pan, spreading it evenly with a spatula.
    7. Bake in the preheated oven for about 50 minutes, or until the top is golden brown and a toothpick inserted in the center comes out clean.
    8. While the cake is baking, prepare the glaze by whisking the powdered sugar with milk until smooth and thickened slightly.
    9. Allow the cake to cool slightly in the pan for 10 minutes, then transfer it to a wire rack to cool completely.
    10. Once cooled, drizzle the glaze over the top of the cake, letting it soak in and create a shiny, inviting surface.
    11. If desired, decorate with additional fresh orange zest for a burst of color and aroma.
    12. Slice and serve the warm or at room temperature to enjoy the tender crumb, fruity apple chunks, and fragrant spice blend.

    Notes

    For extra flavor, add a pinch of nutmeg or a dash of orange liqueur to the batter. Store leftovers covered at room temperature for up to 2 days or refrigerated for longer freshness.
    This apple cake is my go-to comfort treat that fits perfectly into the busy autumn season. It’s simple to make yet impressive enough to serve to friends or family, especially when you want to share a little warmth.

    With each bite, you get a burst of fresh apple and a hint of citrus, making it a delightful mix of flavors. It’s a reminder that sometimes, the simplest ingredients — when combined thoughtfully — create the most memorable desserts.

  • Harvest Gold: The Unconventional Fall Frittata You Need to Try

    Harvest Gold: The Unconventional Fall Frittata You Need to Try

    As the leaves turn and a crisp chill fills the air, I find myself craving more than just pumpkin spice. I want something hearty yet bright, something that captures the essence of fall with every bite. That’s where this Autumn-inspired frittata comes into play, but with a twist that even seasoned cooks might overlook.

    This isn’t your average egg dish. Think caramelized butternut squash, a burst of sage, and a surprise crunch of toasted walnuts tucked inside fluffy eggs. It feels like autumn in every forkful, especially when baked to golden perfection under a gentle broil. I’ve always loved simple egg dishes, but this one elevates the humble frittata into a seasonal sensation.

    Autumn Butternut Squash & Sage Frittata

    This frittata features caramelized butternut squash, fresh sage, and toasted walnuts folded into fluffy eggs. It is baked until golden and set, with a slightly crispy top and tender interior that showcases seasonal flavors and textures.
    Prep Time 15 minutes
    Cook Time 20 minutes
    Total Time 35 minutes
    Servings: 4
    Course: Main Course
    Cuisine: American
    Calories: 210

    Ingredients
      

    • 1 small butternut squash, peeled and diced about 1 cup
    • 2 tablespoons olive oil
    • 1 teaspoon fresh sage, chopped
    • 1/2 cup toasted walnuts, chopped
    • 6 large eggs
    • 1/4 cup milk
    • 1/2 teaspoon salt
    • 1/4 teaspoon black pepper
    • 2 tablespoons grated Parmesan cheese

    Equipment

    • Skillet or ovenproof frying pan
    • Mixing bowl
    • Whisk
    • Measuring cups and spoons
    • Wooden spoon or spatula
    • Oven or broiler

    Method
     

    1. Preheat your oven or broiler to 400°F (200°C). Heat a skillet over medium heat and add a tablespoon of olive oil. Add the diced butternut squash and cook, stirring occasionally, until the edges are golden and caramelized, about 8-10 minutes.
      1 small butternut squash, peeled and diced, 2 tablespoons olive oil
    2. Stir in the chopped sage and cook for another minute until fragrant. Remove the squash mixture from the skillet and set aside to cool slightly.
      1 teaspoon fresh sage, chopped
    3. In a mixing bowl, whisk together the eggs, milk, salt, and black pepper until well combined and slightly frothy. Stir in the grated Parmesan cheese.
      6 large eggs, 1/4 cup milk, 1/2 teaspoon salt, 1/4 teaspoon black pepper, 2 tablespoons grated Parmesan cheese
    4. Add the cooled butternut squash mixture and toasted walnuts to the egg batter, gently folding them in with a spatula. This helps evenly distribute the fillings without deflating the eggs.
      1 small butternut squash, peeled and diced, 1/2 cup toasted walnuts, chopped
    5. Pour the mixture back into the skillet, spreading it out evenly. Cook over medium heat for about 3-4 minutes until the edges start to set and become slightly golden.
    6. Transfer the skillet to the oven or place it under the broiler, and bake for 12-15 minutes until the top is puffed, golden, and set in the center.
    7. Remove the skillet from the oven and allow the frittata to rest for a few minutes. The residual heat will finish setting the eggs and enhance flavor.
    8. Slice the frittata into wedges and serve warm, ideally garnished with additional sage or walnuts if desired.
    This fall, let this frittata be your guide through busy mornings and leisurely brunches alike. Its blend of sweet, savory, and crunchy textures makes it a versatile choice for any occasion. Plus, it reminds me that sometimes the simplest ingredients, paired thoughtfully, create the most memorable meals.

    Enjoy the cozy aroma of sage and roasted squash wafting through your kitchen—an instant reminder that autumn is here. Whether you make this for yourself or for guests, it’s bound to become a seasonal staple. And always, trust that a little extra cheese on top never hurts when aiming for that perfect finish.

    ,

  • The Art of the Gatorade Slushie: A Nostalgic Thirst-Quencher

    The Art of the Gatorade Slushie: A Nostalgic Thirst-Quencher

    Ever wondered how to turn hydration into a fun, nostalgic treat? Enter the Gatorade slushie, a frozen concoction that revives childhood memories while sneaking in some hydration boost. This recipe offers a playful spin on a classic sports drink, transforming it into a cool, icy delight that’s perfect for hot days.

    Crafting this slushie is more than just blending; it’s about capturing the essence of summer and relishing those sweet, tangy flavors that hit just right. Whether you’re cooling down after a workout or looking for a vibrant snack, this recipe is your ticket to icy refreshment with a twist. It’s surprisingly simple, yet endlessly customizable to match your favorite flavors.

    Gatorade Slushie

    A frozen beverage made by blending flavored sports drink with ice to create a tangy, icy treat. The mixture results in a vibrant, slushy consistency that combines refreshment with hydration, perfect for hot days or post-workout recovery.
    Prep Time 5 minutes
    Total Time 5 minutes
    Servings: 2
    Course: Main Course
    Cuisine: fusion
    Calories: 80

    Ingredients
      

    • 2 cups flavored sports drink (e.g., Gatorade) chilled for best results
    • 1 cup ice cubes adjust for desired consistency

    Equipment

    • Blender
    • Measuring cups and spoons

    Method
     

    1. Pour the chilled sports drink into the blender.
    2. Add the ice cubes to the blender with the sports drink.
    3. Secure the lid on the blender and blend on high for about 30-45 seconds, until the mixture is thick and slushy with a smooth, icy texture.
    4. Stop the blender and check the consistency; if it’s too thick, add a splash more sports drink and blend briefly again.
    5. Pour the slushie into glasses, using a spoon if needed to serve any remaining ice in the blender.
    6. Serve immediately with a straw or spoon for a cool, tangy treat.
    This Gatorade slushie is more than just a cool down; it’s a small celebration of flavor and nostalgia. With every sip, you’re transported back to sunny afternoons and carefree moments, now revamped into a modern, icy treat.

    Perfect for hot afternoons or game-day sensibilities, this recipe is a fun way to hydrate and indulge. In less than five minutes, you can whip up a batch that guarantees smiles and chilly refreshment for everyone around you.

  • Chill Out with a Whiskey Slushie on Lazy Summer Days

    Chill Out with a Whiskey Slushie on Lazy Summer Days

    Imagine sitting on a porch, the sun setting, with a glass of whiskey slushie in hand. There’s a mysterious coolness to each sip, dancing with hints of smoky bourbon and a whisper of sweet syrup. This isn’t just a drink; it’s a nostalgic escape wrapped in icy bliss.

    Whiskey slushies aren’t just for parties—they’re perfect for a quiet evening when you crave something spirited yet refreshingly simple. Their icy texture sparks joy, making each sip feel like a mini celebration. So, whether it’s a lazy weekend or a spontaneous get-together, this quirky frozen cocktail will steal the show.

    Whiskey Slushie

    A whiskey slushie is a frozen cocktail made by blending bourbon with sweet syrup and ice, resulting in a smooth, icy drink with a glossy, frosty appearance. The mixture is pureed until thick and slushy, offering a refreshing and spirited beverage with a semi-frozen, granular texture. Its deep amber color and frosty exterior make it visually appealing and perfect for casual sipping.
    Prep Time 10 minutes
    Total Time 10 minutes
    Servings: 2
    Course: Main Course
    Cuisine: American
    Calories: 250

    Ingredients
      

    • 1/2 cup bourbon whiskey preferably a smoky bourbon
    • 1 cup sweetened condensed milk for sweetness and creaminess
    • 3 cups ice cubes crushed or whole
    • 2 tbsp simple syrup adjust to taste for sweetness

    Equipment

    • Blender
    • Measuring cups and spoons

    Method
     

    1. Add the bourbon, sweetened condensed milk, simple syrup, and ice cubes to the blender.
    2. Secure the lid on the blender and blend on high until the mixture is smooth, thick, and slushy, with a frosty consistency comparable to wet snow.
    3. Stop the blender briefly and check the texture; if it’s too thick, add a splash of water or more simple syrup and blend briefly to incorporate.
    4. Pour the frozen mixture into chilled glasses, allowing it to mound slightly above the rim, showcasing its icy texture.
    5. If desired, garnish with a twist of lemon, a maraschino cherry, or a sprig of mint for visual appeal.
    6. Serve immediately with a straw or small spoon so you can scoop and enjoy the cool, boozy treat.

    Notes

    For an extra festive touch, rim the glasses with sugar or sea salt before pouring.
    Whiskey slushies are the ultimate summer-time indulgence that require minimal fuss but deliver maximum flavor. Creating an icy elixir that’s both boozy and refreshing makes any warm day feel like a celebration.

    Plus, their nostalgic charm makes them a perfect conversation starter at almost any gathering. Keep this recipe handy for when you need a cool, spirited pick-me-up—no matter the season, they are a refreshing twist on the classic cocktail.