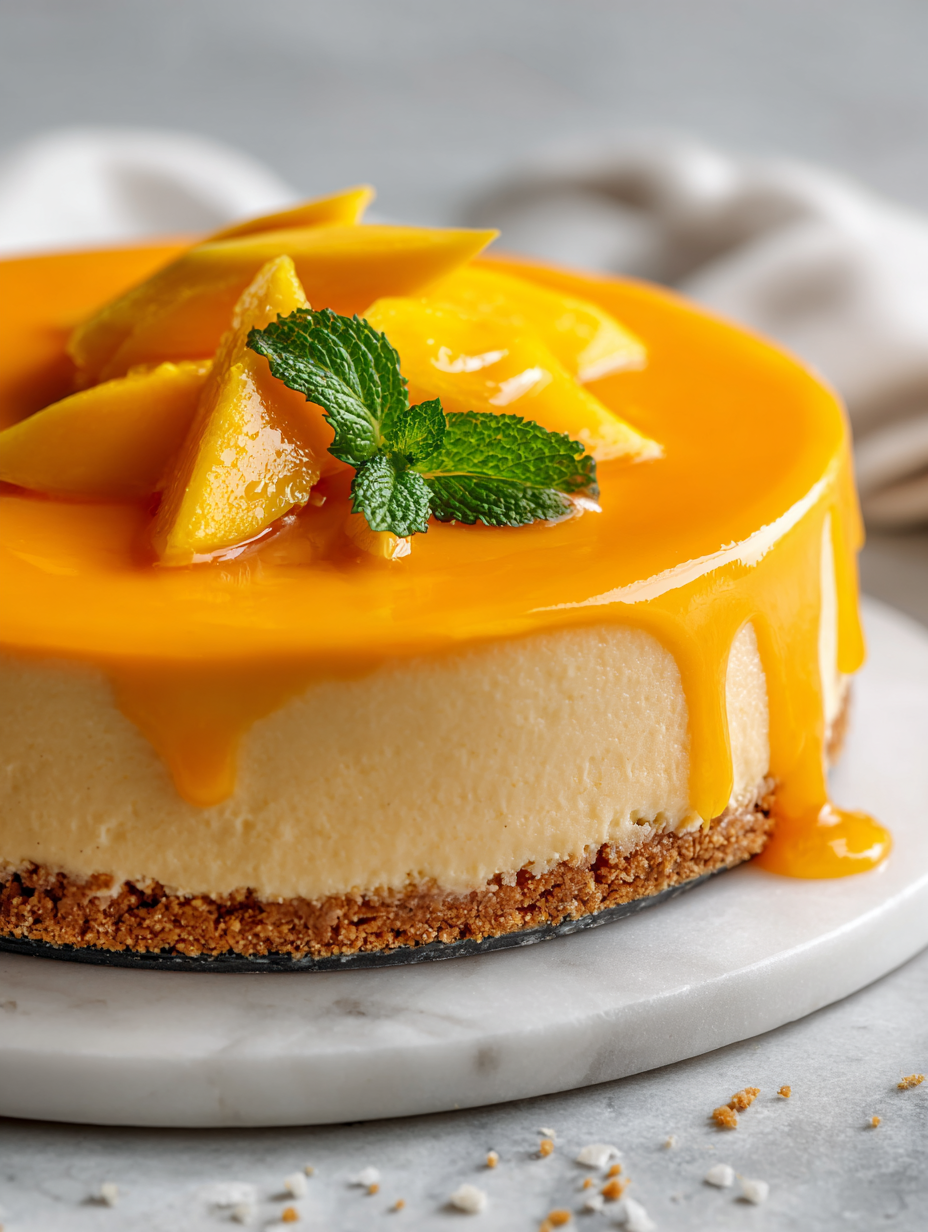
Author: GraceMorgan

  • Spooky Crunch: Halloween Bat Wings (Soy Sauce Chicken Wings)

    Spooky Crunch: Halloween Bat Wings (Soy Sauce Chicken Wings)

    Halloween is the perfect time to embrace the whimsy and spooky charm of the season. These Bat Wings, coated in a savory soy sauce glaze, turn ordinary chicken wings into tiny creatures from the night sky. The crispy skin combined with the umami-rich marinade creates a playful yet satisfying treat.

    What makes this recipe stand out is the unexpected aesthetic—miniature winged creatures that look just like black bats. They’re a delightful surprise for kids and adults alike, adding a touch of fun to any Halloween feast. Plus, the simple ingredients make it an easy yet impressive dish to serve on a busy holiday night.

    Halloween Bat Wing Chicken Wings

    These baked chicken wings are coated in a savory soy sauce glaze and shaped to resemble tiny black bats, creating a playful and spooky appetizer for Halloween. The crispy skin and flavorful marinade give the wings a satisfying texture with a rich umami taste, making them both fun and delicious to serve.
    Prep Time 15 minutes
    Cook Time 25 minutes
    Total Time 40 minutes
    Servings: 4
    Course: Main Course
    Cuisine: American
    Calories: 320

    Ingredients
      

    • 2 pounds chicken wings split into drumettes and flats
    • 1/4 cup soy sauce for marinade
    • 2 tablespoons honey adds slight sweetness to balance the soy
    • 1 teaspoon garlic powder
    • 1/2 teaspoon ground black pepper
    • Optional black food coloring or black tape for shaping wings into bats

    Equipment

    • Baking sheet
    • Mixing bowls

    Method
     

    1. Preheat your oven to 400°F (200°C). Line a baking sheet with parchment paper for easy cleanup.
    2. In a large mixing bowl, whisk together soy sauce, honey, garlic powder, and black pepper until well combined.
    3. Add the chicken wings to the marinade, tossing to coat each piece evenly. Cover and refrigerate for at least 20 minutes to infuse flavor.
    4. Arrange the marinated wings on the prepared baking sheet in a single layer, skin side up. Bake in the preheated oven for about 25 minutes, until the skin is crispy and golden.
    5. Once cooked, remove the wings from the oven and let them cool slightly. Use kitchen scissors or a small knife to cut each wing into two or three sections to resemble bats with outstretched wings.
    6. If you want to enhance the bat shape, use black food coloring or black tape to create wing outlines. Carefully attach or draw wings onto the wing sections to mimic tiny bats.
    7. Arrange the shaped wings on a serving platter, with some positioned to look like bats flying or hanging upside down for a spooky effect.
    8. Serve immediately for crispy, flavorful Halloween bat wings that are sure to impress your guests!

    Notes

    Using black food coloring or tape helps create the bat wing silhouette; however, the wings are tasty even without decoration.

    As the crispness of the wings gives way to a burst of salty, sweet, and savory flavors, these Bat Wings capture the spirit of Halloween perfectly. Their fun appearance makes them a conversation starter, but their unbeatable taste keeps everyone coming back for more.

    Whether you’re hosting a costume party or just looking to add some spooky flair to your dinner table, this recipe offers a playful twist on traditional chicken wings. Remember, sometimes the smallest details—like wings that resemble bats—can turn an ordinary meal into a memorable celebration of the season.

  • The Magic of Oreo Slushies: A Nostalgic Chilldown

    The Magic of Oreo Slushies: A Nostalgic Chilldown

    Imagine a frozen treat that captures the sweet chaos of childhood snack time. The Oreo slushie isn’t just a drink; it’s a trip down memory lane with every icy sip. It’s perfect for those scorching afternoons when your freezer calls out to break the routine.

    This recipe flips the classic cookie dunk into a frosty adventure, blending creamy milk with crushed Oreos into a textured, ice-cold delight. It’s a spontaneous dessert that’s as quick to make as it is to devour, perfect for impromptu gatherings or solo moments of indulgence.

    WHY I LOVE THIS RECIPE?

    • I love how it transforms a simple cookie into a vibrant, ice-cold treat.
    • The nostalgia kicks in with every spoonful, reminding me of summer days at grandma’s house.
    • It’s chaos in a glass — cookies crumbled, milk swirling, a perfect messy delight.
    • The quick blend makes it feel like a small victory in a busy day.
    • I take pride in turning basic ingredients into a show-stopping refreshment.

    AVOID MY DISASTER (You’re Welcome)

    • FORGOT to chill the milk; it turned the slushie into a watery mess. Freeze it first next time.
    • DUMPED too many Oreos; the mixture was too thick. Use a standard handful for perfect texture.
    • OVER‑TORCHED the whipped cream topping; it smelled burnt. Keep the heat low or skip it altogether.
    • REACHED for a regular blender; it couldn’t handle the ice. Use a high-speed blender for smooth crushing.

    QUICK FIXES THAT SAVE YOUR DAY

    • When the mixture is too thin, ADD more crushed Oreos or freeze briefly to firm up.
    • Splash in a little vanilla extract to enhance the flavor profile instantly.
    • Patch a runny texture by freezing the blender jar for 10 minutes, then blend briefly again.
    • Shield your toppings from melting by serving immediately or keeping in the freezer.
    • When the ice is too coarse, crack it with a quick pulse in your blender for finer uniformity.

    The Oreo slushie is more than just a dessert; it’s a quick escape from the ordinary. Its cool, gritty texture satisfies that craving for something sweet and crisp in the same bite. Now, with this recipe, you can whip one up anytime the mood strikes, no matter the season.

    In a world of endless dessert options, sometimes all you need is a simple, nostalgic twist. This treat celebrates the imperfect joy of combining what we love into something refreshingly different. It’s a reminder that good ingredients and a little bit of chaos can lead to moments worth savoring.

    Oreo Slushie

    The Oreo slushie is an icy frozen beverage made by blending crushed Oreo cookies with milk and ice until it reaches a textured, slushy consistency. It has a creamy, gritty texture with a visually appealing dark and white swirl from the cookies, resembling a frosty dessert in a glass.
    Prep Time 5 minutes
    Total Time 5 minutes
    Servings: 2
    Course: Main Course
    Cuisine: Any
    Calories: 200

    Ingredients
      

    • 1 1/2 cups milk chilled
    • 1 cup crushed Oreo cookies about 4-5 cookies crushed
    • 1 cup ice cubes preferably crushed or small pieces

    Equipment

    • High-speed blender
    • Measuring cups and spoons

    Method
     

    1. Add the chilled milk, crushed Oreos, and ice cubes to your high-speed blender.
    2. Secure the lid on the blender and blend on high for about 30-45 seconds until the mixture is smooth, thick, and icy with a gritty texture from the Oreos.
    3. Stop the blender and check the consistency—if it’s too thick, add a splash of milk, then blend briefly to loosen it up; if too thin, add a few more crushed Oreos and pulse a few seconds.
    4. Pour the slushie into chilled glasses, observing the swirling dark and creamy layers that form from the Oreos.
    5. Serve immediately with a straw or spoon, enjoying the cold, gritty texture and rich Oreo flavor.

    Next time you find yourself craving a cool treat, remember how easy it is to turn ordinary ingredients into something special. The Oreo slushie sings the perfect tune of childhood and summer, no fancy gadgets required.

    So gather your ingredients, embrace the chaos, and enjoy the messy, icy goodness. It’s a simple joy that never gets old, especially when the heat is on and you just want a moment of pure, frozen delight.

  • Rustic Pumpkin Muffins with a Twist of Cinnamon and Rum

    Rustic Pumpkin Muffins with a Twist of Cinnamon and Rum

    Autumn’s chill is in the air, and the scent of pumpkin baking suddenly feels like a warm hug. But this recipe isn’t just your average pumpkin muffin—it’s infused with a hint of dark rum that adds a surprising depth of flavor. The smell alone makes the kitchen feel cozier, almost like a patchwork quilt wrapped around your senses.

    These muffins are perfect for a lazy weekend breakfast or a brunch party that calls for something charming yet effortless. The batter is surprisingly forgiving, and the secret ingredient keeps them surprisingly moist and tender. As the pumpkin caramelizes in the oven, the aroma of cinnamon and spices swirls around, making it impossible to resist.

    Pumpkin Muffins with Dark Rum and Spices

    These pumpkin muffins are baked until golden and moist, with a tender crumb enhanced by warm spices and a splash of dark rum for added depth. The batter is mixed simply and baked in the oven, resulting in a fluffy, fragrant final product that’s perfect for cozy mornings or brunch gatherings.
    Prep Time 15 minutes
    Cook Time 20 minutes
    Total Time 35 minutes
    Servings: 12
    Course: Main Course
    Cuisine: American
    Calories: 240

    Ingredients
      

    • 1 3/4 cups all-purpose flour
    • 1 cup granulated sugar
    • 1/2 teaspoon salt
    • 1 teaspoon ground cinnamon
    • 1/2 teaspoon ground ginger
    • 1/4 teaspoon ground cloves
    • 1/2 cup vegetable oil
    • 2 large eggs
    • 1 cup canned pumpkin puree
    • 2 tablespoons dark rum

    Equipment

    • Mixing bowls
    • Whisk
    • Muffin tin
    • Paper or silicone muffin liners
    • Cooling rack

    Method
     

    1. Preheat your oven to 375°F (190°C) and line a muffin tin with paper liners or lightly grease it to prevent sticking.
    2. In a large mixing bowl, whisk together the flour, sugar, salt, cinnamon, ginger, and cloves until well combined. This helps evenly distribute the spices throughout the dry ingredients.
    3. In a separate bowl, whisk together the eggs, vegetable oil, pumpkin puree, and dark rum until smooth and slightly frothy. This creates a moist, cohesive wet mixture.
    4. Pour the wet mixture into the bowl with the dry ingredients, then gently fold them together with a spatula until just combined. Do not overmix; the batter should be slightly lumpy but uniform.
    5. Divide the batter evenly among the muffin cups, filling each about two-thirds full. The batter will be thick but scoopable.
    6. Bake in the preheated oven for 20-22 minutes, or until the muffins are golden on top and a toothpick inserted into the center comes out clean. You’ll start to smell warm spices and pumpkin as they bake.
    7. Remove the muffins from the oven and transfer them to a cooling rack. Let them cool for at least 10 minutes to avoid burning your mouth and to set their moist crumb.
    8. Once cooled slightly, grasp a muffin and gently squeeze to check their moist but tender texture. They should feel soft but hold their shape nicely.
    9. Serve warm or at room temperature, perhaps with a pat of butter or a dusting of powdered sugar. Enjoy the aromatic spices and rich pumpkin flavor with every bite.

    Notes

    For a more intense rum flavor, add an extra tablespoon of dark rum to the batter. Store leftovers in an airtight container at room temperature for up to 2 days or freeze for longer freshness.

    Crafting these muffins is a comforting ritual, especially as the seasons shift. The blend of pumpkin, warm spices, and a splash of rum creates a nostalgic yet sophisticated treat, perfect for any fall gathering. Once out of the oven, the tops are slightly crackly, with a moist crumb beneath that hints at childhood memories — just with a little extra flair.

    Whenever I bake these muffins, I find they bring a quiet joy that lingers long after the last crumb disappears. They’re a reminder that simple ingredients, paired with a bit of creativity, can turn into something memorable. In times when comfort feels most needed, this recipe serves up a slice of seasonal serenity.

  • Spooky Specter: The Halloween Spider Cheese Ball

    Spooky Specter: The Halloween Spider Cheese Ball

    Halloween is the one night when chaos and creativity collide in the kitchen. Instead of the usual candy or pumpkin-shaped treats, this year I decided to craft something really unique: a Halloween Spider Cheese Ball. Its creepy-crawly appearance is just the start; beneath the surface, it’s rich, creamy, and perfect for sharing.

    This cheese ball turns a simple appetizer into a conversation starter. It’s fun to make, and even more fun to watch guests’ eyes widen when they see it. Plus, it’s surprisingly easy — a few ingredients, a little artistry, and you’ve got a spooky centerpiece for your haunted feast.

    Halloween Spider Cheese Ball

    This Halloween-themed appetizer is a creamy cheese ball shaped like a spider, made by combining softened cream cheese and shredded cheese, then shaping and decorating it for a spooky effect. The final dish has a smooth, firm texture with crunchy decorations to resemble spider legs, creating a striking centerpiece for any Halloween party.
    Prep Time 20 minutes
    Total Time 20 minutes
    Servings: 8
    Course: Main Course
    Cuisine: Halloween
    Calories: 250

    Ingredients
      

    • 16 oz cream cheese, softened
    • 2 cups shredded cheddar cheese
    • 1 teaspoon garlic powder
    • 1/2 cup chopped black olives for eyes
    • 12 pieces uncooked spaghetti or pretzel sticks for spider legs
    • plastic wrap

    Equipment

    • Mixing bowl
    • Plastic wrap
    • Knife
    • Spoon

    Method
     

    1. In a mixing bowl, combine softened cream cheese, shredded cheddar, and garlic powder. Mix thoroughly with a spoon until smooth and well blended, creating a uniform cheese mixture.
    2. Scoop the cheese mixture onto a large piece of plastic wrap. Shape it into a rounded sphere, smoothing the surface with your hands.
    3. Tightly wrap the cheese sphere with the plastic wrap and refrigerate for at least 15 minutes to firm up.
    4. Remove the cheese ball from the fridge, then carefully unwrap it and place it on a serving plate. It should be firm yet soft enough to hold its shape.
    5. Decorate the top of the cheese ball with small chopped black olives to form eyes.
    6. Take the uncooked spaghetti or pretzel sticks and cut them in half if they are too long. These will serve as spider legs.
    7. Insert 8 spider legs evenly around the cheese ball, pressing them gently into the surface to secure.
    8. Arrange the completed Halloween Spider Cheese Ball on a platter, adjusting legs for a balanced, creepy look.
    9. Serve immediately or keep refrigerated until ready to enjoy. The cheese ball should have a smooth exterior with playful spider legs radiating outward, perfect for festive Halloween snacking.
    As the night progresses, this cheese ball will be a magnet for hungry fingers and giggles. Its irresistible aroma and gooey texture make it hard to resist grabbing just one more bite. It’s a playful addition that captures the spirit of Halloween—delightfully spooky and delectably satisfying.

    Enjoy the chaos and creativity that comes with this recipe. It’s a perfect way to add a dash of whimsy to your fall gathering. Amidst the pumpkins and costumes, this cheese ball brings both nostalgia and a splash of spooky fun.

  • Spooky Sweetness: The Charm of Halloween Ghost Brownies

    Spooky Sweetness: The Charm of Halloween Ghost Brownies

    Halloween is the perfect time to indulge in treats that are as playful as they are delicious. Ghost brownies offer a whimsical twist on classic chocolate, turning them into enchanting spectral figures that delight both the eyes and the palate. This recipe elevates ordinary baking into a fun, themed activity that captures the spirit of the season.

    What makes these ghost brownies stand out is their simple yet striking design. Silky melted chocolate, fluffy whipped toppings, and a touch of ghostly charm make them ideal for parties or quiet evening scares. Plus, they’re surprisingly easy to assemble, making them a stress-free centerpiece for your spooky buffet.

    WHY I LOVE THIS RECIPE?

    • Feeling nostalgic about childhood Halloweens, this recipe sparks joyful memories.
    • The chaos and mess are part of the fun—who doesn’t love playful kitchen disasters?
    • It’s a perfect blend of chocolate decadence and cute charm, satisfying sweet cravings without fuss.
    • The versatility invites creative variations—mini ghosts, floating spirits, or even haunted faces.

    AVOID MY DISASTER (You’re Welcome)

    • FORGOT to measure the whipped topping, resulting in flat ghosts—always pipe from a piping bag.
    • DUMPED melted chocolate too hot; it cracks or melts the decorations—wait until it’s just warm.
    • OVER‑TORCHED the marshmallow eyes; they turn brown and sticky—use a small torch for quick browning.
    • SKIPPED the parchment paper, so brownies tore off the pan—grease and a liner save your sanity.

    QUICK FIXES THAT SAVE YOUR DAY

    • If the chocolate is too thick to pipe, add a splash of coconut oil to loosen it.
    • When marshmallows stick, dampen your fingers and gently reposition—no tears, just fluff.
    • Splash some edible glitter for a shimmering ghostly glow—instant fog on the surface.
    • Patch a torn ghost with extra whipped topping—try to disguise the flaw with ghostly goo.
    • When eyes are too small, cut larger marshmallows and shape them with kitchen scissors—sly and quick.

    In this season of costume chaos and pumpkin spice everything, these ghost brownies bring a touch of sweet mischief to the table. They’re perfect for a quick craft with kids or a last-minute snack to haunt your fridge.

    They’re also surprisingly versatile, blending spooky fun with rich chocolate flavor that makes every bite memorable. As the evenings grow chillier, sharing these adorable treats feels even warmer. Plus, the process of decorating and creating ghosts adds an extra layer of seasonal joy that’s hard to beat.

    Ghost Brownies

    Ghost brownies are a chocolate dessert featuring fudgy brownie bases topped with whipped topping shaped into ghost figures. Decorated with melted chocolate and marshmallow eyes, they have a rich, dense texture with a playful, spooky appearance. The final presentation combines smooth, glossy surfaces with whimsical ghostly shapes for Halloween-themed treats.
    Prep Time 20 minutes
    Cook Time 30 minutes
    Total Time 50 minutes
    Servings: 12
    Course: Main Course
    Cuisine: Halloween
    Calories: 150

    Ingredients
      

    • 1 box Brownie mix preferably doubled for thickness
    • 1/2 cup vegetable oil as per brownie mix instructions
    • 3 large eggs for brownie batter
    • 2 cups whipped topping thawed, for ghost shapes
    • 100 g dark chocolate melting, for ghost eyes and decoration
    • 20 small marshmallows for eyes and browning
    • optional edible glitter for shimmering ghosts

    Equipment

    • Mixing bowls
    • Oven
    • Parchment paper
    • Baking pan
    • Piping bag or plastic sandwich bag
    • Small torch or kitchen lighter

    Method
     

    1. Preheat your oven to 350°F (175°C). Line a baking pan with parchment paper and prepare the brownie batter according to your mix’s instructions, mixing in the eggs and oil until smooth and glossy.
    2. Pour the batter into the prepared pan, spreading it evenly with a spatula to ensure a smooth surface. Bake for about 25-30 minutes, until the top is set and a toothpick inserted in the center comes out with moist crumbs.
    3. Once baked, remove the pan from the oven and let the brownies cool completely on a wire rack. This helps the texture settle and makes slicing easier.
    4. Carefully lift the cooled brownies out of the pan and slice into individual squares. Transfer the pieces onto a serving tray or plate.
    5. Using a piping bag or plastic sandwich bag with the corner snipped, pipe generous dollops of whipped topping onto each brownie to create ghostly shapes, making sure to form rounded heads and draping bodies.
    6. Melt the dark chocolate gently in a microwave or over a double boiler until smooth and glossy. Carefully dip small marshmallows into the melted chocolate to make cute, shiny eyes, then place them on the whipped topping ghosts.
    7. Using a small torch or kitchen lighter, briefly brown the marshmallow eyes until golden and slightly sticky, or leave them plain if preferred.
    8. If desired, sprinkle edible glitter over the ghosts for a shimmering, ghostly glow, enhancing their spooky appearance.
    9. Arrange the ghost brownies on a serving platter and add extra decorative touches if desired, like tiny marshmallow noses or more whipped topping for a full spectral effect.
    10. Serve your spooky ghost brownies at your Halloween party or enjoy them as a fun, festive treat for the whole family!

    As the final ghostly figures take shape on the tray, the air fills with a chocolaty aroma and a hint of vanilla. It’s these little moments of creative chaos that make Halloween baking so memorable. These ghost brownies aren’t just dessert; they’re a way to celebrate the spooky spirit with a homemade touch.

    Enjoy every gooey, whimsical bite, knowing you’ve added a dash of fun to your Halloween traditions. Whether shared with friends or kept as a spooky secret, these treats will surely become a seasonal staple. And who knows—next year, maybe your ghosts will be even more ghostly.

  • The Secret Spark: Why Sprite Slushies Are the Summer Surge You Didn’t See Coming

    The Secret Spark: Why Sprite Slushies Are the Summer Surge You Didn’t See Coming

    As temperatures soar, most of us reach for plain ice or sugary popsicles. But what if I told you that a seemingly simple Sprite can become a life-changing summer treat? I recently stumbled upon this idea when hunting for a quick chill in the dead of a heatwave. Now, it’s become my go-to, transforming ordinary days into icy adventures.

    This isn’t just about quenching thirst; it’s about capturing that fizzy, lemon-lime zing in every sip. The method is so straightforward that anyone can master it with a few household staples. It’s a refreshing twist that carries nostalgia and chaos, all in one frosty glass.

    Fizzy Lemon-Lime Popsicles

    These fizzy lemon-lime popsicles are made by combining lemon-lime soda with fruit juice and sweetener, then freezing the mixture until solid. The final treats have a smooth, icy texture with a hint of carbonation and tart citrus flavor, presenting as colorful, refreshing frozen bars.
    Prep Time 10 minutes
    Cook Time 4 hours
    Total Time 4 hours 10 minutes
    Servings: 8
    Course: Main Course
    Cuisine: fusion
    Calories: 100

    Ingredients
      

    • 2 cups lemon-lime soda
    • 1 cup fruit juice (e.g., lemon or lime) freshly squeezed for best flavor
    • 1/4 cup sugar or honey adjust to taste

    Equipment

    • Measuring cup
    • Popsicle molds
    • Pouring pitcher
    • Freezer

    Method
     

    1. Pour the lemon-lime soda into a measuring cup and stir in the fruit juice and sweetener until well combined.
    2. Mix gently to preserve some of the fizz, ensuring the sugar dissolves completely.
    3. Carefully pour the mixture into popsicle molds, filling each cavity nearly to the top.
    4. Insert popsicle sticks into each mold, making sure they stand upright in the center.
    5. Place the molds in the freezer and let them set for at least 4 hours or until completely frozen.
    6. Once frozen, run warm water briefly over the outside of each mold to loosen the popsicles.
    7. Gently pull out the popsicles from the molds and enjoy immediately, revealing icy, bubbling, citrus-flavored treats.

    Notes

    For extra fizz, re-insert popsicles into molds and briefly re-freeze if the mixture starts to lose carbonation during handling.

    Next time the heat hits hard, forget heavy desserts or boring drinks. The Sprite slushie is a little burst of joy that needs no fancy equipment or ingredients. Just freeze, blend, and sip your way through summer’s finest moments.

    Sometimes, the simplest solutions are the best. This icy sprint from pantry to mouth is proof that a little creativity can make the hottest days cooler and more playful. Here’s to many more chilled adventures in the fridge aisle—fizz guaranteed every time.

  • Harvest Hues: The Cozy Charm of Roasted Pumpkin Soup

    Harvest Hues: The Cozy Charm of Roasted Pumpkin Soup

    As the leaves turn and a brisk air settles in, I find myself craving something warm and comforting. But this year, I wanted to elevate my seasonal soup game with a little twist—something that whispers autumn in every spoonful.

    Enter the roasted pumpkin soup, but with a secret ingredient: a splash of apple cider to enhance that natural sweetness. The aroma of roasting pumpkin mixed with cinnamon and nutmeg fills my kitchen, sparking instant nostalgia for cozy fall afternoons.

    WHY I LOVE THIS RECIPE?

    • The simple joy of transforming a humble pumpkin into a velvety bowl of warmth.
    • The balancing act of smoky, sweet, and spiced flavors up my cooking game.
    • A versatile fall staple that makes comforting leftovers even better.
    • The way it invites cozy conversations over a steaming bowl.

    AVOID MY DISASTER (You’re Welcome)

    • FORGOT to stir while roasting—burnt aroma! Quickly scrape and add broth to rescue the texture.
    • DUMPED in too much cinnamon—overwhelming! Dilute with more stock and a squeeze of lemon.
    • OVER-TORCHED the pumpkin—dry and bitter! Cover with foil and cook on lower heat next time.
    • FAILED to peel fully—lumpy soup! Use a sharp peeler to prep pumpkins next round.

    QUICK FIXES THAT SAVE YOUR DAY

    • When soup is too thick—splash in warm water or stock to loosen up.
    • Patch flavor with a dash more salt or a pinch of sugar to balance sweetness.
    • Shield burnt spots with more broth and a splash of cream.
    • When pumpkin isn’t tender—deepen roasting or extend cooking time by 10 minutes.
    • When it smells dull—crack open a fresh cinnamon stick or add a dash of ginger.

    Roasted Pumpkin Soup with Apple Cider

    This roasted pumpkin soup combines the natural sweetness of pumpkin with warm spices and a splash of apple cider, creating a velvety, smooth texture with vibrant orange color. The roasting process enhances the pumpkin’s flavor, while blending results in a creamy, comforting bowl perfect for fall.
    Prep Time 15 minutes
    Cook Time 45 minutes
    Total Time 1 hour
    Servings: 4
    Course: Main Course
    Cuisine: American
    Calories: 180

    Ingredients
      

    • 1 medium pumpkin about 2 pounds, halved and seeded
    • 2 tablespoons olive oil for roasting
    • 1 teaspoon cinnamon ground
    • 1/2 teaspoon nutmeg ground
    • 1 cup apple cider for flavoring
    • 1 cup vegetable broth or chicken broth
    • 1 cup heavy cream optional, for richness
    • to taste salt
    • to taste black pepper

    Equipment

    • Baking sheet
    • Blender or Immersion Blender
    • Large pot

    Method
     

    1. Preheat the oven to 400°F (200°C). Place the halved pumpkin on a baking sheet, brush with olive oil, and sprinkle with cinnamon and nutmeg. Roast for about 35-40 minutes until the pumpkin flesh is tender and starts to caramelize slightly.
    2. Let the roasted pumpkin cool slightly, then peel away the skin and scoop the soft flesh into a blender or large mixing bowl.
    3. Add the apple cider and vegetable broth to the pumpkin, then blend until smooth and velvety with no lumps.
    4. Pour the blended mixture into a large pot and bring it to a gentle simmer over medium heat. Stir occasionally, allowing flavors to meld for about 10 minutes.
    5. Stir in the heavy cream for added richness, and season with salt and black pepper to taste. Adjust seasonings as desired.
    6. Once heated through and well combined, ladle the soup into bowls and serve hot, garnished with a swirl of cream or a sprinkle of cinnamon if desired.

    Notes

    For a thinner soup, add more broth or apple cider. To enhance spiciness, include a pinch of ginger or a dash of cayenne pepper for heat.

    This roasted pumpkin soup captures the essence of fall—cozy, rich, and inviting. The slight caramelized edge from roasting gives it depth, making each spoonful a little celebration of the season.

    Whether served as a comforting starter or a filling main, it’s a reminder that sometimes the simplest ingredients, prepared well, create the most memorable meals. As the leaves drift down outside, this warm bowl becomes a perfect pause to savor the moment.

  • Beware the Sweet Chaos: Halloween Poison Toffee Apples

    Beware the Sweet Chaos: Halloween Poison Toffee Apples

    Every October, I find myself irresistibly drawn to the eerie glow of Halloween decorations and the mischievous spirit of the season. This year, I decided to take a twisted turn by creating Poison Toffee Apples—an unsettling twist on a classic treat that combines nostalgia with a dash of chaos. The aroma of caramel mingling with a hint of danger fills the air as I prepare these creepy confections.

    These apples aren’t just for the sweet tooth—they’re a conversation starter. The glossy, crimson coating looks innocent until you realize it’s tainted with a hint of edible evil. Perfect for haunted parties or those nights when you feel like embracing the spooky and the strange, they promise fun with a tiny burst of mischief.

    Poison Toffee Apples

    Poison Toffee Apples are a creepy twist on the classic caramel apple, featuring glossy, red coating with a slightly eerie appearance. The recipe involves boiling sugar to create a glossy caramel layer that is poured over fresh apples, resulting in a crisp shell with a chewy interior. The final look is shiny, vibrant red with a tempting yet sinister presentation.
    Prep Time 15 minutes
    Cook Time 10 minutes
    Total Time 25 minutes
    Servings: 6
    Course: Main Course
    Cuisine: American
    Calories: 250

    Ingredients
      

    • 6 large fresh apples (preferably tart varieties like Granny Smith) washed and dried thoroughly
    • 2 cups granulated sugar for making caramel coating
    • 0.5 teaspoon cream of tartar helps prevent crystallization
    • 0.25 cup water to dissolve sugar
    • 1 pint red food coloring for a sinister, poison-like hue
    • 1 cup powdered sugar for dusting or finishing

    Equipment

    • Candy thermometer
    • Heavy-bottomed saucepan
    • Wooden spoon
    • Baking sheet
    • Parchment paper
    • Skewers or apple sticks

    Method
     

    1. Insert skewers or apple sticks into the stem end of each apple, pressing them firmly but gently so they stay upright.
    2. Line a baking sheet with parchment paper and set aside to prepare for cooling the coated apples.
    3. Combine sugar, water, and cream of tartar in a heavy-bottomed saucepan and attach a candy thermometer to the side.
    4. Heat over medium heat without stirring until the sugar syrup begins to boil and reaches 300°F (hard crack stage), watching for a deep amber color and a bubbling, syrupy texture.
    5. Remove the saucepan from heat and carefully stir in red food coloring for a sinister, blood-red hue, then swirl gently to mix evenly.
    6. Dip each apple into the hot caramel, tilting and rotating to coat completely with a glossy, crimson shell. Let the excess drip off before placing the apple on the prepared parchment.
    7. Allow the apples to cool and the coating to harden at room temperature for about 15-20 minutes, until the shell is crisp and shiny.
    8. Optionally, dust the finished apples with powdered sugar for a ghostly, sickly appearance before serving.
    9. Once set, serve these creepy Poison Toffee Apples as a spooky treat for Halloween parties or haunted gatherings.

    As the night winds down, the lingering scent of caramel and a touch of smoky sugar hang in the air. These Poison Toffee Apples offer a delightful blend of eeriness and comfort, a spooky treat that’s as fun to make as it is to eat. They’re sure to turn any Halloween gathering into a memorable, mischievous adventure.

    So, gather your ingredients and get ready to craft a batch of these eerie delights. They capture the playful spirit of Halloween while adding a pinch of delicious chaos. Nothing beats the satisfaction of showing up with something wild, sweet, and just a little bit wicked.

  • Hauntingly Delicious: Bloody Spaghetti and Sausage Fingers for Halloween

    Hauntingly Delicious: Bloody Spaghetti and Sausage Fingers for Halloween

    Halloween is the one time of year when chaos in the kitchen means fun, not mess. This recipe transforms a simple spaghetti dish into a gory masterpiece that feels like it belongs in a movie scene. The sausage fingers, with their eerie nail beds and blood-red sauce, are both a terrifying and tasty addition.

    Discover how this spooky yet savory meal can turn your table into a haunted house of flavors. Perfect for kids’ parties or a ghostly dinner with friends craving a little culinary mischief.

    This Bloody Spaghetti with Sausage Fingers isn’t just a meal, it’s a storytelling experience on a plate. The visual shock blends seamlessly with the rich, comforting flavors, making it a standout in any Halloween feast.

    As the night winds down, the aroma of garlic, sizzling sausages, and spicy tomato sauce will linger, creating memories as textured as the spaghetti itself. It’s a dish that’s sure to spark conversations and maybe even a few screams of delight.

  • The Cold Buzz: Transforming Coke into a Summer Slushie

    The Cold Buzz: Transforming Coke into a Summer Slushie

    Imagine capturing the sharp, sweet aroma of freshly opened Coke, then freezing that magic into a slushie that crackles with every sip. This isn’t your usual icy drink—it’s a nostalgic explosion wrapped in a frosty shell, perfect for unexpected heat waves or when you crave a sweet escape. The beauty lies in its simplicity and a dash of chaos in the freezer.

    Recently, I stumbled upon a forgotten can lingering in my fridge, and a wild idea struck: what if I froze it? What followed was a messy, flavorful adventure, a reminder that sometimes, the best treats come from spontaneous experiments. This recipe invites a little rebellion, blending childhood joy with a dash of culinary daring.

    Frozen Coke Slushie

    This frozen Coke slushie is made by pouring Coke into a container and freezing it until solid. Once frozen, it’s scraped and stirred to create a crunchy, icy texture with a sparkly, sweet flavor profile. The result is a visually appealing, frosty treat with a chewy, slush-like consistency.
    Prep Time 5 minutes
    Cook Time 4 hours
    Total Time 4 hours 5 minutes
    Servings: 2
    Course: Main Course
    Cuisine: American
    Calories: 150

    Ingredients
      

    • 1 can Coke chilled

    Equipment

    • Freezer
    • Mixing Spoon
    • Fork or Spoon for scraping
    • Serving glasses

    Method
     

    1. Pour the cold Coke into a shallow container or loaf pan, spreading it out evenly.
    2. Place the container in the freezer and leave it untouched for about 4 hours, or until the Coke is completely frozen solid.
    3. Remove the frozen Coke from the freezer and let it sit at room temperature for a few minutes to soften slightly, making it easier to scrape.
    4. Use a fork or spoon to scrape the frozen Coke into small, uneven chunks, creating a slushy, crunchy texture.
    5. Transfer the scraped pieces into serving glasses, and give them a quick stir to loosen and enhance the icy consistency.
    6. Serve immediately with a straw or spoon, enjoying the sparkling, frosty treat that crackles with each bite.

    Notes

    For a smoother texture, you can blend the chunks briefly after scraping. Feel free to add a splash of lemon or lime juice for extra tang.

    There’s something satisfying about turning a common soda into a crunchy, refreshing treat. It’s perfect for backyard gatherings or a solo escape on a hot afternoon. Each bite delivers that unexpected tang, the satisfying crunch, and a burst of familiar sweetness.

    In a season overflowing with options, this Coke slushie stands out as a playful, easy invention that brightens moments. It’s a reminder that simple ingredients, when handled with a little chaos and curiosity, create delightful surprises. Keep the freezer ready for the next spontaneous snack craving—trust me, you’ll thank yourself.