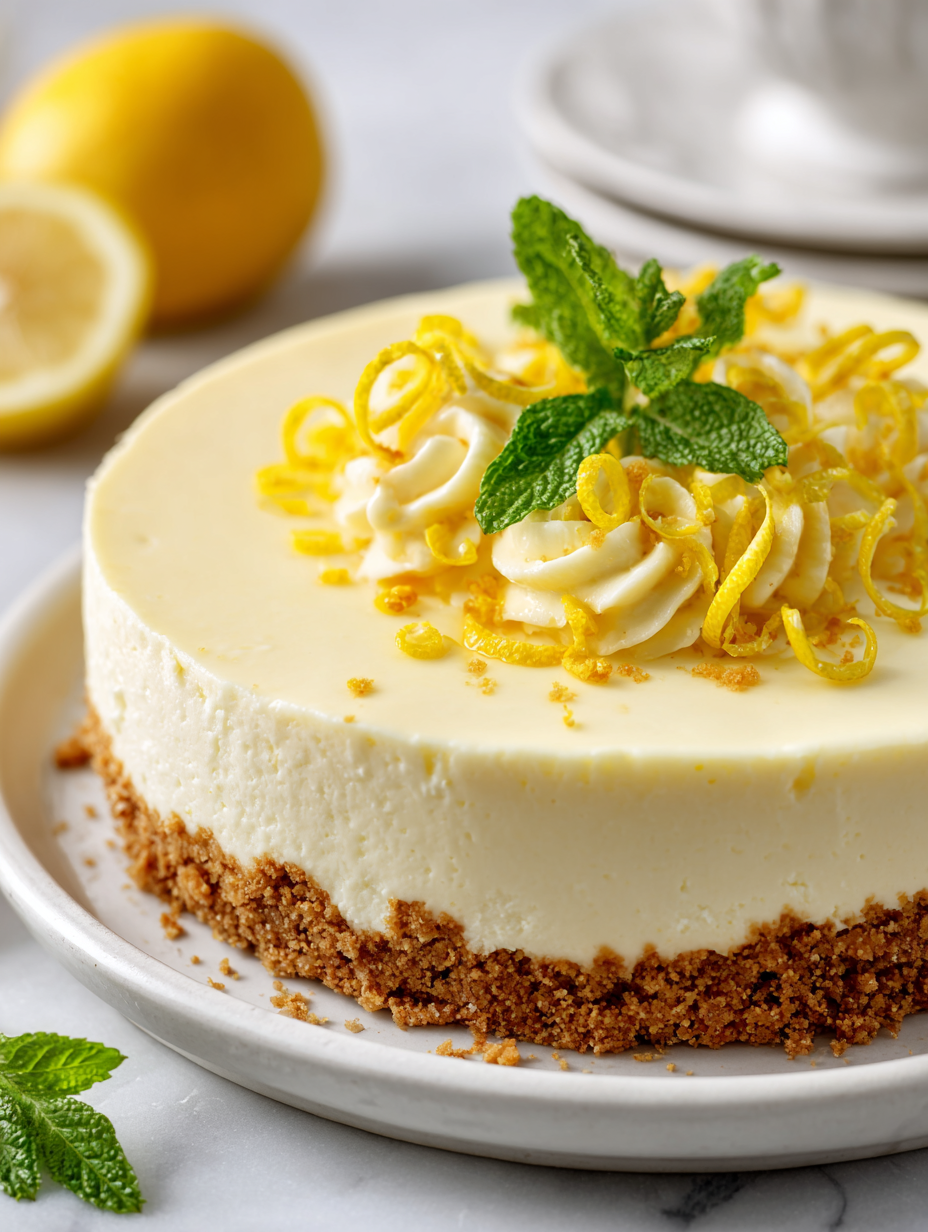
Author: GraceMorgan

  • Spooky Bat-Shaped Guacamole & Chips: A Halloween Getaway

    Spooky Bat-Shaped Guacamole & Chips: A Halloween Getaway

    Halloween is the perfect excuse to unleash your creative side in the kitchen. This year, I decided to craft a playful yet slightly eerie appetizer: bat-shaped tortilla chips paired with luscious, green guacamole. It’s surprising how a simple idea, like shaping chips as bats, can turn an ordinary snack into the star of your spooky gathering.

    As I started cutting out bat shapes from tortillas, the smell of warm corn tortillas filled my kitchen. The vibrant green of the guacamole, speckled with chili and cilantro, contrasts beautifully with the dark silhouettes of the chips. It’s a fun project that gets everyone involved, and the best part — it tastes as good as it looks.

    Bat-Shaped Tortilla Chips with Green Guacamole

    This dish features tortillas cut into bat shapes and baked until crispy, served alongside a creamy, vibrant green guacamole. The chips’ dark silhouettes contrast with the bright, chunky avocado mixture, creating a fun and visually appealing appetizer.
    Prep Time 15 minutes
    Cook Time 10 minutes
    Total Time 25 minutes
    Servings: 4
    Course: Main Course
    Cuisine: American
    Calories: 180

    Ingredients
      

    • 8 large corn tortillas fresh or slightly stale
    • 2 ripe avocados mashed for guacamole
    • 1 tablespoon lime juice freshly squeezed
    • 2 cloves garlic minced
    • 1 small red chili finely chopped, optional for spice
    • 2 tablespoons cilantro chopped
    • to taste salt for seasoning
    • 1 pinch black pepper optional

    Equipment

    • Baking sheet
    • Sharp knife
    • Small cookie cutter or template for bat shape
    • Mixing bowl
    • Fork or potato masher

    Method
     

    1. Preheat your oven to 375°F (190°C). Line a baking sheet with parchment paper for easy cleanup.
    2. Using a sharp knife and a bat-shaped cookie cutter or template, carefully cut out bat shapes from the tortillas. Collect the scraps and reroll if desired for additional chips.
    3. Arrange the bat-shaped tortilla pieces on the prepared baking sheet in a single layer. Bake for about 8-10 minutes until golden and crispy, keeping an eye to prevent burning.
    4. While the chips bake, prepare the guacamole: in a mixing bowl, mash the peeled avocados with a fork or potato masher until mostly smooth but still chunky.
    5. Add lime juice, minced garlic, chopped chili, cilantro, salt, and pepper to the mashed avocados. Mix well until combined and vibrant green in color.
    6. Remove the baked tortilla chips from the oven and let them cool slightly to crisp up further.
    7. Arrange the bat-shaped chips on a serving platter around a bowl of the freshly made green guacamole, or serve the guacamole in a bowl on the side.

    Notes

    For extra fun, use black food coloring in the guacamole or decorate the chips with edible eyes for a spooky effect.
    Creating this Halloween-themed snack adds a dash of chaos and charm to the holiday. Kids and adults alike will appreciate the whimsical touch and the tasty refreshment at your spooky bash.

    Plus, it’s a flexible recipe — tweak the spices, or try different shapes for different occasions. This isn’t just about carving pumpkins; it’s about making every moment delicious and memorable, one creepy chip at a time.

  • Spooky-Sweet Halloween Ghost Veggie Platter

    Spooky-Sweet Halloween Ghost Veggie Platter

    Halloween parties are the perfect excuse to embrace the whimsical chaos of the season. This spooky ghost veggie platter transforms ordinary vegetables into adorable, ghostly figures that kids and adults will adore. Plus, it’s an easy way to sneak health into your ghoul gang’s snack table while looking festive.

    Crafting this platter feels like a mini magic trick — suddenly, veggies become friendly spirits. The best part? It works with whatever seasonal produce you have on hand, making it an adaptable and fun project. When the clock’s ticking down to the party, this is your no-stress, crowd-pleaser centerpiece.

    Spooky Ghost Veggie Platter

    This ghost veggie platter features an assortment of fresh vegetables transformed into adorable ghost shapes using cheese and olives. The vegetables serve as the canvas, while the cheese and olives create the ghostly faces, resulting in a fun, eye-catching display with a crunchy and creamy texture. It’s an easy, healthy snack centerpiece perfect for Halloween gatherings.
    Prep Time 20 minutes
    Total Time 20 minutes
    Servings: 8
    Course: Main Course
    Cuisine: Party Snacks
    Calories: 50

    Ingredients
      

    • 1 bunch celery stalks washed and trimmed
    • 2 cups broccoli florets fresh, washed
    • 2 cups carrot sticks peeled and cut into lengths
    • 1 cup sliced cheese like cheddar or mozzarella, cut into small rectangles
    • 20 pitted black olives black olives for ghost eyes and mouths

    Equipment

    • Knife
    • Cutting board
    • Serving platter

    Method
     

    1. Arrange the celery stalks, broccoli florets, and carrot sticks on a serving platter to resemble forest-like backgrounds for your ghosts, creating different heights and shapes.
    2. Cut the cheese into small rectangular shapes, about the size of a ghost’s body, and place them on top of the vegetables to serve as the ghost figures.
    3. Use black olives to create ghost eyes by slicing them in half and placing each half on the cheese pieces, or use whole olives for larger eyes.
    4. Create ghost mouths by slicing some olives into small rings or chunks and positioning them beneath the eyes for a spooky expression.
    5. Repeat the process across the platter, arranging cheese, olives, and vegetables to resemble a whimsical ghost scene.
    6. Optional: Decorate the platter further with additional veggies or edible embellishments for extra spooky charm.

    Notes

    Feel free to use whatever seasonal vegetables you prefer. This dish is highly customizable for different colors and shapes.

    As the party winds down, the ghostly veggies leave everyone smiling, and maybe even a few asking for the recipe. It’s a charming way to celebrate the season without fuss or frills, just fresh ingredients and a sprinkle of imagination. Plus, it’s the kind of dish that sparks a few giggles and plenty of compliments.

    This platter isn’t just for Halloween — it’s a reminder that food can be playful and beautiful at the same time. Keep it simple, keep it fun, and let your creativity run wild with the ingredients. Happy haunting — and snacking!

  • Autumn’s Secret: The Pumpkin Cheesecake You Need to Try

    Autumn’s Secret: The Pumpkin Cheesecake You Need to Try

    In the heart of fall, I stumbled upon a pumpkin cheesecake recipe that felt like discovering a hidden gem in my pantry. The rich aroma of cinnamon and nutmeg mingling with roasted pumpkin made my kitchen awaken with nostalgia. Each slice promises a velvety texture combined with the cozy flavors that define this season.

    This cheesecake isn’t just a dessert; it’s a story of harvest festivals and chilly evenings wrapped up in a creamy, spiced package. I’ve added my own twist to make it a perfect centerpiece for upcoming family gatherings or quiet Sunday afternoons. The best part? It’s surprisingly simple to make, even during those busy fall weekends.

    **WHY I LOVE THIS RECIPE?**

    • I adore the bold spice notes that instantly evoke autumn memories.
    • The creamy consistency makes every bite smooth and satisfying.
    • The pumpkin adds a rustic, earthy sweetness that feels just right.
    • It’s a beautiful dessert that looks as festive as it tastes.

    **AVOID MY DISASTER (You’re Welcome)**

    • FORGOT to refrigerate the cheesecake overnight – it cracked. Chilled, smooth as silk next day.
    • DUMPED in too much pumpkin – it turned bitter. Balanced with cream, it became perfect.
    • OVER-TORECHED the crust – it was soggy. Used parchment, kept it crisp.
    • UNDERESTIMATED baking time – center wobble. Patience paid off for a firm finish.

    **QUICK FIXES THAT SAVE YOUR DAY**

    • When cracking, gently run a hot towel over the surface and refrigerate again.
    • Splash some vanilla or cinnamon on top to hide minor imperfections.
    • Patch by adding a bit of cream cheese for extra gloss and smoothness.
    • Shield with foil if the edges brown too quickly during baking.
    • If the crust gets soggy, sprinkle with toasted pecans or granulated sugar for crunch.

    Pumpkin Cheesecake

    This pumpkin cheesecake combines a creamy filling with warm fall spices and a crisp graham cracker crust. It is baked until set and has a smooth, velvety texture with a slightly browned top. The dessert features vibrant orange color and a rich, spiced aroma that embodies autumn flavors.
    Prep Time 20 minutes
    Cook Time 1 hour
    Total Time 1 hour 20 minutes
    Servings: 8
    Course: Main Course
    Cuisine: American
    Calories: 380

    Ingredients
      

    • 1 ½ cups graham cracker crumbs for crust
    • ¼ cup granulated sugar for crust
    • 6 tablespoons unsalted butter melted, for crust
    • 3 packages cream cheese softened
    • 1 cup canned pumpkin puree unsweetened
    • 1 cup granulated sugar for filling
    • 3 large eggs at room temperature
    • 1 ½ teaspoons ground cinnamon
    • ½ teaspoon ground nutmeg
    • 1 teaspoon vanilla extract
    • 2 tablespoons all-purpose flour optional, for stability

    Equipment

    • 9-inch springform pan
    • Mixing bowls
    • electric mixer or whisk
    • Spatula
    • Baking sheet
    • Measuring cups and spoons
    • Oven

    Method
     

    1. Start by mixing graham cracker crumbs with sugar and melted butter until the mixture resembles wet sand. Press this mixture into the bottom of a greased springform pan to form an even crust. Bake for 10 minutes at 350°F, then let it cool slightly.
    2. In a large mixing bowl, beat the softened cream cheese with an electric mixer until smooth and fluffy, about 2-3 minutes. Add the pumpkin puree, sugar, cinnamon, nutmeg, vanilla, and flour (if using), mixing well after each addition.
    3. Add the eggs one at a time, beating at low speed just until each egg is incorporated. The batter should be smooth and slightly thickened, with no streaks.
    4. Pour the filling over the cooled crust, smoothing the top with a spatula for an even surface. Gently tap the pan on the counter to eliminate air bubbles.
    5. Bake the cheesecake in a preheated oven at 350°F for 55-60 minutes, or until the edges are lightly browned and the center is just set but still slightly wobbly. The smell of warm spices will fill your kitchen.
    6. Turn off the oven and leave the cheesecake inside with the door slightly ajar for 1 hour to prevent cracking. Then transfer it to a wire rack and allow it to cool completely at room temperature.
    7. Once cooled, refrigerate the cheesecake for at least 4 hours or preferably overnight to set firmly. This will give the best texture and flavor.
    8. Slice and serve chilled, perhaps garnished with a sprinkle of cinnamon or a dollop of whipped cream for extra indulgence.

    Notes

    For a more festive presentation, top with toasted pecans or caramel drizzle. To prevent cracking, avoid over-mixing the batter and bake until just set. Using room-temperature ingredients helps achieve a smooth, creamy texture.
    This pumpkin cheesecake captures the spirit of fall in every bite. The combination of spiced pumpkin and creamy filling makes it a timeless treat for chilly evenings. It’s perfect for making memories, whether that’s through gathering friends or simply savoring quiet moments alone.

  • A Cozy Twist: Pumpkin Spice Pancakes for the Fall Connoisseur

    A Cozy Twist: Pumpkin Spice Pancakes for the Fall Connoisseur

    Imagine waking up to the fragrant aroma of cinnamon, nutmeg, and sweet pumpkin wafting through your kitchen. These pumpkin spice pancakes aren’t just breakfast—they’re a sensory journey that captures the essence of fall in every bite. Perfect for when you want comfort that feels like a warm sweater and a flickering fire.

    Using simple pantry staples, this recipe is a celebration of cozy mornings. The batter is silky and fragrant, surrounded by a crispy edge and fluffy center. It’s a sweet escape during busy weekdays or a special treat on leisurely weekends.

    Pumpkin Spice Pancakes

    Pumpkin spice pancakes are fluffy, golden pancakes infused with fragrant warm spices and pure pumpkin puree. The batter is mixed until smooth, then cooked on a hot griddle or skillet until crispy edges form and the centers remain tender, creating a visually appealing and cozy breakfast treat.
    Prep Time 10 minutes
    Cook Time 15 minutes
    Total Time 25 minutes
    Servings: 4
    Course: Main Course
    Cuisine: American
    Calories: 230

    Ingredients
      

    • 1 ½ cups all-purpose flour sifted
    • 2 tbsp brown sugar
    • 1 tsp baking powder
    • ½ tsp baking soda
    • 1 tsp ground cinnamon
    • ½ tsp ground nutmeg
    • ¼ tsp ground cloves
    • ½ tsp salt
    • 1 cup pure pumpkin puree
    • 1 cup buttermilk
    • 2 large eggs
    • 3 tbsp unsalted butter melted

    Equipment

    • Mixing bowl
    • Whisk
    • Griddle or non-stick skillet
    • Spatula

    Method
     

    1. In a large mixing bowl, whisk together the sifted flour, brown sugar, baking powder, baking soda, cinnamon, nutmeg, cloves, and salt until evenly combined.
    2. Add the pumpkin puree, buttermilk, eggs, and melted butter to the dry ingredients, then whisk until the batter is smooth and slightly thickened, with no large lumps.
    3. Let the batter rest for a few minutes; it will slightly loosen and develop flavor.
    4. Heat a griddle or non-stick skillet over medium heat until hot, and lightly grease it with butter or oil.
    5. Pour about ¼ cup of batter onto the hot surface for each pancake, gently spreading it into a round shape.
    6. Cook until bubbles appear on the surface and the edges look set, about 2-3 minutes, then flip and cook for another 2 minutes or until golden brown.
    7. Remove the pancakes from the skillet and keep warm; repeat with remaining batter, adjusting heat as needed to prevent burning.
    8. Serve the pancakes warm, topped with butter, maple syrup, or your favorite fall-inspired toppings.
    As the crisp air settles in, these pumpkin spice pancakes become a seasonal staple that never fails to lift spirits. They pair beautifully with a drizzle of maple syrup or a swirl of whipped cream. Each bite captures a moment of autumn’s quiet magic.

    This recipe isn’t just about taste; it’s about creating cozy memories and savoring the season’s charm. Whether shared with loved ones or enjoyed solo with a good book, it’s a little ritual of happiness that makes mornings special.

  • Chill Out with an Unusual Lemonade Slushie Twist

    Chill Out with an Unusual Lemonade Slushie Twist

    Imagine turning a standard summer refreshment into an adventure for your taste buds. The lemonade slushie often gets overshadowed by its more exotic frozen cousins, but today I want to challenge that idea. Using a secret ingredient, this recipe elevates the humble lemonade into a frosty delight that sparks nostalgia and surprise.

    Crafting this slushie is about more than just freezing and blending. It’s about paying attention to textures and flavors that dance together in every sip, awakening your senses with a crisp, zesty punch. Perfect for those hot afternoons or when you crave a dessert that’s fresh, fun, and unexpectedly bold.

    Secret Ingredient Lemonade Slushie

    This lemonade slushie combines fresh lemon juice, sugar, and a secret ingredient blended into a frosty, icy beverage. Its smooth texture and vibrant appearance make it a refreshing treat with a surprising flavor twist. Perfect for hot days or as a fun dessert, it balances tartness and sweetness in every sip.
    Prep Time 10 minutes
    Total Time 10 minutes
    Servings: 4
    Course: Main Course
    Cuisine: American
    Calories: 120

    Ingredients
      

    • 1 cup fresh lemon juice about 4-5 lemons
    • 1/2 cup granulated sugar adjust to taste
    • 2 cups water cold
    • 1 teaspoon secret ingredient (e.g., a splash of vanilla extract or a pinch of salt) adds a surprising depth of flavor
    • 2 cups ice cubes

    Equipment

    • Blender
    • Measuring cups and spoons

    Method
     

    1. Combine the fresh lemon juice and granulated sugar in a pitcher, stirring until the sugar dissolves completely and the mixture is well combined.
    2. Add cold water and the secret ingredient to the lemon mixture, stirring gently to blend all flavors evenly.
    3. Pour the lemon mixture into a blender, then add the ice cubes on top.
    4. Secure the lid and blend on high speed until the mixture is smooth, frosty, and somewhat thickened, about 30-45 seconds.
    5. Stop the blender and check the texture; if it’s too thick, add a splash of water and blend briefly again.
    6. Pour the chilled lemonade slushie into glasses, ensuring each gets plenty of icy goodness.

    Notes

    For an extra burst of flavor, garnish with lemon slices or mint leaves before serving.
    This lemonade slushie is more than a thirst quencher. It’s a small celebration in a glass, perfect for brightening even the dullest days. With its lively flavor and smooth texture, it’s sure to become a staple in your summer lineup.

    Enjoy experimenting with this twist on a classic. The simple act of blending icy lemon goodness can turn into a delightful ritual no matter the season or occasion.

  • Spooky Sweetness: Halloween Candy Corn Parfaits That Wow

    Spooky Sweetness: Halloween Candy Corn Parfaits That Wow

    Halloween is the one time of year when chaos and color collide in the best ways. This year, I decided to ditch the usual candies and create something that looks as festive as it tastes: Candy Corn Parfaits with a spooky twist. The layers of vanilla pudding, vibrant fruit, and crushed cookies make every spoonful a surprise.

    The secret is in the unexpected pairing of nostalgic candy with fresh ingredients, turning simple layers into a playful treat. These parfaits are perfect for parties, bringing a pop of bright color and a dash of chaos to your dessert table.

    Candy Corn Parfaits with a Spooky Twist

    These layered parfaits feature vanilla pudding, vibrant fruit, and crushed cookies arranged in colorful strata to resemble candy corn. The dish combines creamy textures with crunchy elements, resulting in a visually appealing and texturally diverse dessert. Its playful presentation makes it perfect for festive occasions like Halloween parties.
    Prep Time 15 minutes
    Cook Time 10 minutes
    Total Time 25 minutes
    Servings: 4
    Course: Main Course
    Cuisine: Universal
    Calories: 250

    Ingredients
      

    • 1 box vanilla pudding mix prepared according to package instructions
    • 1 cup fresh mixed fruit such as strawberries, mango, or peaches, chopped small
    • 1 cup crushed cookies vanilla wafers or graham crackers, for layering
    • 3 tablespoons sugar for optional sweetening
    • Food coloring gels or liquid yellow, orange, white food coloring to tint the pudding for a candy corn effect

    Equipment

    • Mixing bowls
    • Whisk
    • Serving glasses or jars
    • Spoon or spatula
    • Knife
    • Cutting board

    Method
     

    1. Prepare the vanilla pudding according to the package instructions and divide it into three separate bowls.
    2. Add yellow food coloring to one bowl, orange to the second, and leave the third bowl plain for the white layer. Stir each until the colors are evenly distributed and vibrant.
    3. Chop the mixed fruit into small, bite-sized pieces, and set aside.
    4. Crush the cookies into small crumbs using a rolling pin or food processor until fine but still slightly chunky for texture.
    5. Begin assembling the parfaits by adding a layer of crushed cookies at the bottom of each glass or jar.
    6. Spoon the white vanilla pudding layer over the crushed cookies, covering them completely.
    7. Add a layer of mixed fruit on top of the white pudding, spreading it evenly to create a colorful layer.
    8. Slowly pour the orange-colored pudding layer over the fruit, ensuring each layer remains distinct and vibrant.
    9. Finish with another layer of crushed cookies on top for crunch, and lightly press down to settle the layers.
    10. Repeat the layering process in the remaining glasses or jars, building colorful strata with each step.
    11. Chill the parfaits in the refrigerator for at least 30 minutes before serving to let flavors meld and layers set.
    12. Serve the parfaits chilled, garnished with additional crushed cookies or fresh fruit if desired, and enjoy the playful, colorful dessert.

    Notes

    For extra festive effect, use orange and yellow tinted whipped cream or fondant decorations on top.
    As the season shifts and the nights grow longer, these parfaits remind us that a little whimsy and a dash of chaos can make holiday gatherings memorable. They’re simple to assemble, yet full of surprises that delight every guest.

    This candy corn-inspired treat captures the fun of Halloween with none of the fuss. The bright, playful layers invite smiles and spark conversations about childhoods filled with sugar highs and costume adventures.

  • Spooky & Savory: Halloween Jack-o’-Lantern Stuffed Bell Peppers

    Spooky & Savory: Halloween Jack-o’-Lantern Stuffed Bell Peppers

    Every October, I find myself craving the playful chaos of Halloween in the kitchen. These stuffed bell peppers dressed as Jack-o’-Lanterns turn a simple veggie into edible art with carved pumpkin faces that gleam in candlelight. It’s a perfect blend of festive cheer and comfort food on a busy spooky night.

    Their sweet bell pepper aroma, mixed with smoky fillings and melty cheese, fills the house with a nostalgic scent of childhood costumes and candy buckets. Preparing these feels like crafting tiny lanterns, and each pepper becomes a cheerful face full of savory surprises. It’s a clever way to make dinner fun before the night’s spooky festivities begin.

    Halloween Stuffed Bell Peppers as Jack-o’-Lanterns

    This dish features bell peppers carved into Jack-o’-Lantern faces, stuffed with a savory mixture of cooked rice, seasoned ground meat, and cheese. The peppers are baked until tender and the filling is bubbling, resulting in colorful, playful, and flavorful Halloween-themed appetizers or main courses, with a combination of soft peppers and melt-in-your-mouth fillings.
    Prep Time 20 minutes
    Cook Time 30 minutes
    Total Time 50 minutes
    Servings: 4
    Course: Main Course
    Cuisine: American
    Calories: 250

    Ingredients
      

    • 4 large bell peppers preferably orange or yellow for classic Jack-o’-Lantern look
    • 1 cup cooked rice white or jasmine rice works well
    • 1/2 pound ground beef or turkey, for a leaner option
    • 1 cup shredded cheese cheddar, Monterey Jack, or a blend
    • 1 small onion finely chopped
    • 2 cloves garlic minced
    • 2 tablespoons olive oil for sautéing
    • to taste salt and pepper
    • 1 cup cooked pumpkin or carrot puree optional for added color and sweetness

    Equipment

    • Chef’s Knife
    • Baking dish
    • Spoon
    • Cutting board

    Method
     

    1. Preheat your oven to 375°F (190°C). Begin by carefully slicing off the tops of the bell peppers and removing the seeds and membranes, creating an opening for carving and filling.
    2. Use a small paring knife to carve classic Jack-o’-Lantern faces into each pepper. Make sure to cut out eyes, a nose, and a jagged mouth, ensuring the cuts are deep enough to be visible but not through the entire pepper wall.
    3. Heat olive oil in a skillet over medium heat. Add chopped onion and minced garlic, sautéing until fragrant and translucent, about 2-3 minutes. This fills your kitchen with a delicious aroma as the onions soften.
    4. Add ground beef to the skillet, breaking it apart with the spoon. Cook until browned and cooked through, about 5-7 minutes. Season with salt and pepper to taste.
    5. Stir in cooked rice, shredded cheese, and optional pumpkin or carrot puree for added color and sweetness. Mix thoroughly so that all ingredients are combined evenly.
    6. Spoon the filling mixture into each carved pepper, pressing gently to fill fully and level the surface. Place the stuffed peppers upright in a baking dish.
    7. Bake in the preheated oven for about 25-30 minutes, or until the peppers are tender and the filling is hot and bubbly. You’ll hear gentle bubbling and see the cheese lightly melted and browned.
    8. Remove the peppers from the oven and let cool slightly. Use a fork or spoon to add finishing touches, like a small stem or additional face details, if desired.
    9. Serve these colorful Halloween peppers warm, with a side of your favorite autumny sides or a simple salad for a complete meal.

    Notes

    For more fun, use different colored peppers or add small accessory face pieces for extra personality.

    This recipe not only lights up the dinner table but also brings a playful touch to your Halloween gathering. The combination of colorful peppers and cheesy fillings makes it both a visual and flavorful treat. With just a few simple ingredients, you can create a showcase of spooky charm that’s easy to assemble and even easier to enjoy.

    As the season shifts into full spooky mode, these Jack-o’-Lantern stuffed peppers remind us that food can be both delightful and amusing. They’re perfect for parties or a festive family dinner that sparks giggles and compliments alike. After all, Halloween should be fun — and delicious.

  • Pumpkin Bread with a Twist: A Hidden Spice Secret

    Pumpkin Bread with a Twist: A Hidden Spice Secret

    Thinking beyond the typical spice mix, this pumpkin bread introduces a subtle hint of cardamom to awaken your senses and elevate your baking. It’s not just pumpkin and cinnamon; it’s a warm, fragrant surprise hidden in each slice, perfect for those cozy autumn mornings.

    The moist crumb, combined with the aromatic spice, creates a nostalgic journey back to family kitchens, but with an unexpected twist that makes every bite memorable. This recipe is a conversation starter, blending tradition with a splash of adventurous flavor, ideal for sharing with friends or keeping as a personal secret stash.

    As the leaves turn and the air crisps, baking this bread becomes an act of seasonal ritual. The aroma alone — a fragrant swirl of pumpkin and spice — will fill your home with comfort and anticipation. It’s more than bread; it’s a cozy, spice-laced hug in a loaf.

    Pumpkin Cardamom Bread

    This pumpkin bread features a moist crumb infused with aromatic cardamom, creating a fragrant and flavorful loaf. The process involves mixing wet and dry ingredients, folding in pumpkin puree, and baking until golden, resulting in a tender, sliceable bread with a textured, inviting appearance.
    Prep Time 20 minutes
    Cook Time 1 hour
    Total Time 1 hour 20 minutes
    Servings: 8
    Course: Main Course
    Cuisine: baking
    Calories: 250

    Ingredients
      

    • 1 3/4 cups all-purpose flour sifted
    • 1 tsp baking soda
    • 1/2 tsp ground cinnamon
    • 1/4 tsp ground nutmeg
    • 1/4 tsp ground cloves
    • 1/2 tsp ground cardamom
    • 1/2 tsp salt
    • 1/2 cup granulated sugar
    • 1/2 cup brown sugar
    • 1/2 cup vegetable oil
    • 2 large eggs
    • 1 cup pumpkin puree unsweetened
    • 1 tsp vanilla extract

    Equipment

    • Mixing bowls
    • Whisk
    • Loaf pan
    • Cooling rack

    Method
     

    1. Preheat your oven to 350°F (175°C). Grease and flour a standard loaf pan to prepare for baking.
    2. In a large mixing bowl, whisk together the sifted flour, baking soda, cinnamon, nutmeg, cloves, cardamom, and salt until evenly combined. This creates a flavorful, aromatic dry mixture.
    3. In another bowl, mix the granulated sugar, brown sugar, and vegetable oil until the mixture is smooth and slightly bubbly, about a minute.
    4. Add the eggs one at a time to the sugar mixture, whisking after each addition until fully incorporated, which helps create a cohesive batter.
    5. Stir in the pumpkin puree and vanilla extract until the batter is smooth and uniform, with a slightly thick texture.
    6. Gradually fold the dry ingredients into the wet mixture using a spatula, mixing just until there are no dry streaks—be careful not to overmix to keep the bread tender.
    7. Pour the batter into the prepared loaf pan, spreading it evenly with a spatula for a flat top surface.
    8. Bake in the preheated oven for about 60 minutes, or until a toothpick inserted into the center comes out clean and the top is golden brown.
    9. Remove the bread from the oven and let it cool in the pan for 10 minutes—this relaxes the crumb and makes slicing easier.
    10. Transfer the loaf to a wire rack and allow it to cool completely before slicing to prevent crumbling.
    11. Slice the pumpkin bread and enjoy its moist, spiced crumb with fragrant hints of cardamom and pumpkin in every bite.

    Whether it’s for a lazy weekend breakfast or an after-school treat, this pumpkin bread adapts effortlessly to your day. Keep a loaf on hand for surprising guests or to serve warm with a pat of butter or cream cheese spread.

    Every slice carries a story of the season, textured with crunchy edges and lush, spiced crumb. It’s a reminder that sometimes, the simplest pleasures, like a slice of pumpkin bread, connect us to a fleeting moment of warmth amid the cooler days.

  • Spice Up Your Morning with Pumpkin Spice Overnight Oats

    Spice Up Your Morning with Pumpkin Spice Overnight Oats

    When the air turns crisp and the mornings grow cooler, I find myself craving cozy, nourishing breakfasts that do more than just fill me up. Pumpkin Spice Overnight Oats is my seasonal secret — a blend of creamy oats, warming pumpkin, and a symphony of spices that smell like autumn in a jar. It’s a breakfast I prepare the night before, ensuring I wake up to a bowl of comfort and flavor.

    This recipe is a tiny adventure in texture and aroma. The oats soak up the pumpkin and spice, transforming into a velvety, fragrant breakfast that feels as indulgent as pumpkin pie, but with none of the fuss. Plus, it’s customizable: add nuts, a drizzle of honey, or a sprinkle of extra cinnamon to match your mood.

    Pumpkin Spice Overnight Oats

    Pumpkin Spice Overnight Oats is a no-cook breakfast dish where rolled oats are soaked overnight in a mixture of pumpkin puree, milk, and warm spices. The mixture develops a creamy, velvety texture and a fragrant, autumnal flavor profile by morning, ready to serve as a comforting, flavorful morning meal.
    Prep Time 10 minutes
    Total Time 10 minutes
    Servings: 2
    Course: Main Course
    Cuisine: American
    Calories: 250

    Ingredients
      

    • 1 cup rolled oats
    • 1/2 cup pumpkin puree
    • 1 cup milk dairy or plant-based
    • 1 teaspoon ground cinnamon
    • 1/2 teaspoon ground nutmeg
    • 1/4 teaspoon ground cloves
    • 1 tablespoon honey or maple syrup optional, for added sweetness
    • Pinch salt

    Equipment

    • Mixing bowl
    • Spoon or whisk
    • Measuring cups and spoons
    • Jar or container with lid

    Method
     

    1. Combine the rolled oats, pumpkin puree, milk, ground cinnamon, nutmeg, cloves, honey, and a pinch of salt in a mixing bowl. Stir everything thoroughly until the mixture is smooth and the oats are evenly coated.
    2. Pour the mixture into a jar or airtight container, spreading it out evenly. Seal the container with a lid.
    3. Place the jar in the refrigerator overnight, allowing the oats to soak up the flavors and develop a creamy, tender texture.
    4. In the morning, remove the jar from the fridge and give the oats a gentle stir to combine any settling. The mixture should be thick, velvety, and fragrant with pumpkin and spices.
    5. Spoon the pumpkin spice oats into bowls and top with your favorite garnishes like nuts, seeds, or a drizzle of honey if desired.
    6. Enjoy your cozy, nourishing pumpkin spice overnight oats as a delicious start to your day!

    Sharing this Pumpkin Spice Overnight Oats during the early days of fall feels like a warm hug on a chilly morning. It’s a simple way to embrace the season’s flavors without hours in the kitchen. As the mornings get busier, having a nutritious, delicious breakfast waiting is a small joy I look forward to.

    Ultimately, this recipe isn’t just food — it’s a moment of calm before the day’s chaos. The aroma alone can wake up your senses and set the tone for the hours ahead. A little pumpkin spice magic, wrapped in creamy oats, makes every dawn a reason to smile.

  • Spooktacular Blood-Red Flaming Bloody Mary

    Spooktacular Blood-Red Flaming Bloody Mary

    Every October, the air feels heavier with anticipation and a dash of chaos—perfect for elevating the classic Bloody Mary. This year, I decided to transform my usual brunch cocktail into something eerily mesmerizing and totally fitting for Halloween. Think smoky spices, a splash of spice-fire, and a daring presentation that screams “Boo!” at your party.

    Instead of blending just tomato juice and vodka, I infuse this drink with smoky chipotle and a hint of black charcoal to deepen the crimson hue. Garnished with a flashing glow stick or a devilish pickle, this cocktail becomes part of the haunted scene that makes Halloween memorable. It’s a brew that invites awe, a little dread, and lots of admiration.

    Black Charcoal Halloween Bloody Mary

    This Bloody Mary features smoked chipotle and black charcoal infused tomato juice, creating a deep crimson hue with smoky, spicy flavors. The drink is garnished with glowing or spooky elements, making it visually striking and perfect for Halloween festivities. The final beverage has a rich, velvety texture with a smoky, spicy, and slightly charred aroma.
    Prep Time 10 minutes
    Cook Time 5 minutes
    Total Time 15 minutes
    Servings: 4
    Course: Main Course
    Cuisine: Halloween
    Calories: 85

    Ingredients
      

    • 4 cups tomato juice preferably low sodium
    • 2 tsp smoked chipotle powder adjust to taste
    • 1 pinch black activated charcoal food grade, for color and smoky effect
    • 1.5 oz vodka or more, to taste
    • 1 tbsp Worcestershire sauce for umami depth
    • 1 tsp hot sauce adjust for heat preference
    • 1 lemon lemon juice freshly squeezed
    • to taste salt and pepper for balancing flavors

    Equipment

    • Cocktail shaker
    • Glassware

    Method
     

    1. Begin by pouring the tomato juice into a mixing container, creating a vibrant crimson base for your drink.
    2. Add the smoked chipotle powder and a pinch of black activated charcoal to the tomato juice. Stir thoroughly until the mixture develops a deep, smoky, and slightly charcoal-darkened hue, and becomes smooth.
    3. Pour in the vodka, Worcestershire sauce, hot sauce, and freshly squeezed lemon juice. Mix well with a spoon or whisk to combine all the flavors uniformly.
    4. Season the mixture with salt and pepper to taste, then give it one last stir. The liquid should be rich, smoky, with a deep crimson color and a slightly velvety texture.
    5. Fill a glass with ice cubes and carefully strain the mixture into the glass to keep it cold and visually striking. The drink should retain its deep dark red appearance with a smoky finish.
    6. For a spooky presentation, garnish with a glowing pickle, a slice of lemon, or add a flashing glow stick for extra Halloween fun.

    Notes

    Adjust the spice level with more or less chipotle and hot sauce. Use food-grade charcoal carefully, and only in small amounts for color and smoky flavor. For a more dramatic look, serve with glowing or themed garnishes.

    In the end, this Bloody Mary isn’t just about the spooky visuals; it’s about shocking your senses and sparking conversation. Every sip is a smoky, spicy reminder that Halloween is about embracing the wild and whimsical side of life. Whether served at a mad costume party or a cozy night in, it promises a thrill that lingers longer than the sugar rush.

    So, keep your eyes peeled for those little tricks and treats—this cocktail might just become your new Halloween tradition. Its fiery charm and dark allure fit right into the season’s spirit of playful mischief and deliciously creepy fun. Cheers to making your Halloween a little more daring and a lot more memorable.