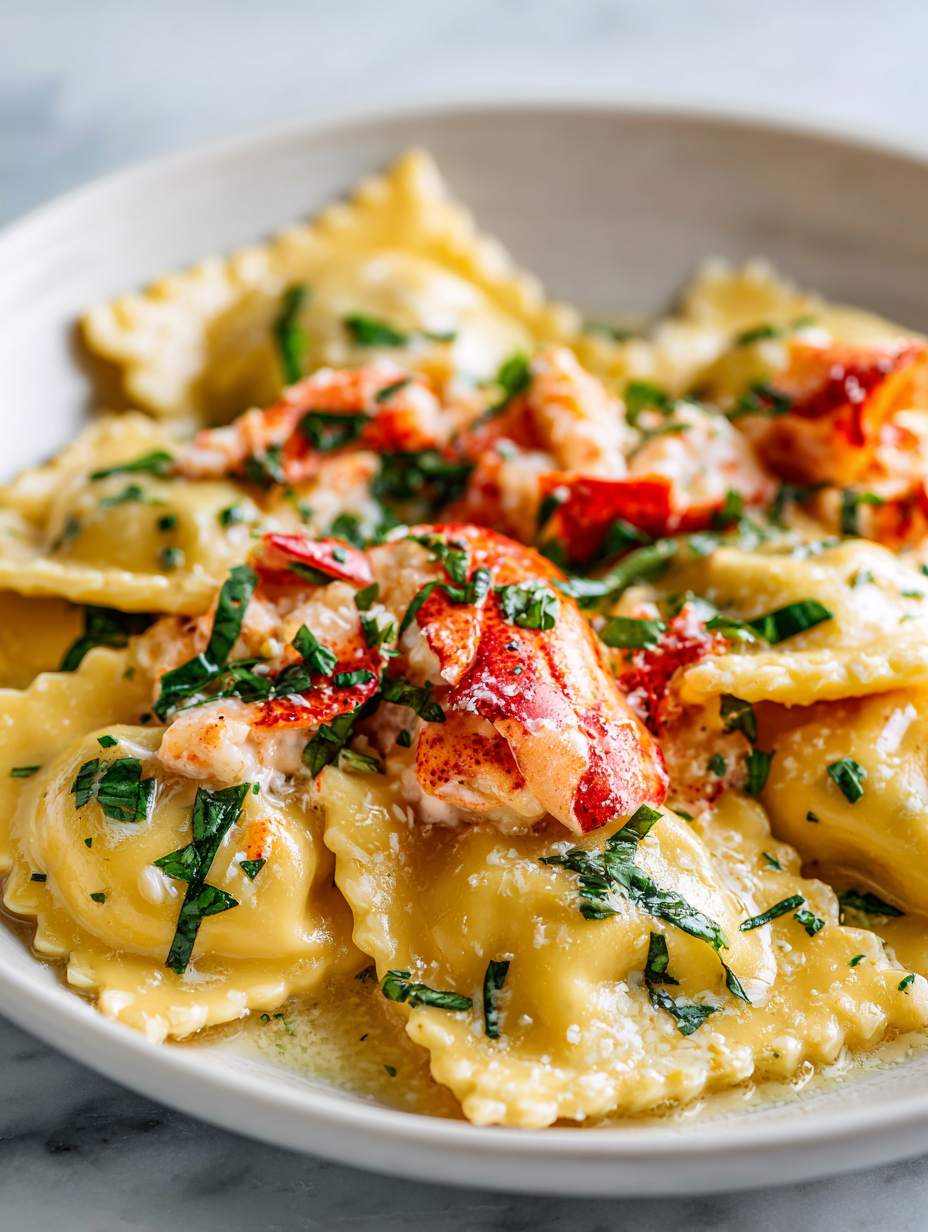
Author: GraceMorgan

  • A Revolutionary Tomato Sauce That Transforms Your Pasta Nights

    A Revolutionary Tomato Sauce That Transforms Your Pasta Nights

    As I stood over my bubbling pot, I realized that cooking isn’t just about following rules. It’s about imagination, about daring to add an unconventional ingredient that turns the familiar into something extraordinary. This sauce is my secret, a little chaos in the kitchen that results in pure deliciousness.

    Creative Chaos Sauce

    This sauce is made by combining a rich tomato base with an unconventional ingredient, creating a complex and vibrant flavor profile. It is simmered until thickened and smooth, with a glossy appearance and velvety texture. The result is a bold, savory sauce perfect for drizzling over pasta, meats, or vegetables.
    Prep Time 10 minutes
    Cook Time 20 minutes
    Total Time 30 minutes
    Servings: 4
    Course: Main Course
    Cuisine: fusion
    Calories: 150

    Ingredients
      

    • 2 cups tomato sauce preferably smooth and rich
    • 1 tablespoon olive oil extra virgin recommended
    • 2 cloves garlic finely minced
    • 1 small unconventional ingredient such as a small piece of dark chocolate or a splash of balsamic vinegar

    Equipment

    • Saucepan
    • Stirring spoon

    Method
     

    1. Heat the olive oil in a saucepan over medium heat until shimmering and fragrant.
    2. Add the minced garlic and sauté for about 30 seconds, until aromatic and slightly golden.
    3. Pour in the tomato sauce and stir to combine with the garlic, bringing the mixture to a gentle simmer.
    4. Drop in your unconventional ingredient, such as a small piece of dark chocolate or a splash of balsamic vinegar, and stir until it melts or evenly incorporates.
    5. Reduce the heat to low and let the sauce simmer gently, stirring occasionally, for about 15 minutes until it thickens slightly and develops a glossy sheen.
    6. Taste the sauce and adjust seasoning if needed, adding salt or pepper as desired, then remove from heat.

    Notes

    Feel free to experiment with different unconventional ingredients to create your unique flavor twist.
    Next time you’re craving comfort food with a twist, remember this recipe. It’s a reminder that even the most familiar dishes can become new adventures when you dare to alter the script.

  • Chill Out with an Unusual Blueberry Slushie Twist

    Chill Out with an Unusual Blueberry Slushie Twist

    Most blueberry recipes lean into warm crumbles or cozy jams, but I challenge you to think chilly and vibrant. Imagine a burst of icy, juicy blueberry flavor that awakens your senses in the heat of summer or a lazy afternoon. This blueberry slushie isn’t just a drink; it’s a cool rebellion against bland hydration.

    What makes this slushie special is its unexpected note of basil blended with ripe blueberries, creating a fresh herbal aroma that dances with sweetness. Plus, it’s insanely easy to whip up with just a few pantry staples—perfect for spontaneous refreshment. When the heat is on, this icy treat becomes my secret weapon for instant coolness.

    Blueberry Basil Slushie

    This blueberry basil slushie combines ripe blueberries blended with fresh basil to create a vibrant, icy beverage. The mixture is pureed until smooth and crushed with ice to achieve a refreshing, slushy texture with a bright, herbal aroma. Served cold, it displays a translucent purple hue with tiny basil flecks topping the surface.
    Prep Time 5 minutes
    Total Time 5 minutes
    Servings: 2
    Course: Main Course
    Cuisine: fusion
    Calories: 85

    Ingredients
      

    • 1 cup blueberries fresh or frozen
    • 4-5 leaves fresh basil roughly chopped
    • 1 cup ice cubes
    • 2 tablespoons honey or simple syrup adjust sweetness as desired
    • 1/2 cup water cold

    Equipment

    • Blender
    • Measuring cup
    • Ice crusher or resealable bag and mallet

    Method
     

    1. Place the blueberries, chopped basil, honey, and water into the blender.
    2. Blend on high until the mixture is smooth, with the blueberries broken down and basil fully incorporated, about 30 seconds.
    3. Add the ice cubes to the blender and pulse a few times to start crushing the ice.
    4. Continue blending until the mixture is thick, slushy, and evenly icy, about 20-30 seconds. Stop and check the texture.
    5. Taste the slushie and adjust sweetness if needed by adding a little more honey, then blend briefly again to combine.
    6. Scoop the blueberry basil slushie into glasses, garnish with a few basil leaves if desired, and serve immediately for the best icy freshness.

    Notes

    For a vegan version, substitute honey with agave syrup or maple syrup.

    Next time you crave a refreshing escape, reach for your blender rather than reaching for a store-bought icy drink. The homemade blueberry slushie offers a vibrant burst of flavor, with the added joy of customizing toppings or adding a splash of lemon for extra zing. It’s simple, satisfying, and just the thing to beat the summer heat.

    Remember, the best recipes come with a touch of chaos—maybe a splash of extra berries or a dash more honey. These little tweaks make the experience uniquely yours. So, whip it up, enjoy the sensory splash, and let the cold, sweet blueberry waves wash over you—effortlessly stylish and endlessly delicious.

  • Spooky Slice: The Halloween Mummy Pizza

    Spooky Slice: The Halloween Mummy Pizza

    Halloween brings out the playful chef in all of us. But this year, I wanted to create something that’s both whimsical and a little chaos in the kitchen. Enter the Mummy Pizza, a gooey, cheesy marvel that looks straight out of a haunted house.

    The aroma of melting cheese mixing with crispy crust and smoky pepperoni makes this recipe irresistible. Plus, the messy, tangled bandages of melted mozzarella are oddly satisfying to assemble. It turns a simple pizza into a spooky, fun masterpiece that kids and adults alike will adore.

    Mummy Pizza

    Mummy Pizza is a playful, cheesy dish featuring a crispy crust topped with melting cheese and smoky pepperoni. It is decorated with melted mozzarella strips resembling mummy bandages, creating a spooky and fun appearance. The final texture combines a crunchy base with gooey, cheesy toppings and a tangled, ghostly design.
    Prep Time 15 minutes
    Cook Time 15 minutes
    Total Time 30 minutes
    Servings: 4
    Course: Main Course
    Cuisine: American
    Calories: 350

    Ingredients
      

    • 1 package pizza dough store-bought or homemade
    • 1 cup shredded mozzarella cheese
    • 1/2 cup pepperoni slices
    • 1 tablespoon olive oil
    • to taste salt

    Equipment

    • Baking sheet
    • Rolling pin
    • Oven
    • Cooking knife
    • Parchment paper

    Method
     

    1. Preheat the oven to 425°F (220°C). Place a sheet of parchment paper on a baking sheet and roll out the pizza dough into a 12-inch circle, shaping it evenly.
    2. Brush the surface of the dough lightly with olive oil to help it crisp up and prevent sogginess.
    3. Spread shredded mozzarella cheese evenly over the dough, leaving a small border around the edges for the crust.
    4. Arrange pepperoni slices over the cheese, concentrating in the center, but leaving space around the edges for the crust and to mimic the mummy’s wrapping effect.
    5. Bake in the preheated oven until the crust is golden and crispy, and the cheese is bubbling—about 12 to 15 minutes.
    6. Remove the pizza from the oven and let it cool for a minute so the cheese sets slightly.
    7. Using a sharp knife, carefully cut thin strips of mozzarella from the remaining cheese or extra cheese block, creating tangled bandages to resemble mummy wrappings.
    8. Gently place the mozzarella strips in a tangled pattern over the top of the pizza, starting from the center and radiating outward to resemble mummy bandages.
    9. Add small pieces of pepperoni or other toppings as ‘mummy eyes’ if desired for extra spooky charm.
    10. Return the decorated pizza to the oven for an additional 2-3 minutes to melt the mozzarella strips slightly and set the design.
    11. Remove the pizza from the oven, let it cool briefly, then slice and serve your fun, spooky Mummy Pizza.

    Notes

    For extra creepy effect, use black olives or cherry tomatoes for eyes. Be careful when arranging mozzarella strips to avoid tearing the cheese.
    Creating this Mummy Pizza is a delightful way to embrace the spooky season. It’s more than just a dish—it’s a little bit of chaos, humor, and culinary creativity on a plate. Plus, it gives the perfect excuse to get a little messy in the kitchen.

    Enjoy the spectacle and flavors as you serve up this eerie, cheesy creation. It’s sure to spark giggles and maybe even a few silly screams around the table. Happy haunting and baking, everyone!

  • Autumn Glow: A Cozy Roasted Butternut Squash & Carrot Soup

    Autumn Glow: A Cozy Roasted Butternut Squash & Carrot Soup

    As the leaves turn and the air crisps, I find myself craving something both hearty and smooth. This roasted butternut squash & carrot soup offers a comforting embrace with every spoonful. Roasting enhances their natural sweetness, filling my kitchen with warm caramel and nutty aromas that make the dreams of fall tangible.

    My twist? I infuse a splash of fragrant saffron and a hint of smoked paprika, transforming humble ingredients into a rich, earthy masterpiece. It’s perfect for those cozy evenings when you want depth with simplicity. Plus, it’s so versatile—dinner, lunch, or a potluck favorite—always hits home.

    Roasted Butternut Squash & Carrot Soup with Saffron and Smoked Paprika

    This roasted butternut squash and carrot soup is made by baking the vegetables until caramelized, then blending them into a smooth, velvety puree. Flavored with saffron and smoked paprika, the soup develops rich, earthy aromas and a vibrant orange color, with a comforting, thick texture.
    Prep Time 15 minutes
    Cook Time 35 minutes
    Total Time 50 minutes
    Servings: 4
    Course: Main Course
    Cuisine: Fall, Vegetarian
    Calories: 180

    Ingredients
      

    • 1 lb butternut squash peeled, seeded, and cut into chunks
    • 2 large carrots peeled and sliced
    • 2 tablespoons olive oil for roasting
    • 1 pinch saffron threads soaked in warm water
    • 1 teaspoon smoked paprika adds smoky depth
    • 4 cups vegetable broth
    • 1 medium onion diced
    • 2 cloves garlic minced
    • 2 tablespoons butter
    • Salt and pepper to taste

    Equipment

    • Baking sheet
    • Large pot or Dutch oven
    • Blender or Immersion Blender
    • Chef’s Knife
    • Cutting board

    Method
     

    1. Preheat your oven to 400°F (200°C). Toss the butternut squash chunks and sliced carrots with olive oil, salt, and pepper, then spread them evenly on a baking sheet. Roast for about 25-30 minutes until they are caramelized and tender, filling the kitchen with sweet, roasted aromas.
    2. While the vegetables roast, soak a pinch of saffron threads in a small bowl of warm water to release their fragrant flavor and golden color. Set aside.
    3. In a large pot, melt the butter over medium heat. Add the diced onion and cook, stirring frequently, until translucent and fragrant, about 5 minutes. Add the minced garlic and cook for another minute until fragrant.
    4. Add the roasted vegetables to the pot with the onions and garlic. Pour in the vegetable broth and bring to a gentle simmer over medium heat. Stir in the smoked paprika and the saffron water, along with its threads, to infuse the soup with earthy aroma and golden hue.
    5. Let the soup simmer for about 10 minutes to allow the flavors to meld beautifully. Then, remove from heat.
    6. Use an immersion blender or transfer the mixture carefully to a blender. Puree until the soup is smooth and velvety, with a vibrant orange color and silky texture. Return to the pot if using a separate blender.
    7. Taste the soup and adjust seasoning with salt and pepper as needed. Warm it through until steaming hot and ready to serve.
    8. Ladle the soup into bowls, garnishing with a drizzle of good olive oil or a sprinkle of fresh herbs if desired. Serve hot, enjoying the rich aroma and creamy texture.

    This soup isn’t just a seasonal delight; it’s a reminder to cherish the slow, warm moments. Its velvety texture and layered flavors make every bowl a small celebration of fall’s bounty. A pinch of spice and a dash of patience turn everyday vegetables into something truly special.

    Enjoy it with crusty bread or a handful of toasted seeds for extra texture. Whether you’re sharing with loved ones or savoring alone, this soup promises a cozy escape from the autumn chill, one spoonful at a time.

  • Unusual White Chicken Chili: A Cozy Twist for Your Next Soup Night

    Unusual White Chicken Chili: A Cozy Twist for Your Next Soup Night

    Imagine a chilly evening with the air carrying the scent of cumin and roasted peppers. Instead of the usual tomato-based chili, this white chicken chili offers a creamy, spice-infused surprise. Its comforting warmth is perfect when you’re craving something different yet familiar.

    This recipe skips the traditional reds for a milder, velvety broth that clings to chunks of tender chicken and tender white beans. It’s an unexpectedly uplifting dish, combining savory, smoky, and tangy notes in every spoonful. A bowl of this chili feels like a warm hug, with a little bit of ‘wow’ in every bite.

    White Chicken Chili

    This white chicken chili features tender chunks of chicken simmered in a creamy, spice-infused broth with white beans and roasted peppers. The dish has a velvety texture with a smoky and savory flavor profile, served warm with a smooth, hearty consistency.
    Prep Time 15 minutes
    Cook Time 30 minutes
    Total Time 45 minutes
    Servings: 6
    Course: Main Course
    Cuisine: American
    Calories: 350

    Ingredients
      

    • 1 lb boneless, skinless chicken breasts cut into cubes
    • 2 tablespoons olive oil
    • 1 cup diced roasted peppers jarred or freshly roasted, drained
    • 3 cloves garlic minced
    • 4 cups chicken broth
    • 2 cups white beans cooked or canned, drained and rinsed
    • 1 teaspoon ground cumin
    • 1/2 cup sour cream for creaminess
    • Salt and pepper to taste

    Equipment

    • Large pot or Dutch oven
    • Sharp knife
    • Cutting board
    • Ladle

    Method
     

    1. Heat olive oil in a large pot over medium heat, then add the cubed chicken. Cook until the chicken is browned and cooked through, about 5-7 minutes. Remove the chicken and set aside.
    2. Add diced roasted peppers and minced garlic to the same pot, sautéing for about 2 minutes until fragrant and slightly softened. You should smell the garlic releasing its aroma, and the peppers turning slightly darker.
    3. Pour in the chicken broth, scraping up any browned bits from the bottom of the pot to develop flavor. Bring the broth to a gentle simmer.
    4. Add the cooked chicken, white beans, and ground cumin to the simmering broth. Stir everything together, ensuring the ingredients are evenly distributed.
    5. Allow the chili to simmer uncovered for about 15 minutes, gently bubbling, until the flavors meld and the broth thickens slightly. The mixture will turn creamy and velvety.
    6. Stir in the sour cream to add richness and a smooth texture to the broth. Mix well until fully combined and heated through, about 2 minutes.
    7. Taste and season with salt and pepper as needed for flavor balance. Ladle the hot chili into bowls and serve immediately.
    This white chicken chili is more than just a change of pace; it’s a cozy bowl that makes even the gloomiest days brighter. Its versatility means you can tweak the spice level or add your favorite greens for extra freshness. It’s an easy, satisfying meal that fits perfectly into a busy schedule.

    Layered flavors and a comforting texture make this dish a delightful addition to your culinary repertoire. Whether it’s for a weeknight dinner or a lazy weekend gathering, it offers a thoughtful, hearty option that warms both body and soul.

  • Spooky Creativity with Halloween Mummy Hot Dogs!

    Spooky Creativity with Halloween Mummy Hot Dogs!

    As the season shifts into spook mode, I love exploring treats that blend fun and simplicity. This year, I dove into a project inspired by classic horror movies and old-school kids’ parties—transforming ordinary hot dogs into creepy mummies. The process is so satisfying, especially when wrapping the hot dogs like shrouds of wriggly bandages.

    Using just a few ingredients—hot dogs, crescent roll dough, and some tiny googly eyes—you get to channel your inner mad scientist while crafting creepy, delicious bites. The aroma of baked dough mixed with sizzling hot dogs is pure nostalgia, making this a perfect, no-fuss Halloween snack for all ages. Plus, messes are minimal, but the laughs are plenty.

    Creepy Mummy Hot Dogs

    Creepy mummy hot dogs are made by wrapping hot dogs in crescent roll dough to resemble bandaged mummies, then baking until golden. The dish features crispy, flaky dough with juicy hot dogs inside, finished off with googly eyes for a fun, spooky appearance. It results in bite-sized, savory treats with a crunchy exterior and tender interior.
    Prep Time 10 minutes
    Cook Time 15 minutes
    Total Time 25 minutes
    Servings: 6
    Course: Main Course
    Cuisine: American
    Calories: 250

    Ingredients
      

    • 1 pack crescent roll dough cut into strips
    • 6 hot dogs hot dogs
    • small googly eyes for decoration

    Equipment

    • Baking sheet
    • Parchment paper
    • Knife
    • Cutting board
    • Small bowl
    • Toothpick

    Method
     

    1. Preheat your oven to 375°F (190°C) and line a baking sheet with parchment paper.
    2. Unroll the crescent roll dough and use a sharp knife to cut it into thin strips, about 1/4 inch wide. These will mimic bandages.
    3. Place a hot dog on the edge of a dough strip and gently swirl or wrap the dough around the hot dog, leaving a small gap at the top for the ‘face.’ Repeat with all hot dogs.
    4. Arrange the wrapped hot dogs on the prepared baking sheet, spacing them out evenly.
    5. Bake in the preheated oven for about 12-15 minutes, or until the dough is golden brown and crispy.
    6. Remove from the oven and let cool slightly, just enough to handle without burning your fingers.
    7. Using a toothpick, carefully place a small googly eye on the ‘face’ of each mummy for a spooky flair. Press gently to secure.
    8. Your creepy mummy hot dogs are now ready to serve! They offer a fun, festive look with a crispy exterior and juicy inside, perfect for Halloween parties.

    Notes

    Feel free to use different edible eyes or decorate with additional features like tiny bits of olives for eyes or ketchup for mouths.

    Whether it’s for a last-minute party or a fun family project, these mummy hot dogs bring a festive twist to your table. They’re quick to put together and sure to turn heads and spark giggles. As the oven buzzes away, you’re already imagining the next spooky creation to try.

    This recipe is a reminder that Halloween is about creativity and celebration, not perfection. The little imperfections—like slightly lopsided bandages—add to the charm. Now, you’ve got a creepy, delightful treat that’s as fun to make as it is to eat.

  • Pumpkin Power: The Sweet Secret to Healthier Mornings

    Pumpkin Power: The Sweet Secret to Healthier Mornings

    Discover a new way to embrace fall’s most vibrant ingredient—pumpkin—in the most unexpected form: fluffy pancakes. These aren’t your ordinary pancakes; they’re packed with antioxidants, fiber, and a hint of spice that awakens your senses with every bite. Perfect for chilly mornings, they combine nostalgia with a health-conscious twist.

    What makes these pancakes stand out is their versatility. You can swap traditional toppings for toasted seeds, a drizzle of honey, or even a dollop of Greek yogurt. It’s a cozy, nourishing start that feels indulgent but is surprisingly good for you. Plus, they’re quick to whip up, making mornings less rushed.

    Pumpkin Pancakes

    Pumpkin pancakes are fluffy, flavorful breakfast treats made by folding pumpkin puree into a pancake batter and cooking on a griddle until golden brown. The final pancakes have a tender, airy texture with a slight spiced aroma, perfect for cozy mornings. Topped with various toppings, they offer a warm, comforting bite with vibrant fall flavor.
    Prep Time 10 minutes
    Cook Time 15 minutes
    Total Time 25 minutes
    Servings: 4
    Course: Main Course
    Cuisine: American
    Calories: 210

    Ingredients
      

    • 1 1/2 cups all-purpose flour sifted
    • 2 tablespoons granulated sugar
    • 1 teaspoon baking powder
    • 1/2 teaspoon baking soda
    • 1/2 teaspoon ground cinnamon optional but recommended
    • 1/4 teaspoon ground nutmeg optional
    • 1/4 teaspoon ground ginger optional
    • 1 cup pumpkin puree
    • 1 cup milk any kind you prefer
    • 2 large eggs
    • 2 tablespoons unsalted butter melted, for cooking

    Equipment

    • Mixing bowls
    • Whisk
    • Griddle or non-stick skillet
    • Spatula
    • Measuring cups and spoons

    Method
     

    1. In a large mixing bowl, whisk together the sifted flour, sugar, baking powder, baking soda, cinnamon, nutmeg, and ginger to combine the dry ingredients evenly.
    2. In a separate bowl, whisk the eggs and then stir in the pumpkin puree, milk, and melted butter until the mixture is smooth and well combined.
    3. Pour the wet mixture into the dry ingredients, and gently fold together with a spatula until just combined. Be careful not to overmix; lumps are okay.
    4. Preheat a griddle or non-stick skillet over medium heat until hot. Lightly grease with a little butter or oil if needed.
    5. Using a ladle or measuring cup, pour about 1/4 cup of batter onto the hot skillet for each pancake, leaving space between each.
    6. Cook the pancakes for 2-3 minutes, until bubbles form on the surface and the edges look set. The bottom should turn golden brown.
    7. Carefully flip each pancake using a spatula, and cook for another 2-3 minutes until golden and cooked through in the center.
    8. Remove the cooked pancakes from the skillet and keep warm. Repeat with remaining batter, adding more butter or oil as needed.
    9. Serve the pumpkin pancakes warm, topped with your favorite extras like toasted seeds, a drizzle of honey, or a dollop of Greek yogurt for added flavor.

    Notes

    Ensure not to overmix the batter to keep the pancakes fluffy. Adjust cooking time if pancakes are thicker or thinner. These freeze well and can be reheated in a toaster or oven.
    These pumpkin pancakes are more than just a seasonal treat. They’re a reminder that healthy can also be delicious and satisfying. As the flavors meld and the aroma fills your kitchen, it’s hard not to feel grateful for simple, wholesome pleasures.

    Enjoy these pancakes whenever you need a comforting, nutrient-rich breakfast that keeps your mornings bright and your body fueled. The subtle sweetness and earthiness make them a perfect match for any fall day or lazy weekend brunch.

  • Twist and Roar: The Unexpected Charm of Sweet Potato and Kale Casserole

    Twist and Roar: The Unexpected Charm of Sweet Potato and Kale Casserole

    As the crisp air of fall settles in, I find myself craving more than just the usual apple pies and pumpkin treats. This year, I decided to go beyond the typical and experiment with a dish that mixes comfort with a touch of the unexpected: sweet potato and kale casserole with a hint of spice. The aroma of roasting sweet potatoes mingling with toasted garlic and melting cheese fills the kitchen with nostalgia and excitement.

    This casserole isn’t just colorful and hearty—it’s a conversation starter. The vibrant orange of the sweet potatoes paired with deep green kale makes for a blend that is as eye-catching as it is satisfying. It’s perfect for those cool evenings when you want the house to smell warm and inviting without too much fuss.

    Sweet Potato and Kale Casserole with Spices

    This dish features roasted sweet potatoes combined with sautéed kale, baked together with melted cheese and spices. The casserole has a hearty, tender texture with a vibrant appearance, showcasing bright orange and green hues. It is baked until bubbling and browned on top, offering a comforting and visually appealing meal.
    Prep Time 15 minutes
    Cook Time 35 minutes
    Total Time 50 minutes
    Servings: 4
    Course: Main Course
    Cuisine: American
    Calories: 320

    Ingredients
      

    • 2 large sweet potatoes peeled and cubed
    • 2 cups kale chopped, stems removed
    • 3 cloves garlic minced
    • 1 cup shredded cheese cheddar or your choice
    • 2 tablespoons olive oil
    • 1 teaspoon cumin ground
    • 0.5 teaspoon cinnamon
    • 1/2 teaspoon paprika
    • to taste salt and pepper

    Equipment

    • Baking sheet
    • Large skillet
    • Cooking spoon
    • Mixing bowl
    • Baking dish

    Method
     

    1. Preheat your oven to 400°F (200°C). Spread the cubed sweet potatoes on a baking sheet, drizzle with a tablespoon of olive oil, and toss to coat evenly. Roast for about 25 minutes until they are tender and slightly caramelized, filling your kitchen with a sweet, toasty aroma.
    2. While the sweet potatoes are roasting, heat a large skillet over medium heat. Add the remaining tablespoon of olive oil and once shimmering, sauté the minced garlic until fragrant—about 30 seconds—then add the chopped kale. Cook, stirring frequently, until wilted and bright green, about 3-4 minutes. Season with cumin, cinnamon, paprika, salt, and pepper for warmth and depth.
    3. Remove the roasted sweet potatoes from the oven and transfer them to a large mixing bowl. Gently mash them with a fork or potato masher to break them into chunky pieces, while leaving some larger bits for texture.
    4. Add the cooked kale and garlic mixture to the mashed sweet potatoes. Mix well to combine, ensuring the greens are evenly distributed throughout the sweet potatoes. This creates a colorful and hearty base for the casserole.
    5. Transfer the mixture into a greased baking dish, spreading it out evenly with a spatula. Sprinkle the shredded cheese evenly over the top, covering the entire surface for a cheesy crust that melts beautifully during baking.
    6. Bake in the preheated oven for 15-20 minutes, or until the cheese is melted, bubbly, and golden brown. The dish will emit a warm, cheesy aroma that invites everyone to dig in.

    This dish captures the essence of fall—rich, nourishing, and just a little bit adventurous. It’s great for quiet dinners or potlucks where everyone appreciates a twist on regular comfort food. The simple ingredients and easy steps mean you can throw it together even on a busy weeknight.

    Revisit the flavors of autumn with a casserole that’s both satisfying and full of surprises. As the season wanes, this recipe offers a cozy reminder of the beauty in trying something a little different. Sometimes, comfort food is about surprising the senses and sparking new favorites—and this dish does just that.

  • Spooky Sips: Halloween Monster Mash Punch That Will Bewitch Your Party

    Spooky Sips: Halloween Monster Mash Punch That Will Bewitch Your Party

    Every October, I find myself craving a mix that’s more than just a beverage — it’s an experience. The Halloween Monster Mash Punch brings a chaotic splash of colors and flavors, transforming my kitchen into a haunted carnival. The scent of citrus and fizzy cola mingles with a hint of eerie green gumdrop eyes, setting the mood before the first sip.

    This recipe is my antidote to boring party drinks. It’s a chance to unleash your inner mad scientist, swirling together bright, bubbly ingredients that bubble and sparkle like a witch’s brew. It’s perfect for those who love a little chaos on their tables and a lot of fun in their cups.

    Halloween Monster Mash Punch

    A vibrant, fizzy punch featuring a colorful mix of citrus soda, fruit juices, and playful green gumdrop eyes. The drink combines bubbly carbonation with sweet and tart flavors, creating a lively, effervescent beverage with a fun, chaotic appearance. Final presentation includes garnishes that enhance its spooky carnival vibe.
    Prep Time 10 minutes
    Total Time 10 minutes
    Servings: 8
    Course: Main Course
    Cuisine: Halloween
    Calories: 150

    Ingredients
      

    • 3 cups fruit juice (such as orange or pineapple) for a sweet base
    • 2 cups cola soda for bubbles and flavor
    • 1 cup lemon-lime soda adds extra fizz
    • 1 green green gumdrops for eerie eyes and decoration
    • a handful ice cubes to chill and dilute slightly

    Equipment

    • Large mixing bowl
    • Measuring cups and spoons
    • Ladle or large spoon

    Method
     

    1. Pour the fruit juice into a large mixing bowl, creating a vibrant base for your punch.
    2. Add the lemon-lime soda to the fruit juice, gently pouring to preserve the bubbles and fizz, then stir carefully to combine.
    3. Sprinkle in the green gumdrops, pressing some into the surface for eerie, googly eyes that float and sparkle.
    4. Add a handful of ice cubes to chill the mixture and make the punch refreshingly cold.
    5. Pour the cola soda into the bowl slowly, watching it bubble up and create a lively, bubbly effect that resembles a bubbling cauldron.
    6. Gently stir all the ingredients together until the colors are bright and the mixture is well combined, with frothy bubbles on top.
    7. Serve the punch in clear cups or glasses, garnished with additional green gumdrops or spooky straws for extra fun.

    Notes

    For extra spooky flair, add small plastic spiders or glow-in-the-dark stir sticks. Adjust the amount of soda and juice for desired sweetness and fizz.

    As the last of the ice melts into this ghoulish concoction, the magic lingers in the air. The Monster Mash Punch not only refreshes but sparks giggles among friends as they marvel at its wild, colorful appearance. It’s a reminder that Halloween is less about fear and more about the joyful, spooky chaos we create together.

    Whether it’s a party centerpiece or a spontaneous spill of colors on a foggy night, this punch stands out. It’s a bubbling testament to the quirky spirit of Halloween, full of surprises and giggles all around.

  • Spiced Pumpkin Cookies: A Nostalgic Fall Delight

    Spiced Pumpkin Cookies: A Nostalgic Fall Delight

    As the leaves turn golden and the air carries a chill, I find myself craving more than just pumpkin spice lattes. I crave the warm, comforting aroma of freshly baked pumpkin cookies filling every corner of my kitchen. These cookies aren’t just treats; they’re a festive embrace that turns ordinary days into cozy memories.

    What makes this recipe unique is how it balances the natural sweetness of pumpkin with a dash of unexpected spices—cinnamon, nutmeg, and a hint of ginger. The dough comes together in seconds but bakes into cookies that are crisp on the edges yet tender inside. They’re perfect for sharing, wrapped in parchment or enjoyed immediately with a mug of cider.

    The vibrant orange hue alone is almost too pretty to resist, and I love how each bite releases a burst of seasonal flavors. Baking these feels like a warm hug after a long day, especially as the days get shorter and the air sharper. Every crumb is a reminder of autumn’s simple pleasures.

    Fresh Pumpkin Cookies

    These pumpkin cookies are made by mixing pumpkin puree with sugar, spices, and flour to create a soft dough. They are baked until the edges are crisp while the centers remain tender, and have a bright orange appearance with an aromatic, seasonal flavor. The cookies offer a balance of texture, with a slightly chewy interior and a lightly crisp exterior.
    Prep Time 15 minutes
    Cook Time 12 minutes
    Total Time 27 minutes
    Servings: 12
    Course: Main Course
    Cuisine: American
    Calories: 150

    Ingredients
      

    • 1 cup pumpkin puree unsweetened
    • 1 cup granulated sugar
    • 1/2 cup unsalted butter melted
    • 1 large egg
    • 2 cups all-purpose flour
    • 1 teaspoon cinnamon ground
    • 1/2 teaspoon nutmeg ground
    • 1/2 teaspoon ginger ground
    • 1/2 teaspoon salt
    • 1/2 teaspoon baking soda
    • 1/2 teaspoon vanilla extract

    Equipment

    • Mixing bowls
    • Baking sheet
    • Parchment paper
    • Measuring cups and spoons
    • Whisk or spatula

    Method
     

    1. Preheat your oven to 350°F (180°C) and line a baking sheet with parchment paper to prevent sticking.
    2. In a large mixing bowl, whisk together the pumpkin puree, melted butter, and sugar until the mixture is smooth and creamy.
    3. Add the egg and vanilla extract to the bowl and whisk again until fully incorporated.
    4. In a separate bowl, sift together the flour, spices, salt, and baking soda to evenly distribute the dry ingredients.
    5. Gradually fold the dry ingredients into the wet pumpkin mixture, mixing gently until just combined; the dough will be thick and slightly sticky.
    6. Using a spoon or cookie scoop, portion out rounds of dough onto the prepared baking sheet, spacing them about 2 inches apart.
    7. Bake in the preheated oven for 12–14 minutes, or until the edges are golden brown and the centers look set.
    8. Remove the baking sheet from the oven and let the cookies cool on the sheet for 5 minutes, allowing them to firm up slightly.
    9. Transfer the cookies to a wire rack to cool completely, revealing their vibrant orange color and tender texture.
    10. Once cooled, serve the pumpkin cookies as they are or enjoy them with a cup of cider for extra seasonal flair.

    Making these pumpkin cookies is more than just a baking project; it’s a celebration of the season’s rich flavors. Their inviting smell and familiar comfort create a little moment of joy in the chaos of everyday life. Whether it’s a quiet morning or a bustling afternoon, they fit perfectly into autumn’s rhythm.

    As these cookies cool and the cinnamon lingers on your fingertips, you realize how a simple recipe can connect you to the fleeting beauty of fall. They might just become a new tradition in your home, a sweet pause in your busy season. Sharing them, savoring them—that’s what this season is all about.