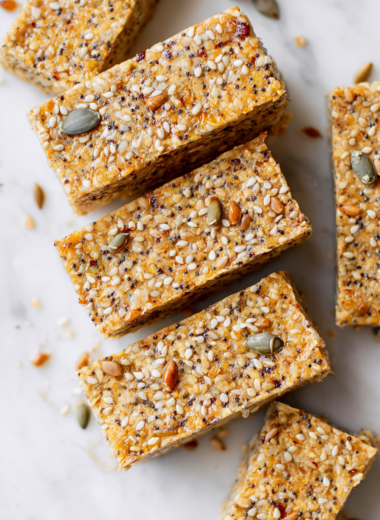
Author: GraceMorgan

  • Vegan Stuffed Peppers Recipe

    Most stuffed pepper recipes tell you to buy fresh, bright peppers and fill them with a carefully measured mixture. But I’ve found that the real magic happens when you use what’s about to go soft in your fridge—leftover roasted carrots, a bit of wilted spinach, or even some sautéed mushrooms.

    It’s a bit chaotic, yes, but that’s where the flavor builds. The peppers become a vessel for whatever you’ve got—no waste, no fuss. And honestly, it’s a small act of rebellion against the plastic-packaged, perfectly uniform trend.”],[

    The Unexpected Charm of Leftover Veggies in Vegan Stuffed Peppers

    Why I Keep Coming Back to This Simple, adaptable Meal

    • I love how forgiving this dish is—almost anything goes.
    • There’s a strange satisfaction in turning leftovers into something beautiful.
    • Seeing a rainbow of peppers on my plate feels like a small celebration.
    • I feel proud when I use up that last bit of roasted vegetables—no waste!

    The story behind my favorite way to use leftovers

    • I stumbled upon this idea when I had a fridge full of odds and ends. It turned into my go-to because it’s flexible and forgiving.
    • It reminds me that cooking isn’t about perfection, but about making do and making tasty.
    • Over time, I’ve tweaked it—adding spices, swapping grains, and experimenting with toppings.

    A brief history and fun facts about stuffed peppers

    • Originally inspired by using up leftover roasted vegetables in a quick, hearty meal.
    • Peppers have been stuffed with various fillings since ancient times, across many cultures.
    • Vegan stuffed peppers became popular in the 1980s as plant-based diets gained traction.
    • The colorful peppers not only brighten the plate but also add a sweet, smoky flavor when roasted.

    Breaking down key ingredients

    • Bell peppers: I love the sweetness of red peppers; swap with green if you want a more bitter bite.
    • Quinoa: I prefer fluffy, slightly nutty quinoa; switch to couscous for a softer texture.
    • Black beans: Creamy, hearty, and filling—try chickpeas if you want a slightly different flavor.
    • Spinach: Wilted greens add moisture and earthiness—kale works well too.
    • Lemon juice: Brightens everything up—use lime for a different citrus note.

    Spotlight on Bell Peppers and Quinoa

    Bell peppers:

    • These get soft and slightly charred during roasting, releasing a sweet aroma.
    • Their skin blisters and shrinks, making them easier to stuff.

    Quinoa:

    • Fluffs up with a nutty scent as it cooks, adding a light texture to the filling.
    • It absorbs flavors well, becoming tender and slightly chewy.

    Substitution ideas for ingredients

    • Vegan cheese: Use nutritional yeast or vegan cheese shreds for cheesy flavor, softer melt.
    • Gluten-free: Swap grains with millet or buckwheat for a different texture.
    • Soy-free: Replace soy-based ingredients with chickpeas or lentils.
    • Nut-free: Use sunflower seeds instead of nuts for crunch and richness.
    • Spice: Adjust chili powder or cayenne for heat, or omit for milder flavor.

    Equipment & Tools

    • Baking dish: Holds peppers during roasting.
    • Sharp knife: Cuts peppers and chops veggies.
    • Mixing bowl: Combines filling ingredients.
    • Spoon: Stuff peppers.
    • Aluminum foil: Prevents drying out during baking.

    Step-by-step guide to making vegan stuffed peppers

    1. Preheat oven to 180°C (356°F).
    2. Slice the peppers in half lengthwise, remove seeds, and set aside.
    3. Chop leftover veggies into small pieces. Mix with cooked grains, beans, and spices.
    4. Stuff the peppers generously with the filling, pressing down slightly.
    5. Place peppers in a baking dish, drizzle with olive oil, and cover with foil.
    6. Bake for 25-30 minutes, until peppers are soft and filling is bubbling.
    7. Remove foil, bake for another 5 minutes to blister the skin slightly.
    8. Let rest for 5 minutes after baking.
    9. Serve with a squeeze of lemon or a drizzle of tahini.
    10. Check doneness by piercing peppers—they should be tender and filling heated through.

    Let peppers rest for 5 minutes; then serve warm, garnished with herbs or a squeeze of lemon.

    How to Know It’s Done

    • Peppers are tender when pierced easily with a knife.
    • Filling is hot and slightly bubbling.
    • Peppers develop a light blister, indicating caramelization.

    Leftover Veggie Stuffed Peppers

    This dish transforms leftover roasted vegetables, wilted greens, and sautéed mushrooms into vibrant, baked stuffed peppers. The peppers are roasted until tender and slightly blistered, with a warm, hearty filling that boasts a mix of textures and flavors. It’s a flexible, waste-free meal that makes colorful, satisfying plates every time.
    Prep Time 15 minutes
    Cook Time 35 minutes
    Total Time 50 minutes
    Servings: 4
    Course: Main Course
    Cuisine: fusion
    Calories: 250

    Ingredients
      

    • 4 large bell peppers preferably red or yellow
    • 1 cup cooked grains (quinoa, rice, or couscous) cooled
    • 1 can black beans rinsed and drained
    • 1 cup leftover roasted vegetables chopped small
    • 1 cup wilted spinach chopped
    • 1 tablespoon lemon juice freshly squeezed
    • 2 cloves garlic minced
    • 2 tablespoons olive oil divided
    • 1/2 teaspoon smoked paprika
    • to taste salt and pepper

    Equipment

    • Baking dish
    • Sharp knife
    • Mixing bowl
    • Spoon
    • Aluminum foil

    Method
     

    1. Preheat your oven to 180°C (356°F). Slice each bell pepper in half lengthwise and carefully remove the seeds and membranes with a sharp knife, creating hollow vessels ready for stuffing.
    2. Chop leftover roasted vegetables into small, uniform pieces. In a mixing bowl, combine the chopped veggies with cooked grains, rinsed black beans, and wilted spinach.
    3. Add minced garlic, lemon juice, half of the olive oil, smoked paprika, salt, and pepper to the bowl. Mix everything thoroughly until well combined and fragrant.
    4. Use a spoon to generously stuff each pepper half with the filling, pressing down slightly to pack in the mixture and ensure it stays in place.
    5. Arrange the stuffed peppers in a baking dish, then drizzle the remaining olive oil over the top. Cover the dish loosely with aluminum foil to keep the peppers moist during baking.
    6. Bake in the preheated oven for 25-30 minutes, until the peppers are tender and slightly blistered, with the filling bubbling inside.
    7. Remove the foil and bake for an additional 5 minutes to allow the peppers’ skins to blister and develop a smoky, caramelized flavor.
    8. Take the dish out of the oven and let the peppers rest for about 5 minutes. This helps the flavors settle and makes handling easier.
    9. Squeeze fresh lemon juice over the peppers or drizzle with tahini for an extra burst of flavor. Serve warm, garnished with herbs if desired.

    Notes

    Feel free to customize the filling with other leftovers like sautéed mushrooms or different greens. For extra richness, top with vegan cheese or a sprinkle of nutritional yeast before the final bake.

    Pro tips for perfect stuffed peppers

    • THE PEPPERS: Use a small paring knife to cut peppers evenly for uniform cooking.
    • SEASON THE FILLING: Taste and adjust spices before stuffing for a flavor punch.
    • USE A HOT OVEN: Ensure oven is fully preheated to 180°C (356°F) for even roasting.
    • PROBE THE TEMP: Peppers should reach about 75°C (165°F) internally.
    • BROWN THE TOP: Remove foil in the last 5 minutes for a slight char and flavor.

    Common mistakes and how to fix them

    • FORGOT TO PRE-BOIL GRAINS? → Use quick-cooking grains or pre-cooked rice.
    • DUMPED TOO MUCH OIL? → Use a light hand or brush peppers with oil instead.
    • OVER-TORCHED PEPPERS? → Cover with foil and lower oven temperature.
    • PEPPERS AREN’T TENDER? → Extend baking time or cover with foil to soften.

    Fast fixes for common issues

    • When peppers are too crispy, cover with foil and bake a bit longer.
    • Splash a little water or broth if filling is too dry during baking.
    • Patch a collapsed pepper with a fresh slice if it leaks.
    • Shield burnt edges with foil if the tops brown too quickly.
    • When in doubt, reheat gently to avoid overcooking.

    Make-ahead and storage tips

    • Prepare filling a day before; store in an airtight container for up to 2 days.
    • Stuffed peppers can be assembled a few hours ahead; keep refrigerated.
    • Bake directly from fridge; add 5–10 minutes if cold.
    • Leftovers reheat well in oven or microwave; check for heat and softness.

    10 Practical Q&As for Perfect Vegan Stuffed Peppers

    1. What size and color peppers work best?

    Use large bell peppers—preferably red or yellow—to hold more filling and add vibrant color.

    2. How do I know when the filling is ready?

    Cook the filling until it’s fragrant and the veggies are tender but not mushy, about 8-10 minutes.

    3. What’s the perfect baking time?

    Bake at 180°C (356°F) for about 25-30 minutes until the peppers are soft and slightly blistered.

    4. Why rest the peppers?

    Let the peppers rest for 5 minutes after baking to settle the flavors before serving.

    5. How do I check if they’re cooked through?

    Use a sharp knife or skewer to check if the peppers are tender—easy to pierce without resistance.

    6. How can I elevate the flavor?

    Add a squeeze of lemon or a drizzle of tahini before serving for a fresh, bright flavor.

    7. How long do leftovers last?

    Store leftovers in an airtight container in the fridge for up to 3 days.

    8. Best way to reheat?

    Reheat in the oven at 160°C (320°F) for 10-15 minutes until hot, or microwave briefly.

    9. What if the peppers burst?

    If peppers collapse or leak during baking, cover with foil and lower heat slightly.

    10. How can I add smoky flavor?

    For a smoky flavor, add a touch of smoked paprika to the filling.

    This dish is about embracing the imperfect, the leftover, the thrown-together. It’s a reminder that good food doesn’t need to be staged on a pristine kitchen counter.

    Sometimes, the best meals are the ones born from chaos—those little moments of improvisation that turn into something memorable. And in the end, that’s what cooking really is: making something comforting out of whatever’s in your fridge.

  • Sweet Potato Carrot Soup Recipe

    This isn’t your average veggie soup. I like to think of it as a cozy hug in a bowl, where roasted sweet potatoes and carrots bring out their deepest flavors. It’s the kind of dish that smells warm and inviting, even before you taste it.

    Making this soup feels like a small act of kindness—roasting the vegetables turns their natural sugars into something caramelized and rich. The process is simple but makes a big difference, especially on chilly days when you need a bit of extra warmth.

    A soup that’s rooted in comfort but built with a focus on the simple joy of earthy, roasted flavors, emphasizing the textures and natural sweetness of vegetables.

    Why This Soup Means Something to Me

    • Making this soup always reminds me of fall mornings in the kitchen.
    • I love how roasting makes the vegetables smell sweet and smoky—like a little bit of sunshine.
    • There’s something satisfying about transforming humble roots into something so rich and comforting.

    The story behind my favorite fall soup

    • This recipe was born out of a lazy Sunday afternoon, when I had a handful of root vegetables and a craving for warmth.
    • I started roasting, just to see what would happen, and was surprised by how caramelized and fragrant everything became.
    • It’s become a go-to comfort food, especially on days when I need a little extra nurturing from the kitchen.

    A little history and fun facts about the ingredients

    • Sweet potatoes are native to Central and South America, dating back thousands of years.
    • Carrots were originally purple and yellow; the orange variety was cultivated in the 17th century in the Netherlands.
    • Roasting vegetables enhances their natural sweetness, a technique used in many traditional cuisines.
    • This soup echoes old farmstead recipes where root vegetables were staples in winter diets.

    Ingredient insights and tweaks

    • Sweet potatoes: First I love their creamy, sweet flesh when roasted. Swap with butternut squash for a similar texture and flavor.
    • Carrots: Their bright, earthy sweetness makes the soup vibrant. Use parsnips for a milder, spicier twist.
    • Garlic: Provides warmth and depth. Substitute with shallots for a milder, sweeter aroma.
    • Vegetable broth: The flavor foundation. Use chicken broth for a richer, more savory base.
    • Lemon: Brightens everything up. A splash of apple cider vinegar can mimic that tang.

    Spotlight on Sweet Potatoes and Carrots

    Sweet potatoes:

    • They become silky when roasted, with a natural caramel sweetness that’s irresistible.
    • Look for firm, unblemished skins with a deep orange hue for best flavor.

    Carrots:

    • Their earthy aroma intensifies when roasted, adding a smoky sweetness.
    • Choose fresh, brightly colored carrots—avoid limp, dull ones for the best bite.

    Substitution tips for dietary needs and flavor tweaks

    • Dairy-Free: Use coconut milk instead of cream for rich, tropical flavor.
    • Gluten-Free: This soup is naturally gluten-free, no swaps needed.
    • Vegan: Ensure broth is vegetable-based, and skip dairy toppings.
    • Extra Creamy: Add a dollop of coconut yogurt or cashew cream.
    • Sweetness Boost: Maple syrup can enhance caramel notes if needed.

    Equipment & Tools

    • Oven: Roast vegetables for deep flavor.
    • Large pot: Cook and simmer the soup.
    • Immersion blender or regular blender: Puree the soup smoothly.
    • Baking sheet: Roast vegetables evenly.

    Step-by-step guide to making sweet potato carrot soup

    1. Preheat your oven to 200°C (400°F).
    2. Peel and chop 2 large sweet potatoes and 3 carrots into even chunks.
    3. Toss the vegetables with olive oil, salt, and a pinch of pepper. Spread on a baking sheet.
    4. Roast for about 30-35 minutes, stirring halfway, until they’re caramelized and tender.
    5. In a large pot, sauté 1 chopped onion and 2 minced garlic cloves in a splash of oil until fragrant, about 5 minutes.
    6. Add the roasted vegetables to the pot. Pour in 4 cups of vegetable broth.
    7. Bring to a boil, then reduce heat and simmer for 10 minutes, letting the flavors meld.
    8. Use an immersion blender or transfer to a blender to puree the soup until smooth.
    9. Taste and adjust seasoning—add salt, pepper, and a squeeze of lemon if desired.
    10. Serve hot, garnished with herbs or a swirl of cream if you like.

    Let the soup rest for 5 minutes after blending to settle. Serve in warm bowls, garnished as desired.

    How to Know It’s Done

    • Soup is smooth and velvety when blended.
    • A slight caramelized smell indicates good roasting.
    • Soup should be hot and steaming when served.

    Roasted Sweet Potato and Carrot Soup

    This cozy soup features roasted sweet potatoes and carrots blended into a smooth, velvety texture with deep caramelized flavors. The roasting process enhances their natural sweetness, creating a warm and inviting dish perfect for chilly days. The final result is a vibrant, comforting bowl with a rich, earthy aroma.
    Prep Time 10 minutes
    Cook Time 45 minutes
    Total Time 55 minutes
    Servings: 4
    Course: Main Course
    Cuisine: Comfort Food
    Calories: 180

    Ingredients
      

    • 2 large sweet potatoes firm and unblemished
    • 3 medium carrots bright and fresh
    • 2 cloves garlic minced
    • 1 large onion chopped
    • 4 cups vegetable broth or chicken broth
    • 2 tablespoons olive oil for roasting and sautéing
    • to taste salt and pepper
    • 1 squeeze lemon optional, for brightening

    Equipment

    • Oven
    • Large pot
    • Immersion blender or regular blender
    • Baking sheet

    Method
     

    1. Preheat your oven to 200°C (400°F). Line a baking sheet with parchment paper for easy cleanup.
    2. Peel the sweet potatoes and carrots, then chop them into even chunks to ensure they roast uniformly.
    3. Toss the chopped vegetables with olive oil, salt, and pepper until well coated. Spread them out in a single layer on the prepared baking sheet.
    4. Roast the vegetables in the oven for about 30-35 minutes, flipping halfway through, until they are caramelized and tender with golden edges.
    5. Meanwhile, heat a splash of olive oil in a large pot over medium heat. Add the chopped onion and sauté for about 5 minutes until translucent and fragrant.
    6. Add the minced garlic to the pot and cook for another minute until fragrant, being careful not to burn it.
    7. Once the roasted vegetables are done, add them to the pot with the sautéed onions and garlic.
    8. Pour in the vegetable broth and bring the mixture to a gentle boil. Reduce the heat and let it simmer for about 10 minutes to allow the flavors to meld.
    9. Use an immersion blender directly in the pot, or carefully transfer the soup to a blender, and blend until completely smooth and velvety.
    10. Taste the soup and adjust the seasoning with salt, pepper, and a squeeze of lemon for brightness if desired.
    11. Serve the hot soup in bowls, garnished with fresh herbs or a drizzle of olive oil for an extra touch.

    Tips and tricks for perfect soup

    • FLAVOR: Roast the vegetables until slightly charred for a smoky depth.
    • TEXTURE: Puree in stages if the soup is too thick, to avoid strain.
    • AROMA: Add a sprig of thyme during simmering for subtle herbal notes.
    • HEAT: Keep the soup at a gentle simmer—boiling too hard can break down the vegetables.
    • BALANCE: Finish with a squeeze of lemon to brighten the sweetness.

    Common mistakes and how to fix them

    • FORGOT TO peel the vegetables? Just scrape the skins off after roasting for a smoother soup.
    • DUMPED too much broth? Add a splash of water or more roasted veggies to balance.
    • OVER-TORCHED the garlic? Discard and start fresh—bitter tastes ruin the sweetness.
    • SCOURED the bottom of the pot? Deglaze with a little broth to lift the caramelized bits.

    Quick fixes for common issues

    • When too thick, splash in hot water or broth and blend again.
    • Splash a little vinegar if the soup tastes flat.
    • Patch blandness by stirring in a dash of soy sauce or miso.
    • Shield burnt bits with a splash of water and scrape up the flavor.
    • Shimmer with a drizzle of olive oil or cream for richness.

    Make-ahead tips and storage notes

    • Roasted vegetables can be prepared a day ahead. Store in an airtight container in the fridge.
    • Soup can be made 2 days in advance; reheat gently on the stove, stirring often.
    • The flavors deepen overnight, making it even more comforting.
    • Reheat the soup on low heat until steaming, checking for even warmth and adjusting seasoning as needed.

    10 Practical Q&As About Sweet Potato Carrot Soup

    1. How do I safely blend hot soup?

    Use a sturdy blender or immersion blender. Make sure to let the hot soup cool slightly before blending to avoid splatters.

    2. Can I make this soup richer?

    Add a splash of coconut milk or cream before blending for extra creaminess and a subtle sweetness.

    3. Should I roast the vegetables beforehand?

    Roast the sweet potatoes and carrots first for a smoky depth. It’s a game changer for flavor.

    4. When should I taste and adjust the seasoning?

    Adjust seasoning at the end—taste for salt, pepper, and maybe a squeeze of lemon to brighten.

    5. How long does leftover soup last?

    Store in airtight containers for up to 3 days in the fridge. Reheat gently on the stove, stirring often.

    6. What toppings can I add?

    Add a handful of chopped fresh herbs or a drizzle of good olive oil before serving for a fresh note.

    7. Can I substitute the broth?

    Use vegetable broth for a lighter soup, or chicken broth for more body.

    8. What if my soup is too thick?

    If the soup is too thick, thin it out with a little hot water or more broth.

    9. How do I know when the vegetables are cooked enough?

    Cook the vegetables until very soft; they should almost fall apart for the best texture.

    10. How can I spice it up?

    For a spicier kick, add a pinch of cayenne or chili flakes during cooking.

    Once you’ve ladled out a bowl, the aroma alone is enough to make you pause. It’s simple, honest food that fills the kitchen with a gentle sweetness and earthy undertone.

    This soup is a reminder that sometimes, the best comfort comes from a handful of humble ingredients transformed by time and heat. It’s a quiet, satisfying way to nourish yourself, no fuss needed.

  • Cranberry Brie Bites Recipe

    These cranberry brie bites started as a desperate attempt to make holiday appetizers feel a little more special. The secret? A splash of tart cranberries paired with that silky, almost buttery brie, all wrapped in flaky pastry that crunches just right.

    I like to think of them as tiny bites of celebration—familiar flavors that surprise you each time you pop one in your mouth. They’re a bit messy, a bit luxurious, and a lot addictive. Perfect for when you want a little sparkle on the table without fuss.

    A cook’s notes on turning a simple appetizer into a sensory journey by focusing on the textures and flavors that dance in your mouth.

    Why I Keep Coming Back to This Simple Appetizer

    • I love how the tart cranberries cut through the rich brie.
    • They remind me of holiday mornings spent baking with my family.
    • The crunch of the pastry is my favorite part—so satisfying.
    • I’ve made these for last-minute guests, and they disappear in minutes.

    A Little Inspiration Behind the Bites

    • This dish was born out of a busy holiday season when I needed something quick yet impressive. I experimented with different fruit and cheese combos but kept returning to cranberries and brie because they balance each other so well.
    • It’s a reminder that good things don’t have to be complicated—just a few quality ingredients and a little heat, and you’re there.
    • The aroma alone makes the whole house feel festive.

    The Little History Behind the Bites

    • Inspired by a need to elevate holiday snacking with minimal fuss.
    • Traditionally, cranberries and brie are paired in charcuterie boards, but these bites make it portable.
    • The pastry base is a quick puff or tart shell, borrowed from classic appetizers.
    • Cranberries symbolize festive cheer, and brie adds a luxurious creaminess.

    Ingredient Insights for Better Bites

    • Cranberries: Fresh cranberries are tart and firm, releasing juice as they bake, adding a nice shimmer.
    • Brie: Creamy, buttery, melts smoothly—look for a firm block that softens easily without oil separation.
    • Pastry: Flaky and crisp when baked, but can be a bit greasy if overworked. Keep it cold.
    • Orange zest: Brightens the flavor, making the tartness pop—use a microplane for fine zest.
    • Herbs: Fresh thyme adds earthy notes, but dried can work in a pinch—add before baking for flavor.

    Spotlight on Cranberries and Brie

    Cranberries:

    • Fresh cranberries: They’re firm, tart, and burst with a juicy pop when baked.
    • They caramelize slightly, adding a sweet-tart glaze that balances richness.
    • Their natural acidity cuts through the creamy brie, creating harmony.

    Brie:

    • Tangles with a mild, buttery flavor, melting into a silky pool when warm.
    • It’s soft but holds shape, and it browns beautifully at the edges.
    • Look for a high-quality brie to avoid oil separation or too much salt.

    Ingredient Swaps to Suit Your Pantry

    • Dairy-Free: Use coconut-based cheese for creaminess, but expect a different flavor profile.
    • Gluten-Free: Swap puff pastry for a gluten-free tart shell or rice paper cups.
    • Sweetener: Honey or maple syrup can replace sugar in the cranberry mixture for a deeper flavor.
    • Herbs: Fresh basil or rosemary can replace thyme for a different aromatic note.
    • Cranberries: Dried cranberries soaked in warm water or orange juice can substitute fresh berries.

    Equipment & Tools

    • Mini muffin tin or baking sheet: Shape and hold the pastry shells
    • Cookie cutter or glass: Cut pastry into rounds
    • Small mixing bowl: Combine cranberries and seasonings
    • Oven: Bake the bites
    • Spatula or small spoon: Fill pastry shells

    Step-by-Step Guide to Perfect Cranberry Brie Bites

    1. Preheat your oven to 190°C (375°F). Line a baking sheet with parchment.
    2. If using puff pastry, roll it out slightly and cut into small rounds using a cookie cutter. Place in mini muffin tins or on a baking sheet.
    3. Mix fresh cranberries with a little sugar, a splash of orange juice, and a pinch of cinnamon. Let sit for 10 minutes.
    4. Cut brie into small cubes or slices that will fit into your pastry shells.
    5. Spoon cranberry mixture into each pastry shell, then top with a piece of brie.
    6. Bake for about 15 minutes, until the pastry is golden and the cheese is bubbly.
    7. Remove from oven and let sit for a few minutes before transferring to a serving platter.
    8. Garnish with fresh thyme or a sprig of rosemary if desired.
    9. Serve warm, with a little extra cranberry sauce on the side.

    Let the bites rest for 3–5 minutes after baking to settle. Serve warm or at room temperature.

    How to Know It’s Done

    • Pastry edges are golden and crisp.
    • Cheese is melted and bubbling.
    • Cranberry topping is shiny and slightly caramelized.

    Cranberry Brie Bites

    These bite-sized appetizers feature a flaky pastry shell filled with a tart cranberry mixture and creamy brie cheese. The dish combines crisp textures with melty cheese and juicy cranberries, creating a festive and visually appealing treat. Perfect for holiday gatherings, they offer a balance of sweet, tart, and savory flavors in each bite.
    Prep Time 15 minutes
    Cook Time 15 minutes
    Total Time 30 minutes
    Servings: 12
    Course: Main Course
    Cuisine: Appetizer, Holiday
    Calories: 150

    Ingredients
      

    • 1 package puff pastry or mini tart shells thawed if frozen
    • 1 cup fresh cranberries cranberries rinsed and drained
    • 1 tablespoon sugar adjust to taste
    • 1 tablespoon orange juice fresh squeezed or bottled
    • 1 pinch cinnamon optional
    • 8 oz brie cheese cut into small cubes
    • fresh thyme for garnish fresh thyme optional

    Equipment

    • Mini muffin tin or baking sheet
    • Cookie cutter or glass
    • Small mixing bowl
    • Oven
    • Spatula or small spoon

    Method
     

    1. Preheat your oven to 190°C (375°F) and line a baking sheet with parchment paper.
    2. If using puff pastry, roll it out gently on a floured surface to slightly relax the dough, then cut into small rounds with a cookie cutter or glass. Place the pastry rounds into mini muffin tins or on the prepared baking sheet.
    3. In a small mixing bowl, combine the cranberries with sugar, orange juice, and a pinch of cinnamon. Toss gently to coat and let sit for about 10 minutes until the cranberries begin to release their juices and soften slightly.
    4. Drop a small spoonful of the cranberry mixture into each pastry shell, distributing evenly. Follow with a small cube or slice of brie cheese on top of the cranberries.
    5. Bake in the preheated oven for about 15 minutes, or until the pastry edges are golden brown and crispy, and the brie is melted and bubbling.
    6. Remove from the oven and let cool slightly for 3–5 minutes. Garnish with fresh thyme if desired, then serve warm for the best melty cheese and juicy cranberries.

    Tips & Tricks for Perfect Cranberry Brie Bites

    • THE CRUST: Brush with egg wash for extra golden color.
    • CRACKLE THE TOP: Sprinkle a little sugar on top before baking for a caramelized finish.
    • SMOKEY FLAVOR: Toss cranberries with a dash of smoked paprika for depth.
    • JIGGLE TEST: Gently shake the tray—bites should be stable and slightly firm.
    • SEAR THE BRIE: Briefly broil for a bubbly, bubbly top.

    Common Mistakes and How to Fix Them

    • FORGOT TO PREHEAT THE OVEN? Turn it on immediately and don’t delay baking.
    • DUMPED TOO MUCH CRANBERRY? Use less next time or drain excess juice for less sogginess.
    • OVER-TORCHED THE EDGES? Lower the oven temperature slightly or cover with foil.
    • PASSED ON THE CHEESE? Add more brie or sprinkle with extra for gooey richness.

    Quick Fixes for Common Baking Woes

    • When pastry softens, splash a little water on the crust and bake 2 min longer.
    • Patch soggy spots with a sprinkle of crushed crackers before baking.
    • Shield over-browned edges with foil if they turn too dark.
    • If cheese isn’t melting, increase oven temp slightly or bake a minute longer.
    • Smell burnt? Remove immediately and cover with foil, then lower oven temp for next batch.

    Make-Ahead and Storage Tips for Cranberry Brie Bites

    • Prepare the cranberry mixture a day ahead; refrigerate and add to pastry just before baking.
    • Baked bites are best fresh but can be stored in the fridge for 1–2 days.
    • Reheat in the oven at 160°C (320°F) for 5–7 minutes until the cheese is melty and pastry crisp.
    • Cranberries might soften over time, so serve soon after baking for maximum sparkle.

    10 Practical Q&As About Cranberry Brie Bites

    1. What kind of pastry should I use?

    Use mini tart shells or cut puff pastry into small rounds. They hold everything nicely and are easy to handle.

    2. Can I use dried cranberries?

    Fresh cranberries give a bright, tart flavor, but dried cranberries work if you soak them in warm water first.

    3. How long do I bake them?

    Bake at 190°C (375°F) for about 15 minutes until the cheese is bubbly and the crust is golden.

    4. How do I fill the bites?

    Use a small spoon to scoop the cranberry mixture into each pastry shell. Don’t overfill to avoid spilling.

    5. When is the best time to serve?

    Serve warm, right out of the oven, for the best melty cheese and juicy cranberries.

    6. Can I make these ahead?

    They keep well in the fridge for up to 2 days. Reheat in the oven at 160°C (320°F) to keep the crust crisp.

    7. Can I swap the cheese?

    Switch brie for goat cheese for a tangier bite. Use cream cheese if you want a softer, milder flavor.

    8. What toppings can I add?

    Add a sprinkle of chopped pecans or walnuts for crunch. Fresh thyme or rosemary adds aromatic depth.

    9. What tools are helpful?

    Use a silicone mold for easy removal and less mess. A small offset spatula helps with filling.

    10. How do I know when they’re done?

    Check the bites when they’re golden around the edges and the cheese is bubbling.

    Once baked, I like to scatter them on a platter, letting the warm aroma draw everyone in. They’re best enjoyed right away, when the cheese is gooey and the pastry is crisp.

    These little bites remind me that sometimes, the simplest ingredients can make the most memorable bites. They’re not just appetizers—they’re a small, joyful moment in any gathering.

  • Easy Vegan Potato Soup Recipe

    Imagine peeling potatoes on a chilly weekend, craving something warm but simple. This soup isn’t fancy, but it’s honest in its flavor, with that soothing, starchy richness that hits right when you need it.

    I’ve made this recipe a hundred times, tweaking it with whatever’s lurking in the fridge. It’s the kind of dish that feels like a little hug, especially when the air turns crisp and the garden’s bounty has dwindled.

    The comforting, no-fuss approach to making vegan potato soup that highlights the humble potato’s versatility, with a focus on improvisation and pantry staples.

    Why this vegan potato soup means everything to me.

    • This recipe reminds me of my grandma’s kitchen, where simplicity reigned.
    • I love how adaptable it is—sometimes I toss in kale or a splash of hot sauce.
    • It’s my go-to when I want something quick, filling, and nourishing.
    • Making this soup always feels like a small victory—no fuss, just flavor.

    The story behind this simple, soulful soup.

    • I was inspired by the need for a meal that’s both filling and quick, using pantry staples.
    • The creaminess of the potatoes paired with the warmth of garlic and herbs feels like a hug in a bowl.
    • I often make it during busy weeks when I want comfort without hours in the kitchen.
    • It’s a reminder that some of the best dishes are born from improvisation and humble ingredients.

    The humble history and fun facts about potato soup.

    • Potato soup dates back centuries, with roots in peasant cuisines across Europe.
    • The potato was once called the ‘Irish treasure’ for its role in survival during famine.
    • Vegan versions gained popularity as more people seek hearty plant-based comfort food.
    • This soup can be a blank canvas—add any vegetables or herbs you love.

    Ingredient insights: what makes this soup sing.

    • Potatoes: I prefer Yukon Gold for their buttery flavor and creamy texture. Swap with sweet potatoes for a sweeter, denser soup.
    • Onion: Adds sweetness and depth. Red or yellow onions both work, but yellow gives a mellow, caramelized note.
    • Garlic: It’s the backbone—smells garlicky and warm as it cooks, transforming the broth. Use fresh for best flavor.
    • Vegetable broth: The base that ties everything together. Use homemade or store-bought, but check for added salt.
    • Coconut milk: For creaminess and a subtle tropical note—can substitute with any plant-based milk, but won’t be as rich.

    Spotlight on potatoes and garlic.

    Potatoes:

    • Their starchy, creamy interior melts into the soup, creating a velvety texture and a subtle earthy aroma.
    • Garlic: When sautéed, it releases a warm, savory scent that infuses the broth. Be cautious not to burn it, or it turns bitter.

    Garlic:

    • Potatoes: Their starchy, creamy interior melts into the soup, creating a velvety texture and a subtle earthy aroma.
    • When sautéed, it releases a warm, savory scent that infuses the broth. Be cautious not to burn it, or it turns bitter.

    Smart swaps and tweaks for dietary preferences.

    • Dairy-Free: Use coconut milk or cashew cream for richness, though it adds a different flavor dimension.
    • Low-Sodium: Opt for reduced-salt broth and add salt gradually to control flavor.
    • Gluten-Free: This recipe is naturally gluten-free, just ensure your broth is certified gluten-free.
    • Extra Protein: Toss in cooked chickpeas or lentils for added heartiness.
    • Flavor Boost: A teaspoon of smoked paprika or turmeric can add warmth and depth.

    Equipment & Tools

    • Large pot: To cook the potatoes and soup
    • Immersion blender or potato masher: To blend or mash the soup to desired consistency
    • Measuring cups and spoons: For precise seasoning
    • Wooden spoon or spatula: To stir during cooking

    How to make vegan potato soup — a cozy, straightforward guide.

    1. Peel and dice 4 large potatoes into 2-cm chunks. Set aside.
    2. Heat a large pot over medium, add 1 tbsp olive oil, and sauté 1 chopped onion until translucent, about 5 minutes.
    3. Add potatoes to the pot, stir to coat with oil and onion, cook for 2 minutes.
    4. Pour in 4 cups vegetable broth, bring to a boil. Reduce heat to simmer.
    5. Cook uncovered for 15-20 minutes, until potatoes are fork-tender.
    6. Use a potato masher or immersion blender to mash or blend the soup until smooth or slightly chunky.
    7. Stir in ½ cup coconut milk or plant-based cream, season with salt, pepper, and a pinch of nutmeg.
    8. Simmer for another 5 minutes, adjust seasoning.
    9. Remove from heat, taste, and adjust salt or add a splash more broth if too thick.
    10. Serve hot, garnished with chopped green onions or herbs.

    Let the soup sit for 5 minutes after blending, then taste again for seasoning. Serve with your favorite toppings.

    How to Know It’s Done

    • Potatoes are easily pierced with a fork.
    • Soup has thickened and is steaming gently.
    • A quick taste test shows balanced salt and creaminess.

    Vegan Potato Soup

    This simple vegan potato soup features tender potatoes simmered in vegetable broth, blended to a creamy consistency with coconut milk for added richness. The process involves sautéing onions and garlic, simmering until the potatoes are soft, and then blending the mixture until smooth or slightly chunky, resulting in a comforting, hearty bowl with a velvety texture.
    Prep Time 10 minutes
    Cook Time 25 minutes
    Total Time 35 minutes
    Servings: 4
    Course: Main Course
    Cuisine: Vegan
    Calories: 180

    Ingredients
      

    • 4 large potatoes Yukon Gold preferred for creaminess
    • 1 medium onion Chopped
    • 3 cloves garlic Minced
    • 4 cups vegetable broth Check for added salt
    • 1/2 cup coconut milk For creaminess
    • 1 tablespoon olive oil For sautéing
    • to taste Salt and pepper Adjust to preference
    • a pinch nutmeg Optional, for depth

    Equipment

    • Large pot
    • Immersion blender or potato masher
    • Measuring cups and spoons
    • Wooden spoon or spatula

    Method
     

    1. Peel and dice the potatoes into roughly 2-cm chunks. Set aside.
    2. Heat a large pot over medium heat, then add a tablespoon of olive oil. Once shimmering, add chopped onions and sauté until they turn translucent and fragrant, about 5 minutes.
    3. Add the diced potatoes to the pot, stirring to coat them with the onion and oil. Cook for another 2 minutes, allowing the potatoes to start warming through.
    4. Pour in the vegetable broth, bringing the mixture to a gentle boil. Once bubbling, reduce the heat to low and cover the pot.
    5. Simmer uncovered for 15-20 minutes, or until the potatoes are fork-tender and easily mashable.
    6. Use an immersion blender or a potato masher to blend or mash the soup directly in the pot, creating a smooth or slightly chunky texture based on your preference.
    7. Stir in the coconut milk, then season with salt, pepper, and a pinch of nutmeg. Mix well to combine all flavors.
    8. Allow the soup to simmer gently for another 5 minutes, tasting and adjusting the seasoning as needed.
    9. Remove from heat and let sit for a few minutes to let the flavors meld. Serve hot, garnished with chopped herbs or green onions if desired.

    Notes

    For a richer flavor, roast the potatoes beforehand or add a splash of lemon juice at the end for brightness.

    Pro tips for perfect vegan potato soup.

    • Use starchy potatoes for natural creaminess. Russets or Yukon Gold work best.
    • Sauté onions until they smell sweet and golden. This builds flavor.
    • Simmer uncovered to let excess moisture evaporate, concentrating the flavor.
    • Mash or blend to your preferred texture—chunky or smooth.
    • Taste and adjust seasoning at the end—sometimes a squeeze of lemon brightens the whole pot.

    Common pitfalls and how to fix them.

    • FORGOT TO salt the potatoes? Add a pinch of salt during simmering to bring out flavor.
    • DUMPED too much broth? Thicken with a splash of plant-based milk or blend in some potato bits.
    • OVER-TORCHED the garlic? Use fresh garlic in the next batch and add at the end of cooking.
    • NO blender? Mash with a fork or potato masher for a rustic texture.

    Fast fixes for common soup mishaps.

    • When too thick, splash in hot broth and stir until loosened.
    • If bland, add a splash of soy sauce or lemon juice.
    • Splash extra olive oil for richness if the soup feels dull.
    • Patch over over-salted soup with a peeled potato simmered in it.
    • Shield burnt bits with a splash of water and scrape up the flavor.

    Prep, store, and reheat without losing that cozy flavor.

    • Peel and chop potatoes ahead, store in water in the fridge for up to 24 hours.
    • Soup thickens as it cools; reheat gently on the stove, stirring often.
    • Stir in a little water or broth when reheating to loosen the texture.
    • Flavors deepen overnight, so it’s often better the next day.

    10 Practical Questions & Answers for Easy Vegan Potato Soup

    1. Can I use sweet potatoes instead?

    Use starchy potatoes like Yukon Gold or Russets for creaminess. They break down well and thicken the soup naturally.

    2. What if I don’t have veggie broth?

    Yes, sweet potatoes add a sweeter, earthier flavor. Adjust cooking time slightly, as they can soften faster.

    3. How do I make it thicker?

    Water with a pinch of salt works in a pinch, but broth adds depth. Consider adding a splash of soy sauce or miso for umami.

    4. Is this soup freezer friendly?

    Simmer it longer uncovered or mash some potatoes in the pot. For extra creaminess, blend a portion of the soup.

    5. Can I add protein?

    Absolutely, cool it first, then store in airtight containers for up to 3 months. Reheat on low, stirring often.

    6. How do I prevent it from sticking?

    Sure, toss in cooked chickpeas, tofu cubes, or a swirl of coconut cream for richness.

    7. What’s a good garnish?

    Stir frequently during simmering, and keep the heat moderate—around 85°C or 185°F.

    8. Can I make this spicy?

    Chopped green onions, a drizzle of olive oil, cracked black pepper, or fresh herbs like parsley or thyme.

    9. How do I store leftovers?

    Add a pinch of smoked paprika, cayenne, or hot sauce during cooking for a warming kick.

    10. What kind of onion works best?

    Keep in airtight containers in the fridge for up to 4 days. Reheat gently, stirring to restore creaminess.

    This soup isn’t just about comfort, though. It’s about using what you’ve got, leaning into those small moments of cooking without fuss.

    When you ladle this into a bowl, the smell of garlic, potato, and a hint of herbs fills the kitchen with a quiet cheer. It’s a reminder that good, simple food doesn’t need to be complicated.

  • No-bake Peanut Butter Bars Recipe

    There’s something about making these no-bake peanut butter bars that feels like a quick hug from your childhood. No oven, no fuss, just the right mix of sweet, salty, and nutty. They’re perfect for when you want something satisfying but don’t want to turn on the stove.

    I love how easy they are to customize—more chocolate, less sugar, a sprinkle of sea salt on top. Plus, they come together in under 20 minutes, which is a miracle when everyone’s snacking or craving something fast. It’s a recipe that’s become a little ritual for me, a way to bring a bit of comfort into chaotic days.

    A nostalgic treat with a modern twist: how no-bake peanut butter bars connect us to childhood moments, yet fit into busy, health-conscious lives.

    Why I keep coming back to this recipe

    • I love how these bars instantly bring back childhood memories.
    • Making them feels like a mini celebration, even on the busiest days.
    • There’s a satisfying crunch in every bite that I can’t get enough of.
    • They remind me that simple ingredients can create something truly comforting.

    My story behind these bars

    • This recipe was born out of a need for a quick, satisfying snack that my kids would love.
    • I experimented with different nut butters and sweeteners until I found the perfect balance.
    • It’s become a staple in my kitchen because it’s flexible, forgiving, and so easy to make.

    A brief history of no-bake peanut butter bars

    • These bars became popular in the 1970s as a quick, no-bake treat for busy households.
    • Using graham crackers adds a nostalgic crunch, reminiscent of childhood s’mores.
    • The combination of peanut butter and honey was originally a health-conscious snack in the early days.
    • Chocolate topping became a favorite addition in the 1980s, making them more decadent.
    • They’re sometimes called ‘Lazy Girl’s Brownies’ because of how effortlessly they come together.

    Ingredient insights for perfect texture and flavor

    • Peanut Butter: I prefer creamy for smoothness, but crunchy adds texture—try natural or processed.
    • Honey: Use real honey for a rich flavor, or maple syrup for a more subtle sweetness.
    • Graham Crackers: They add a toasty, slightly sweet crunch—substitute digestive biscuits for a similar effect.
    • Chocolate Chips: I love semisweet for balance, but dark or white chocolate work too.
    • Butter: Salted or unsalted, depending on your preference—salted adds a subtle contrast.

    Key ingredients that make these bars special

    Peanut Butter:

    • It’s creamy and rich, giving the bars their signature flavor and smooth texture.
    • During melting, it becomes oozy and blends seamlessly.

    Chocolate Chips:

    • They melt smoothly and shimmer when heated, adding a decadent topping.
    • They crackle slightly when biting into the cooled bars.

    Substitutions for dietary needs and flavor tweaks

    • Nut-Free: Use sunflower seed butter for a nut-free version, with a slightly different flavor.
    • Sweetener: Swap honey for agave syrup or brown rice syrup for a different sweetness profile.
    • Gluten-Free: Use gluten-free graham crackers or digestive biscuits.
    • Vegan: Use vegan butter and dairy-free chocolate chips.
    • Low-Sugar: Substitute with a sugar-free syrup or reduce honey, but expect less sweetness.

    Equipment & Tools

    • Mixing bowl: Combine ingredients smoothly and evenly.
    • Microwave-safe bowl: Melt butter quickly and evenly.
    • Spatula: Press mixture into the pan and spread evenly.
    • Knife: Cutting clean bars.
    • Parchment paper: Prevent sticking and easy removal.

    Step-by-step guide to perfect no-bake peanut butter bars

    1. Prepare a 20×20 cm (8×8 inch) pan by lining it with parchment paper.
    2. In a microwave-safe bowl, melt 1/2 cup (115g) butter in 30 seconds, until just liquid.
    3. Combine 1 cup (250g) peanut butter, 1/2 cup (120ml) honey or maple syrup, and a pinch of salt in a mixing bowl.
    4. Pour the melted butter into the peanut butter mixture, stirring until smooth and glossy.
    5. Add 2 cups (200g) of crushed graham crackers or digestive biscuits; mix well.
    6. Transfer the mixture into the prepared pan, pressing down firmly with a spatula to even out.
    7. Melt 1/2 cup (90g) chocolate chips, then drizzle over the top for extra richness.
    8. Chill in the fridge for at least 2 hours or until firm and set.
    9. Check for doneness: the surface should be glossy, edges slightly pulled from the pan, and it should hold together when pressed.
    10. Use a sharp knife to cut into bars, wiping the blade between cuts for clean edges.
    11. Store in an airtight container; they keep at room temperature for 3 days or in the fridge for up to a week.

    Let the bars rest in the fridge for at least 2 hours before cutting. Serve chilled or at room temperature, depending on preference.

    How to Know It’s Done

    • Bars are firm and hold shape when pressed.
    • Surface is glossy and chocolate drizzle looks shiny.
    • Edges are slightly pulled from the pan, indicating firmness.

    No-Bake Peanut Butter Bars

    These no-bake peanut butter bars are a nostalgic treat with a creamy, crunchy texture that comes together effortlessly without an oven. Made from a blend of peanut butter, honey, graham crackers, and topped with chocolate, they are firm yet tender, with a glossy finish and a satisfying bite. Perfect for quick snacking or satisfying sweet cravings with minimal fuss.
    Prep Time 15 minutes
    Total Time 15 minutes
    Servings: 12
    Course: Main Course
    Cuisine: American
    Calories: 250

    Ingredients
      

    • 1/2 cup butter unsalted preferred
    • 1 cup peanut butter creamy or crunchy
    • 1/2 cup honey or maple syrup
    • 2 cups graham crackers crushed into small pieces
    • 1/2 cup chocolate chips semisweet or dark

    Equipment

    • Mixing bowl
    • Microwave-safe bowl
    • Spatula
    • Knife
    • Parchment paper

    Method
     

    1. Line an 8×8 inch (20×20 cm) pan with parchment paper, leaving a bit overhang for easy removal.
    2. In a microwave-safe bowl, melt the butter in short bursts of about 30 seconds, stirring in between, until fully liquid and fragrant.
    3. Add the peanut butter and honey to the melted butter, then stir until the mixture is smooth, glossy, and well combined. It should smell nutty and sweet.
    4. Crush the graham crackers into small crumbs or pieces, then gently fold them into the peanut butter mixture, creating a thick, sticky dough.
    5. Transfer the mixture into the prepared pan, then press it down firmly with a spatula or your fingers to create an even, compact layer. You should hear a slight resistance as you press.
    6. In a separate microwave-safe bowl, melt the chocolate chips in short intervals, stirring until smooth and shiny. This should take about 30-45 seconds.
    7. Drizzle or spread the melted chocolate evenly over the pressed peanut butter mixture, creating a glossy top layer.
    8. Place the pan in the fridge and chill for at least 2 hours, or until the bars are firm and set, with a shiny chocolate top.
    9. Once chilled and firm, use the parchment overhang to lift the bars out of the pan, then place on a cutting board.
    10. Using a sharp knife, cut into 12 equal bars, wiping the blade clean between cuts for clean edges.
    11. Serve immediately or store in an airtight container in the fridge for up to a week. Enjoy these sweet, crunchy, and creamy treats!

    Tips & tricks for perfect bars

    • Use room temperature peanut butter for easier mixing.
    • Press down firmly when spreading to avoid air pockets.
    • Chill the bars in a single layer for even setting.
    • Use a serrated knife for cleaner cuts.
    • Add a pinch of sea salt on top for enhanced flavor.

    Common mistakes and how to fix them

    • FORGOT TO CHILL: Chill longer or re-freeze to firm up.
    • DUMPED TOO MUCH OIL: Drain excess oil or add more dry ingredients.
    • OVER-TORCHED CHOCOLATE: Use a double boiler or microwave in short bursts.
    • NOT ENOUGH PRESSURE: Press mixture firmly into the pan to avoid crumbly bars.

    Quick fixes to common issues

    • When mixture is too sticky, add crushed biscuits or oats.
    • Splash a little warm water on the chocolate to loosen it.
    • Patch cracks by pressing in extra crumbs or melted chocolate.
    • Shield edges with parchment if they crack during slicing.
    • When in doubt, refrigerate longer for a firmer texture.

    Make-ahead and storage tips

    • You can prepare the mixture a day ahead, just store it covered in the fridge.
    • Bars can be stored in an airtight container at room temperature for up to 3 days.
    • Refrigerate for longer shelf life; they stay good for up to a week.
    • For best texture, serve straight from the fridge or let sit at room temp for 10 minutes before slicing.

    10 Practical Q&As for No-Bake Peanut Butter Bars

    1. Can I use crunchy peanut butter?

    Use creamy peanut butter for smoothness, but crunchy adds a nice texture if you prefer bite.

    2. How do I melt the butter?

    Yes, melt butter in the microwave or on the stove, just until it’s fully liquid—about 30 seconds in the microwave.

    3. What size pan should I use?

    Line your pan with parchment paper for easy removal and cleanup. A 20×20 cm (8×8 inch) pan works well.

    4. How long do I need to chill them?

    Chill the bars in the fridge for at least 2 hours or until firm. They should be solid and slightly glossy on top.

    5. How do I cut clean bars?

    Use a sharp knife to cut clean slices, wiping it between cuts for neat edges.

    6. How should I store the bars?

    Store in an airtight container at room temp for up to 3 days or refrigerate for longer shelf life.

    7. Can I freeze these bars?

    Yes, you can freeze them for up to 3 months. Wrap tightly in plastic wrap before freezing.

    8. Can I tweak the sweetness?

    Adjust sweetness by adding a pinch of salt or a drizzle of honey if you like a richer flavor.

    9. Can I use other nut butters?

    Yes, substitute almond or cashew butter for a different nutty flavor, but expect a slightly different texture.

    10. Can I add chocolate?

    Adding chocolate chips on top before chilling makes a richer, more decadent bar.

    These bars are a reminder that some of the best treats are simple, straightforward, and made with love. They’re perfect for sharing at gatherings or just keeping around for a quick fix of sweetness.

    Whenever I make them, I think about how a handful of ingredients can turn into something so satisfying. No matter the season, they’re a little piece of homemade joy that’s easy to whip up anytime.

  • Crispy Baked Tofu Nuggets Recipe

    When I first started making baked tofu, I was obsessed with getting that elusive crispy exterior. I tried everything—spray oils, different coatings, even baking on parchment. Turns out, the secret isn’t just the ingredients but how you handle the tofu beforehand.

    That crispy crunch I crave isn’t just texture; it’s a moment of contrast—soft, mild tofu giving way to a toasted, smoky bite. It’s a bit of a science, a bit of an art, and a lot of trial and error. But once you nail that, it’s surprisingly addictive.

    The Unseen Art of Achieving Perfectly Crispy Tofu Nuggets Without Frying

    Why I Keep Coming Back to These Nuggets

    • I love how simple ingredients can transform into something so satisfying.
    • The first time I got that perfect crunch, I felt like I unlocked a secret.
    • This recipe is my go-to when I want something crispy but don’t want to deep fry.
    • It’s a way to enjoy comfort food with less guilt and more control.
    • Every batch reminds me that patience and attention make all the difference.

    The Inspiration Behind the Crunch

    • This recipe was born out of my obsession with crispy textures and the desire to make something healthier than fried foods.
    • I experimented with different coatings and baking techniques, finally settling on a simple cornstarch dredge paired with a hot oven.
    • It’s a quick fix for those days when I need a snack that’s both satisfying and guilt-free.
    • The crispness still surprises me, especially since it’s baked, not fried.

    Behind the Recipe: The Quiet Art of Crisping Tofu

    • Tofu has been a staple in Asian cuisines for centuries, valued for its protein and versatility.
    • Baking tofu to crispness is a modern adaptation, inspired by traditional fried techniques but healthier.
    • The idea of coating tofu with cornstarch mimics the texture of fried foods without the oil.
    • Using smoked paprika gives the nuggets a subtle smoky flavor, reminiscent of outdoor grilling.
    • The name ‘nuggets’ became popular in the 1980s, thanks to fast-food branding, but these are a healthier, homemade version.

    Ingredient Insights for Perfect Nuggets

    • Tofu: I prefer firm or extra-firm. It’s dense, holds shape, and crisps beautifully. If softer, it’ll be mushy, so press well.
    • Cornstarch: The magic dust that makes these crispy. Rice flour works too, but cornstarch is lighter and crunchier.
    • Soy sauce: Adds umami and helps flavor penetrate. Low-sodium is best if you’re watching salt.
    • Sesame oil: Imparts a toasty aroma. Substitute with vegetable oil if needed, but don’t skip the oil coating.
    • Smoked paprika: It gives a subtle smoky depth, pairing perfectly with the crispy exterior. Regular paprika works, but loses that smoky note.

    Spotlight on Tofu and Cornstarch

    Tofu:

    • Its spongy nature absorbs marinades, but it’s also the key to that crispy bite once baked.
    • Pressing removes excess water, which is crucial for crispiness and coating adhesion.
    • Look for organic, non-gmo tofu for better texture and flavor.

    Cornstarch:

    • This fine powder turns into a light, airy crust. It’s the secret to that crunch.
    • It reacts to heat by puffing up slightly, creating a delicate exterior. Keep an eye on the oven!

    Smart Substitutions for Dietary Needs and Flavor Variations

    • Dairy-Free: Swap regular soy sauce for coconut aminos for a sweet, milder flavor.
    • Gluten-Free: Use gluten-free flour or tapioca starch instead of cornstarch.
    • Low-Sodium: Reduce soy sauce or use a salt-free seasoning blend.
    • Extra Crispy: Add a sprinkle of panko breadcrumbs to the coating.
    • Flavor Boost: Mix in a pinch of curry powder or cumin for a different spice profile.

    Equipment & Tools

    • Baking rack: Allows air circulation for even crisping
    • Baking sheet: Supports the rack and catches drips
    • Press or heavy object: Press tofu to remove moisture
    • Mixing bowls: Prepare coatings and marinades
    • Spoon or spatula: Coat tofu evenly

    Step-by-Step Guide to Perfectly Crispy Baked Tofu Nuggets

    1. Press the tofu for at least 15 minutes to remove excess water. Wrap it in a clean towel and place a weight on top.
    2. Cut the tofu into bite-sized pieces, about 2 cm (0.8 inches) thick.
    3. In a bowl, mix your coating: ½ cup cornstarch, 1 teaspoon smoked paprika, ½ teaspoon garlic powder, a pinch of salt.
    4. Dip each tofu piece into a mixture of 2 tablespoons soy sauce and 1 tablespoon sesame oil, then coat thoroughly in the dry mixture.
    5. Place the coated tofu on a baking rack set over a baking sheet lined with parchment. Spray lightly with oil.
    6. Bake at 200°C (390°F) for 25-30 minutes, flipping halfway, until golden and crispy.
    7. Check for doneness: the coating should be crisp, tofu should jiggle slightly when shaken, and smell toasted.
    8. Rest the nuggets on the rack for 5 minutes after baking to keep them crispy.
    9. Serve hot, with your favorite dipping sauce, or toss into salads or bowls.

    Let the nuggets rest on the rack for 5 minutes. Serve immediately for best crunch. Garnish with herbs or a squeeze of lemon if desired.

    How to Know It’s Done

    • Color: golden-brown coating, not burnt
    • Texture: crispy exterior, tender inside
    • Appearance: evenly coated and baked to crispness

    Baked Crispy Tofu Nuggets

    These baked tofu nuggets feature a crispy, golden exterior with a soft, tender interior. Main ingredients include firm tofu coated in a cornstarch and smoked paprika mixture, then baked to achieve a crunchy texture without frying. The result is a smoky, satisfying snack or main that’s both healthy and addictive.
    Prep Time 20 minutes
    Cook Time 30 minutes
    Total Time 50 minutes
    Servings: 4
    Course: Main Course
    Cuisine: Asian-inspired
    Calories: 180

    Ingredients
      

    • 14 oz firm or extra-firm tofu press to remove excess water
    • ½ cup cornstarch or rice flour for gluten-free option
    • 1 teaspoon smoked paprika adds smoky flavor
    • ½ teaspoon garlic powder
    • ½ teaspoon salt
    • 2 tablespoons soy sauce low-sodium preferred
    • 1 tablespoon sesame oil imparts toasted aroma

    Equipment

    • Baking rack
    • Baking sheet
    • Press or heavy object
    • Mixing bowls
    • Spoon or spatula

    Method
     

    1. Press the tofu by wrapping it in a clean towel and placing a heavy object on top for at least 15 minutes, to remove excess moisture.
    2. Once pressed, cut the tofu into bite-sized pieces about 2 cm thick, creating uniform nuggets.
    3. In a small bowl, combine cornstarch, smoked paprika, garlic powder, and salt to create the coating mixture.
    4. In a separate bowl, whisk together soy sauce and sesame oil to make a marinade for the tofu.
    5. Dip each tofu piece into the marinade, then thoroughly coat it in the dry mixture, pressing gently to adhere.
    6. Arrange the coated tofu pieces on a baking rack set over a parchment-lined baking sheet, giving each piece space for air to circulate.
    7. Spray the tofu lightly with oil to encourage crisping, then bake in a preheated oven at 200°C (390°F) for 25-30 minutes, flipping halfway through, until golden brown and crispy.
    8. Remove the nuggets from the oven once they’re evenly golden and crispy, and let them rest on the rack for 5 minutes to maintain crunchiness.
    9. Serve the baked tofu nuggets hot with your favorite dipping sauce or toss into salads for added texture and flavor.

    Notes

    Pressing the tofu thoroughly is key to achieving maximum crispiness. Using a baking rack allows air circulation, ensuring even baking and crunch. Feel free to customize with additional spices or coatings for different flavor profiles.

    Tips & Tricks for Crispy Baked Tofu Nuggets

    • Use a light spray of oil before baking to boost crispiness.
    • Ensure tofu is thoroughly pressed for maximum crunch.
    • Toss nuggets in a little sesame oil or hot sauce post-baking for extra flavor.
    • Bake on a rack to prevent sogginess and promote even crisping.
    • Flip halfway to crisp both sides evenly.
    • Use high heat to achieve a golden crust without burning.
    • Don’t overcrowd the pan—give each piece space to crisp.

    Common Mistakes and How to Fix Them

    • FORGOT TO PRESS THE TOFU? Press longer or between two plates with weight.
    • DUMPED TOO MUCH OIL? Use a light spray to keep them crisp without greasiness.
    • OVER-TORCHED? Cover with foil and lower the oven temp for a few minutes.
    • FAILED TO CRISP? Increase baking time or broil for 1-2 minutes, watching carefully.

    Kitchen Fixes for Common Nugget Woes

    • When nuggets are soggy, pop them under the broiler for 2 minutes.
    • Splash a little vinegar into the marinade if too bland.
    • Patch sticky coating with a quick spray of oil and a few extra minutes.
    • Shield burnt edges with foil and extend baking time for uniform crisp.
    • When in doubt, reheat in the oven—crackling heat brings back crispness.

    Prepping and Storing Your Nuggets

    • Press and cut the tofu a day ahead; store covered in the fridge.
    • Coat the tofu just before baking to keep it crisp.
    • These nuggets reheat well in a 180°C (350°F) oven for 10 minutes, until crispy again.
    • Store leftovers in an airtight container in the fridge for up to 3 days.
    • For best texture, reheat in the oven, not the microwave—watch for that crackle.

    10 Practical Q&As About Crispy Baked Tofu Nuggets

    1. Can I use soft tofu?

    Use firm or extra-firm tofu for the best texture; it holds up well during baking and stays crispy.

    2. How do I press tofu?

    Press the tofu thoroughly to remove excess moisture, which helps the coating stick and crisp up.

    3. What oven temperature is best?

    Bake at 200°C (390°F) for about 25-30 minutes until golden and crispy, flipping halfway.

    4. Can I substitute cornstarch?

    Use cornstarch or rice flour in the coating for extra crispness and a light, crunchy texture.

    5. How do I reheat without sogginess?

    Serve immediately for the crunchiest texture. If storing, reheat in the oven to regain crispiness.

    6. How can I boost flavor after baking?

    Add a sprinkle of fresh herbs or a squeeze of lemon after baking for bright flavor.

    7. Why are some nuggets soggy?

    Make sure the tofu pieces are evenly coated for uniform crispness and flavor.

    8. What if my nuggets stick?

    Use a baking rack set over a baking sheet to ensure even crisping all sides.

    9. Why do my nuggets fall apart?

    Adjust coating thickness—don’t make it too thick or it won’t crisp properly.

    10. How do I know when they’re done?

    Try baking a little longer if not crispy enough; sometimes, a few extra minutes do the trick.

    These nuggets are my go-to snack when I want something satisfying but still light. They remind me that simplicity and patience in the kitchen can reward you with real, honest flavor.

    Plus, they’re versatile—great with a quick dip or tossed into a salad for crunch. No matter how busy life gets, they’re a reminder that good food doesn’t have to be complicated.

  • Vegan Lentil Soup Recipe

    In my cramped kitchen, every recipe has to earn its place. This lentil soup, simple and humble as it is, became my go-to when space feels tight but I crave something nourishing and warm. It’s the kind of dish that fills the room with earthy aroma and makes the small space feel cozy.

    Cooking in a tiny kitchen means I linger over every step—sautéing onions until they smell sweet and smoky, stirring the lentils gently. This soup is proof that good things don’t need fancy equipment or a big counter. It’s about patience, good ingredients, and a little bit of love poured into every bowl.

    The Unexpected Comfort of a Rustic Lentil Soup in a Tiny Kitchen

    Why This Lentil Soup Matters to Me

    • I love how this soup feels like a warm hug after a long day.
    • There’s a quiet pride in transforming humble ingredients into something soul-satisfying.
    • It’s a recipe I’ve made over and over, each time tweaking just a little to suit how I feel.
    • Cooking this dish reminds me of my grandma’s kitchen, full of smells and stories.
    • It’s a reminder that good, honest food doesn’t need complexity or fuss.

    The humble beginnings of my favorite soup

    • This recipe was born out of necessity and love.
    • I wanted something nourishing that I could make with pantry staples.
    • It’s a dish that’s forgiving—adjust ingredients based on what’s in your cupboard.

    The history and trivia behind lentil soup

    • Lentils have been a staple in human diets for over 8,000 years, dating back to ancient Mesopotamia.
    • This simple soup echoes traditional Mediterranean and Middle Eastern cuisines.
    • In many cultures, lentil soup is a symbol of humility and nourishment, often made with whatever was on hand.
    • The word ‘lentil’ comes from Latin ‘lens,’ referring to the shape of the legume.
    • Adding lemon or vinegar at the end is a nod to the bright, balancing flavors typical in Mediterranean cooking.

    Ingredient insights for perfect soup

    • Lentils: Earthy and hearty, they soften beautifully but need rinsing to remove grit.
    • Vegetable broth: Rich and savory, it forms the base; homemade adds depth, store-bought works too.
    • Carrots: Sweet and crunchy, they balance earthiness; cook longer if you want a softer, melting texture.
    • Onions: Aromatic and sweet when sautéed, they build flavor from the first step.
    • Garlic: Adds pungency and warmth; cook just enough to release aroma without burning.

    Spotlight on Lentils and Vegetables

    Carrots: Their sweet aroma intensifies as they cook, adding natural sweetness to the broth.:

    • Lentils: They hold shape well after cooking, offer a mild earthiness, and need a good rinse to remove dust.
    • They tend to cook unevenly if not sorted—check for debris before cooking.

    Onions: When sautéed, they turn golden and release a sweet, savory smell that forms the soup’s backbone.:

    • Carrots: Bright orange, they bring a fresh burst of color and flavor—slice thin for quicker softening.
    • Their crunch adds a nice texture if added later in cooking.

    Ingredient substitution ideas

    • Broth: Use water with added herbs if broth isn’t available, but flavor will be milder.
    • Carrots: Sweet potatoes can replace carrots for a creamier texture and subtle sweetness.
    • Garlic: Shallots or leeks add a milder, sweeter note—adjust cooking time accordingly.
    • Herbs: Fresh thyme or bay leaves enhance flavor, dried herbs work too—just use less.
    • Acid: Lemon juice or vinegar brightens the soup—use sparingly, start with a teaspoon.

    Equipment & Tools

    • Medium pot: To cook the soup evenly.
    • Wooden spoon: For stirring and sautéing.
    • Measuring cups and spoons: Accurate ingredient measurement.
    • Knife and cutting board: Chopping vegetables.
    • Ladle: Serving the soup.

    Step-by-step guide for making Vegan Lentil Soup

    1. Rinse 1 cup of lentils until water runs clear. Set aside.
    2. Chop 1 large onion, 2 carrots, and 3 cloves garlic.
    3. Heat 2 tbsp olive oil in a medium pot over medium heat (about 160°C/320°F).
    4. Sauté onions and carrots until onion is translucent, about 5 minutes. Add garlic, cook 30 seconds.
    5. Stir in lentils, 4 cups vegetable broth, 1 tsp cumin, 1/2 tsp smoked paprika.
    6. Bring to a boil, then reduce to low. Cover and simmer 25-30 minutes.
    7. Check lentils—they should be tender but not mushy. If too firm, cook longer. If mushy, lower heat.
    8. Taste and season with salt, pepper, and a splash of lemon juice or vinegar.
    9. If desired, stir in chopped greens during the last 5 minutes.
    10. Let sit for 5 minutes before serving to allow flavors to meld.
    11. Checkpoints: Lentils tender but intact; aroma rich and smoky; soup thickens but isn’t too dry.

    Let the soup rest for 5 minutes off heat, then taste again and adjust seasoning. Serve with crusty bread or a side salad.

    How to Know It’s Done

    • Lentils are tender but hold their shape.
    • The aroma should be earthy and fragrant.
    • Soup should thicken slightly but still be pourable.

    Rustic Lentil Soup

    This humble lentil soup is a comforting and nourishing dish made with simple pantry ingredients. It features tender lentils simmered with sautéed onions and carrots, resulting in a warm, earthy broth with a hearty, slightly chunky texture. Perfect for cozying up in a small kitchen, it fills the room with inviting aromas and layers of flavor.
    Prep Time 10 minutes
    Cook Time 30 minutes
    Total Time 40 minutes
    Servings: 4
    Course: Main Course
    Cuisine: Mediterranean
    Calories: 250

    Ingredients
      

    • 1 cup dried lentils rinsed until water runs clear
    • 1 large onion chopped
    • 3 cloves garlic minced
    • 4 cups vegetable broth or water with herbs
    • 2 tablespoons olive oil for sautéing
    • 1 teaspoon cumin ground
    • 1/2 teaspoon smoked paprika
    • to taste salt and pepper
    • 1 tablespoon lemon juice or vinegar, optional

    Equipment

    • Medium pot
    • Wooden spoon
    • Measuring cups and spoons
    • Knife
    • Cutting board
    • Ladle

    Method
     

    1. Begin by rinsing the lentils thoroughly in cold water until the water runs clear, then set them aside to drain.
    2. Chop the onion into small, even pieces and peel and slice the carrots into thin rounds.
    3. Heat the olive oil in a medium pot over medium heat until it shimmers and begins to bubble gently.
    4. Add the chopped onion to the pot and sauté, stirring frequently, until it turns golden and fragrant—about 5 minutes. You should smell a sweet, smoky aroma as the onions soften.
    5. Add the sliced carrots to the pot and cook for another 3-4 minutes, stirring occasionally, until they begin to soften and release their aroma.
    6. Stir in the minced garlic, cumin, and smoked paprika, cooking for about 30 seconds until the garlic becomes fragrant and slightly golden.
    7. Pour in the rinsed lentils and vegetable broth, stirring well to combine all ingredients and scraping up any flavorful bits from the bottom of the pot.
    8. Bring the mixture to a gentle boil over high heat, then reduce the heat to low, cover, and let simmer for 25 to 30 minutes. During this time, the lentils will soften and the flavors will meld, filling your kitchen with earthy, savory aromas.
    9. Once the lentils are tender and the soup has thickened slightly, taste and season with salt and pepper as needed. For brightness, stir in a tablespoon of lemon juice or vinegar if desired.
    10. If you like, stir in chopped greens like spinach or kale during the last 5 minutes of cooking for an extra touch of freshness and color.
    11. Remove the pot from heat and let the soup sit for 5 minutes to allow flavors to deepen and settle. Then, give it a final taste and adjust seasoning if needed.
    12. Serve the warm, hearty lentil soup in bowls, garnished with a squeeze of lemon or vinegar if desired, and enjoy this cozy, rustic dish with crusty bread or a side salad.

    Cooking tips and tricks for perfect lentil soup

    • Sauté onions and carrots until deeply fragrant—this builds flavor.
    • Use a gentle simmer—keep it at a lively but not boiling boil to keep lentils intact.
    • Add acidity at the end—brightens and balances earthiness.
    • Keep the lid slightly ajar during simmering—stews develop a richer flavor.
    • Stir occasionally—prevents sticking and helps flavors meld.

    Common mistakes and how to fix them

    • FORGOT to rinse lentils? Rinse vigorously next time to remove grit.
    • DUMPED too much salt? Add a splash of water and simmer to dilute.
    • OVERTORCHED the garlic? Quickly add a bit of broth to cool the pan and stop the burn.
    • SOUPer too thick? Thin with hot water or broth, then simmer 2 minutes.

    Quick kitchen fixes for common issues

    • If the soup is too thick, splash in hot water and stir—shimmering and gentle.
    • When under-seasoned, sprinkle with salt and a squeeze of lemon—zesty and bright.
    • Splash a dash of vinegar if the flavor is dull—sharpen and enliven.
    • Patch over burnt bits immediately with a little water—quickly prevents bitterness.
    • Shield from overcooking by removing from heat as soon as lentils are tender—avoid mush.

    Make-ahead and storage tips for this soup

    • Cook the soup a day ahead. It tastes even better after the flavors meld.
    • Store in an airtight container in the fridge for up to 3 days.
    • The flavors deepen overnight, becoming richer and more complex.
    • Reheat on the stove over medium heat, stirring occasionally, until steaming—about 10 minutes.

    10 Practical Q&As About Vegan Lentil Soup

    1. Can I use other lentil types?

    Use green or brown lentils—they hold their shape better. Rinse well, as they can be gritty.

    2. Can I substitute red lentils?

    Yes, red lentils cook faster and turn mushy, making them great for a creamier texture. Adjust cooking time.

    3. How do I get a richer flavor?

    Saute onions and garlic until fragrant and slightly caramelized—this deepens flavor and adds richness.

    4. How do I keep it bright?

    Add a splash of vinegar or lemon juice at the end—brightens the soup and balances earthiness.

    5. How do I know when the lentils are done?

    Simmer the soup until the lentils are tender but not falling apart—around 25-30 minutes.

    6. How do I enhance flavor?

    Adjust salt and pepper to taste. A pinch of smoked paprika adds smoky depth.

    7. Can I use water instead of broth?

    Use vegetable broth for a deeper, more complex base, rather than just water.

    8. Can I add greens?

    Stir in greens like spinach or kale in the last 5 minutes for added freshness.

    9. How long does it keep?

    Store leftovers in an airtight container for up to 3 days in the fridge.

    10. How do I reheat without losing texture?

    Reheat gently on the stove, adding a splash of water or broth if it thickens too much.

    This soup is more than just a meal; it’s a reminder that simplicity often tastes the best. It’s perfect for those days when you need something honest, filling, and easy to make, with no fuss. Plus, it’s a great way to stretch a small pantry into a satisfying dinner.

    Next time you’re feeling squeezed for time or space, remember this humble pot of lentils. It’s a quick fix that warms your hands and your heart, no matter the size of your kitchen or the chaos outside. Sometimes, the simplest recipes are the ones that stick with you.

  • Roasted Pumpkin Ravioli: A Cozy Fall Spin with Unexpected Depth

    Roasted Pumpkin Ravioli: A Cozy Fall Spin with Unexpected Depth

    There’s a certain magic in turning a humble vegetable into delicate, golden pillows. Roasting transforms pumpkin into a sweet, smoky essence that elevates simple pasta into something special. This dish is my go-to when I want comfort with a touch of elegance, especially as the leaves turn and the air gets crisper. It feels like a small, warm rebellion against the rush of everyday life.

    Why This Dish Calls Me Back Year After Year

    It’s the ritual of roasting, the warmth of the oven filling the kitchen with a sweet, caramel aroma. Every bite reminds me of cozy autumn weekends, family gatherings, and quiet evenings alone. The process is meditative, the flavors complex yet comforting. This dish is a gentle reminder to slow down and savor the season’s bounty.

    Inside the Pumpkin: What Goes Into the Filling

    • Roasted Pumpkin: Sweet, smoky, and silky. The star, bringing warmth and depth to every bite.
    • Ricotta cheese: Creamy and mild. Balances the sweetness with a gentle tang.
    • Parmesan: Sharp, salty, and nutty. Adds umami and a bit of bite.
    • Sage leaves: Earthy and fragrant. I love frying them crisp for garnish.
    • Nutmeg or cinnamon: A pinch adds warmth, but don’t overdo it. Just a whisper of spice.
    • Salt and pepper: Basic, essential, to make all flavors pop.
    • Egg yolk: Acts as a binder and adds richness, making filling stick together.

    Tools of the Trade for Perfectly Roasted Pumpkin Ravioli

    • Baking sheet: To hold the pumpkin halves for roasting evenly.
    • Food processor or masher: To puree roasted pumpkin into a smooth filling.
    • Rolling pin or pasta machine: To roll out the pasta dough to your desired thickness.
    • Piercing tool or fork: To seal the ravioli edges securely.
    • Large pot: To boil the ravioli gently.

    The Art of Crafting Pumpkin Ravioli from Scratch

    Step 1: Preheat your oven to 200°C (390°F).

    Step 2: Cut the pumpkin in half, scoop out seeds, and place cut-side down on a baking sheet lined with parchment.

    Step 3: Roast for 40-50 minutes, until the flesh is silky and caramelized.

    Step 4: While pumpkin cools, whip up your pasta dough or buy fresh sheets if in a rush.

    Cooking Checkpoints and Tips to Keep in Mind

    • The pumpkin should be deeply golden and soft enough to mash easily.
    • Pasta dough should be smooth and elastic, not sticky or dry.
    • Watch the edges of the ravioli while boiling; they should stay intact and not burst.

    Common Pitfalls and How to Avoid Them

    • Ravioli opening up in the boiling water.? If the ravioli bursts during cooking, ensure the edges are well sealed with water or egg wash.
    • Filling is too runny, making ravioli difficult to seal.? If the pumpkin is too watery, drain excess moisture before filling.
    • Ravioli tearing apart in boiling water.? Use a gentle simmer, not a rolling boil, to prevent delicate pasta from tearing.
    • Dough sticking to the work surface and rolling pin.? If the pasta is too sticky, dust with a little flour during rolling.

    Roasted Pumpkin Ravioli

    This dish features delicate ravioli filled with silky roasted pumpkin and creamy ricotta, wrapped in tender pasta dough. The ravioli are gently boiled until tender, then served with crispy sage and a sprinkle of Parmesan for a comforting, elegant fall-inspired meal. The golden pillows have a soft, luscious interior contrasted by a slightly chewy exterior.
    Prep Time 1 hour
    Cook Time 15 minutes
    Total Time 1 hour 15 minutes
    Servings: 4
    Course: Main Course
    Cuisine: Italian
    Calories: 350

    Ingredients
      

    • 1 small small sugar pumpkin halved and seeded
    • 2 cups all-purpose flour for pasta dough
    • 2 large eggs for pasta dough
    • 1 cup ricotta cheese creamy and mild
    • 1/2 cup Parmesan cheese grated
    • 8 leaves sage for frying and garnish
    • 1/4 teaspoon nutmeg or cinnamon a pinch
    • 1 large egg yolk acts as a binder
    • Salt and pepper to taste
    • 2 tablespoons olive oil for frying sage

    Equipment

    • Baking sheet
    • Food processor or masher
    • Rolling pin or pasta machine
    • Piercing tool or fork
    • Large pot

    Method
     

    1. Preheat your oven to 200°C (390°F). Place the pumpkin halves cut-side down on a parchment-lined baking sheet and roast for 40-50 minutes until the flesh is soft and caramelized. Let cool slightly.
    2. Scoop the roasted pumpkin flesh into a food processor or mash it thoroughly until smooth and silky, then transfer to a bowl. Stir in the ricotta, Parmesan, a pinch of nutmeg or cinnamon, salt, and pepper, adjusting seasoning to taste. Mix in the egg yolk to help the filling hold together.
    3. Make your pasta dough by placing the flour on a clean surface, creating a well in the center. Crack the eggs into the well and gently mix with a fork, gradually incorporating the flour until a dough forms. Knead until smooth and elastic, then cover and let rest for 30 minutes.
    4. Divide the dough into smaller portions and roll out each piece with a rolling pin or pasta machine until thin, about 1/16 inch thick. Lightly dust with flour if sticking occurs.
    5. Place small spoonfuls of pumpkin filling about 1 inch apart on one sheet of pasta. Brush around the filling with a little water or beaten egg to help seal.
    6. Carefully lay a second sheet of pasta over the filling, pressing gently around each mound to remove air and seal the edges. Use a piercing tool or fork to crimp the edges securely.
    7. Bring a large pot of salted water to a gentle boil. Carefully drop the ravioli into the water, cooking in batches if necessary. Boil for about 3-4 minutes until they float to the surface and are tender.
    8. Meanwhile, heat olive oil in a skillet over medium heat. Add sage leaves and fry until crispy and fragrant, about 1-2 minutes. Remove with a slotted spoon and set aside.
    9. Using a slotted spoon, lift the cooked ravioli out of the water and transfer to a serving plate. Top with the crispy sage leaves and a sprinkle of Parmesan cheese.
    10. Serve immediately, enjoying the warm, tender ravioli with fragrant fried sage and a touch of cheese. Savor the comforting flavors and the perfect balance of textures.

    Notes

    Ensure the edges are well sealed to prevent filling from leaking during boiling. If the pumpkin is watery, drain excess moisture before filling the ravioli. Use gentle heat when boiling to keep delicate pasta intact.
    Making pumpkin ravioli feels like a quiet rebellion against the busy season. The smoky sweetness of roasted pumpkin paired with tender pasta is a reminder that simple ingredients can surprise us. Don’t be afraid to tweak the filling with a pinch of sage or a splash of bourbon for a personal touch. Enjoy every bite, knowing this dish is a little labor of love.

  • Spooky-Sweet Halloween Brownies with a Twist of Black Sesame and Charcoal

    Spooky-Sweet Halloween Brownies with a Twist of Black Sesame and Charcoal

    Halloween isn’t just about costumes and candy anymore. It’s about transforming familiar treats into something a bit more mysterious and fun. These brownies, with their dark, smoky layers and hint of sesame, feel like an edible spell cast at your kitchen table. They’re a nod to the season’s darker side, with a little crunch and a lot of character.

    Why these brownies will haunt your kitchen again and again

    They’re a perfect mix of decadence and darkness, with unexpected crunch and smoky depth. Each bite is a little ritual, a break from ordinary sweets. The visual impact alone makes them worth revisiting, especially when you want to impress or surprise. They’re easy to customize, turning into a Halloween staple that’s both spooky and satisfying.

    Dark secrets: ingredients and their dark magic

    • Dark chocolate: Rich, bittersweet, with a deep cocoa flavor, essential for that intense brownie base.
    • Black sesame seeds: Adds crunch and a nutty, smoky flavor—think of it as the season’s secret weapon.
    • Activated charcoal powder: Gives that eerie black color and a subtle smoky undertone, just enough to unsettle the eye.
    • Butter: Creates richness and helps the brownies stay moist—use good quality for best flavor.
    • Eggs: Bind everything together, add structure, and a slight lift—fresh eggs are a must.
    • Sugar: Sweetens and balances the bitterness of dark chocolate—measure carefully.
    • Salt: Enhances all flavors and prevents the brownies from tasting flat.

    Tools of the dark arts: what you’ll need

    • Oven: To bake the brownies evenly.
    • 20cm (8-inch) square pan: Holds the batter and shapes the brownies.
    • Parchment paper: Prevents sticking and makes removal easy.
    • Spatula: To smooth the batter and fold ingredients.
    • Whisk: To beat eggs and sugar smoothly.
    • Cooling rack: To cool brownies evenly without sogginess.

    Step-by-step guide to making your Halloween brownies perfectly

    Step 1: Preheat your oven to 175°C (350°F). Line a 20cm (8-inch) square pan with parchment paper.

    Step 2: Melt 200g of dark chocolate and 100g of butter together, stirring until smooth and glossy.

    Step 3: In a bowl, whisk 3 eggs with 150g of sugar and a pinch of salt until pale and slightly fluffy.

    Step 4: Fold the melted chocolate into the egg mixture, then gently incorporate 100g of black sesame seeds.

    Step 5: Pour the batter into your prepared pan, smoothing the top with a spatula.

    Step 6: Bake for about 25-30 minutes. The edges should be set, but the center still slightly gooey.

    Step 7: Let the brownies cool in the pan for 15 minutes, then transfer to a wire rack to cool completely.

    Step 8: Once cooled, cut into squares. For extra spooky flair, dust with a thin layer of activated charcoal powder.

    Step 9: Serve with a drizzle of dark caramel or a smear of black berry jam for a hauntingly beautiful finish.

    Cooking checkpoints to keep your brownies hauntingly perfect

    • Chocolate should be melted smoothly, not grainy. If it’s thick, gently warm it again.
    • The batter is ready when it’s glossy and flows slowly from the spatula.
    • Brownies should be slightly cracked on top and still moist inside.
    • Avoid over-baking; the center should be slightly jiggly—carryover heat will finish the job.

    Common pitfalls and how to dodge them

    • Over-baking leading to dry, crumbly brownies.? If brownies are overbaked and dry, reduce baking time by 5 minutes.
    • The batter is too dense to pour smoothly.? If the batter is too thick, fold in a splash of warm milk.
    • Chocolate burning or seizing during melting.? If the chocolate seizes, gently reheat it over a double boiler.
    • Cracking and splitting on the surface.? If brownies crack too much on top, cover with foil halfway through baking.

    Black Sesame Charcoal Brownies

    These brownies feature a dark, smoky appearance thanks to activated charcoal, with a rich chocolate base complemented by crunchy black sesame seeds. The baking process creates a fudgy, slightly cracked top that reveals a moist, dense interior. A touch of sesame adds nuttiness and texture, making them both visually striking and indulgent.
    Prep Time 15 minutes
    Cook Time 30 minutes
    Total Time 45 minutes
    Servings: 9
    Course: Main Course
    Cuisine: Halloween
    Calories: 250

    Ingredients
      

    • 200 g dark chocolate bittersweet, high quality
    • 100 g butter unsalted
    • 3 eggs fresh
    • 150 g sugar caster or superfine
    • 100 g black sesame seeds lightly toasted for flavor
    • 1 tsp activated charcoal powder food grade, for color and smoky undertone
    • a pinch salt to balance flavors

    Equipment

    • Oven
    • 20cm (8-inch) square pan
    • Parchment paper
    • Spatula
    • Whisk
    • Cooling rack

    Method
     

    1. Preheat your oven to 175°C (350°F) and line your square pan with parchment paper, leaving some overhang for easy removal.
    2. Chop the dark chocolate and melt it together with the butter in a heatproof bowl over gentle simmering water, stirring until smooth and glossy, filling your kitchen with a rich chocolate aroma.
    3. In a separate bowl, whisk the eggs with sugar and a pinch of salt until the mixture turns pale, slightly fluffy, and fragrant, about 2-3 minutes.
    4. Gently fold the melted chocolate mixture into the egg mixture, combining until smooth and uniform.
    5. Stir in the toasted black sesame seeds, ensuring they are evenly distributed throughout the batter.
    6. Mix the activated charcoal powder into the batter, creating an eerie black color and smoky undertone, until fully incorporated.
    7. Pour the batter into your prepared pan, spreading it evenly with a spatula to fill all corners.
    8. Bake for about 25-30 minutes, until the edges are set and slightly cracked on top, while the center remains moist and gooey.
    9. Remove the pan from the oven and let the brownies cool in the pan for 15 minutes, then transfer them to a wire rack to cool completely, which helps develop their fudgy texture.
    10. Once cooled, lift the brownies out of the pan using the parchment paper overhang and cut into neat squares.
    11. For an extra spooky effect, dust the top lightly with additional activated charcoal powder or serve with dark caramel or black berry jam to enhance the haunting look and flavor.

    Notes

    Ensure to use food-grade activated charcoal to avoid any health risks. Toast the sesame seeds beforehand for a deeper flavor. Keep an eye on baking time to prevent over-drying the brownies.
    These brownies aren’t just a treat; they’re a conversation starter. The smoky aroma of burnt sugar and the crunch of black sesame create a complex bite that surprises every time. Personalize with your favorite spooky toppings or keep it simple—either way, they’re a hit. Enjoy baking these eerie treats, and don’t shy away from tweaking the flavors to make them uniquely yours.

  • Spooky-Sweet Halloween Brownies with a Twist of Black Sesame and Charcoal

    Spooky-Sweet Halloween Brownies with a Twist of Black Sesame and Charcoal

    Halloween isn’t just about costumes and candy anymore. It’s about transforming familiar treats into something a bit more mysterious and fun. These brownies, with their dark, smoky layers and hint of sesame, feel like an edible spell cast at your kitchen table. They’re a nod to the season’s darker side, with a little crunch and a lot of character.

    Why these brownies will haunt your kitchen again and again

    They’re a perfect mix of decadence and darkness, with unexpected crunch and smoky depth. Each bite is a little ritual, a break from ordinary sweets. The visual impact alone makes them worth revisiting, especially when you want to impress or surprise. They’re easy to customize, turning into a Halloween staple that’s both spooky and satisfying.

    Dark secrets: ingredients and their dark magic

    • Dark chocolate: Rich, bittersweet, with a deep cocoa flavor, essential for that intense brownie base.
    • Black sesame seeds: Adds crunch and a nutty, smoky flavor—think of it as the season’s secret weapon.
    • Activated charcoal powder: Gives that eerie black color and a subtle smoky undertone, just enough to unsettle the eye.
    • Butter: Creates richness and helps the brownies stay moist—use good quality for best flavor.
    • Eggs: Bind everything together, add structure, and a slight lift—fresh eggs are a must.
    • Sugar: Sweetens and balances the bitterness of dark chocolate—measure carefully.
    • Salt: Enhances all flavors and prevents the brownies from tasting flat.

    Tools of the dark arts: what you’ll need

    • Oven: To bake the brownies evenly.
    • 20cm (8-inch) square pan: Holds the batter and shapes the brownies.
    • Parchment paper: Prevents sticking and makes removal easy.
    • Spatula: To smooth the batter and fold ingredients.
    • Whisk: To beat eggs and sugar smoothly.
    • Cooling rack: To cool brownies evenly without sogginess.

    Step-by-step guide to making your Halloween brownies perfectly

    Step 1: Preheat your oven to 175°C (350°F). Line a 20cm (8-inch) square pan with parchment paper.

    Step 2: Melt 200g of dark chocolate and 100g of butter together, stirring until smooth and glossy.

    Step 3: In a bowl, whisk 3 eggs with 150g of sugar and a pinch of salt until pale and slightly fluffy.

    Step 4: Fold the melted chocolate into the egg mixture, then gently incorporate 100g of black sesame seeds.

    Step 5: Pour the batter into your prepared pan, smoothing the top with a spatula.

    Step 6: Bake for about 25-30 minutes. The edges should be set, but the center still slightly gooey.

    Step 7: Let the brownies cool in the pan for 15 minutes, then transfer to a wire rack to cool completely.

    Step 8: Once cooled, cut into squares. For extra spooky flair, dust with a thin layer of activated charcoal powder.

    Step 9: Serve with a drizzle of dark caramel or a smear of black berry jam for a hauntingly beautiful finish.

    Cooking checkpoints to keep your brownies hauntingly perfect

    • Chocolate should be melted smoothly, not grainy. If it’s thick, gently warm it again.
    • The batter is ready when it’s glossy and flows slowly from the spatula.
    • Brownies should be slightly cracked on top and still moist inside.
    • Avoid over-baking; the center should be slightly jiggly—carryover heat will finish the job.

    Common pitfalls and how to dodge them

    • Over-baking leading to dry, crumbly brownies.? If brownies are overbaked and dry, reduce baking time by 5 minutes.
    • The batter is too dense to pour smoothly.? If the batter is too thick, fold in a splash of warm milk.
    • Chocolate burning or seizing during melting.? If the chocolate seizes, gently reheat it over a double boiler.
    • Cracking and splitting on the surface.? If brownies crack too much on top, cover with foil halfway through baking.

    Dark Sesame Halloween Brownies

    These rich, fudgy brownies feature a deep cocoa flavor enhanced with smoky black sesame seeds and activated charcoal for an eerie black color. The batter’s glossy texture and the cracked top promise a moist, fudgy interior with a slight crunch, perfect for a spooky season treat. Finished with a dusting of charcoal powder and optional dark toppings, they’re as visually striking as they are delicious.
    Prep Time 15 minutes
    Cook Time 30 minutes
    Total Time 45 minutes
    Servings: 12
    Course: Main Course
    Cuisine: Halloween
    Calories: 250

    Ingredients
      

    • 200 g dark chocolate bittersweet, high-quality
    • 100 g butter unsalted
    • 3 eggs fresh
    • 150 g sugar granulated
    • 100 g black sesame seeds adds crunch and smoky flavor
    • 1 tsp activated charcoal powder for color and smoky undertone
    • 0.5 tsp salt

    Equipment

    • Oven
    • 20cm (8-inch) square pan
    • Parchment paper
    • Spatula
    • Whisk
    • Cooling rack

    Method
     

    1. Preheat your oven to 175°C (350°F) and line your square pan with parchment paper, leaving some overhang for easy removal.
    2. Chop the dark chocolate into small pieces and melt it together with the butter in a heatproof bowl set over a pot of simmering water, stirring until smooth and glossy.
    3. In a large bowl, whisk the eggs, sugar, and salt until the mixture is pale, slightly fluffy, and fragrant about 2-3 minutes.
    4. Gently fold the melted chocolate mixture into the egg mixture, combining until smooth and uniform.
    5. Sprinkle the black sesame seeds into the batter and fold them in carefully to distribute evenly.
    6. Pour the batter into your prepared pan, smoothing the top with a spatula for an even surface.
    7. Bake for 25 to 30 minutes, until the edges are set and a crack forms on top, but the center remains slightly gooey.
    8. Remove the brownies from the oven and let them cool in the pan for about 15 minutes, then transfer to a wire rack to cool completely.
    9. Once cooled, lift the brownies out of the pan using the parchment overhang and cut into squares.
    10. For a spooky touch, lightly dust the top with activated charcoal powder, creating an eerie black surface.
    11. Finish with a drizzle of dark caramel or a smear of black berry jam, if desired, for extra flavor and visual impact.
    12. Enjoy these decadent, smoky Halloween brownies — their dark, fudgy texture and striking appearance will make them a seasonal hit!
    These brownies aren’t just a treat; they’re a conversation starter. The smoky aroma of burnt sugar and the crunch of black sesame create a complex bite that surprises every time. Personalize with your favorite spooky toppings or keep it simple—either way, they’re a hit. Enjoy baking these eerie treats, and don’t shy away from tweaking the flavors to make them uniquely yours.