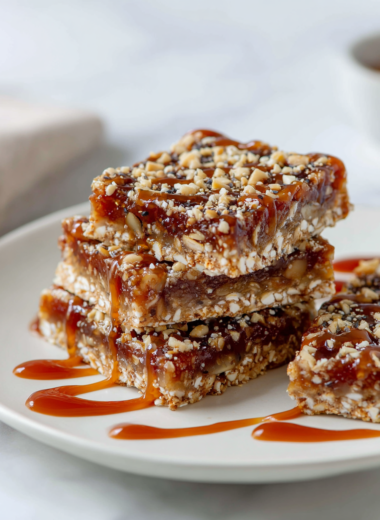
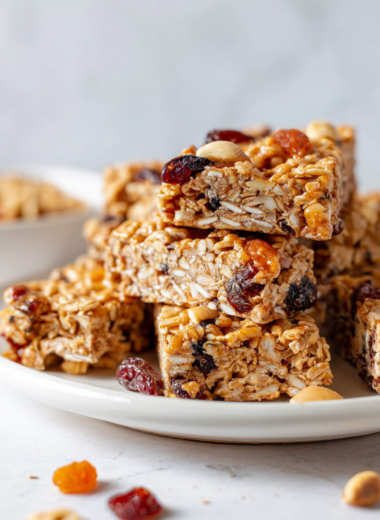
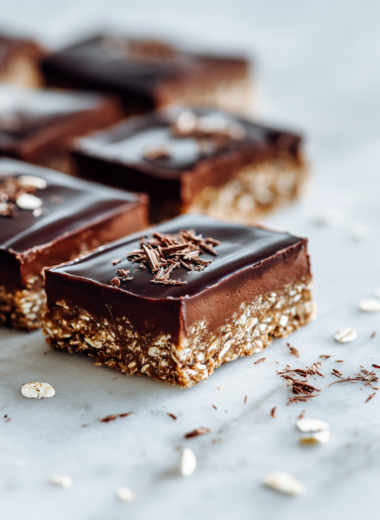
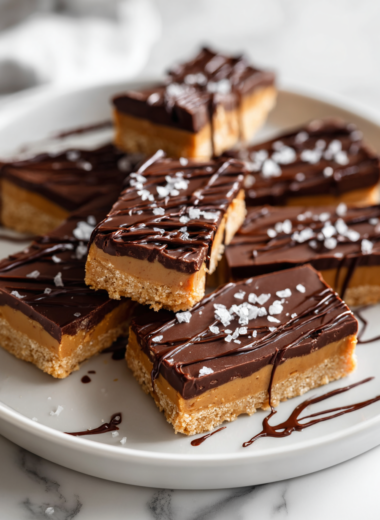
Author: GraceMorgan

  • Spooky Stuffed Peppers: A Nighttime Bites Adventure

    Spooky Stuffed Peppers: A Nighttime Bites Adventure

    Stuffed peppers have a way of feeling like comfort wrapped in a bit of mischief. But this version leans into the thrill of the unknown—spooky, savory, and a little unexpected. It’s a dish that celebrates the chaos of flavors and textures, perfect for an autumn evening or any night that needs a bit of extra punch.

    Why I Keep Coming Back to This Dish

    It’s a reminder that simple ingredients can turn into something unexpectedly thrilling. The smoky aroma when baking, the ooze of melted cheese, that slight char—this dish hits all the right notes after a long day. It’s customizable, forgiving, and always a little wild.

    Inside the Ingredients for Spooky Stuffed Peppers

    • Bell peppers: Large, sturdy peppers with a sweet, smoky flavor. Swap for poblano for a spicier, earthier bite.
    • Ground meat or lentils: Adds hearty richness. Lentils are great for a vegetarian spin, and soak up spices nicely.
    • Cooked rice: Feeds the filling and adds a mild, chewy texture. Quinoa can be a good alternative for nuttiness.
    • Chopped tomatoes: Juicy and bright, they give moisture. Canned tomatoes work perfectly, fresh during summer.
    • Spices (cumin, paprika, chili powder): Build smoky, warm layers. Adjust to your heat preference.
    • Cheese (cheddar, Monterey Jack): Melts into a gooey topping. Use vegan cheese if you want dairy-free.
    • Onion & garlic: Base flavor builders, fragrant and essential for depth.

    Tools of the Trade for Spooky Stuffed Peppers

    • Oven: To bake the peppers until tender and slightly charred.
    • Skillet: To sauté the filling ingredients and build flavor.
    • Spoon: To scoop out seeds and stuff the peppers.
    • Baking dish: To hold the stuffed peppers during baking.
    • Aluminum foil: To cover peppers for even cooking.

    Step-by-Step to Spooky Perfection

    Step 1: Preheat your oven to 180°C (350°F).

    Step 2: Slice the tops off the peppers and scoop out seeds and membranes.

    Step 3: In a skillet, heat olive oil over medium. Sauté chopped onions and garlic until fragrant, about 3 minutes.

    Step 4: Add ground meat or lentils, cook until browned, about 8 minutes.

    Step 5: Mix in cooked rice, chopped tomatoes, and spices. Season with salt and pepper.

    Step 6: Stuff the peppers with the filling, pressing down lightly.

    Step 7: Place stuffed peppers in a baking dish, cover with foil.

    Step 8: Bake for 30-35 minutes, until peppers are tender and filling is bubbling.

    Step 9: Remove foil, sprinkle cheese on top, and broil for 2-3 minutes until golden.

    Step 10: Let rest for 5 minutes before serving.

    Cooking Tips & Checkpoints

    • Peppers should be tender and slightly charred around the edges.
    • Filling should be hot and bubbling when you remove it from the oven.
    • Cheese on top should be melted and golden, not burnt.
    • Use a thermometer to check that the filling’s internal temp hits 75°C (165°F).

    Common Mistakes & How to Fix Them

    • Peppers are getting too dark before cooking through.? Add a splash of water or broth when peppers start to burn.
    • Filling is drying out or burning.? Reduce oven temperature to 160°C (320°F).
    • Cheese on top burns before peppers are tender.? Cover with foil if cheese is browning too quickly.
    • Peppers remain too firm after baking.? Use a sharp knife to gently check if peppers are soft.

    Spooky Stuffed Peppers

    This dish features bell peppers filled with a savory mixture of ground meat or lentils, rice, tomatoes, and spices, then baked until tender with a bubbly, golden cheese topping. The peppers develop a slight char and the filling becomes rich and flavorful, creating a comforting yet exciting main course with a play of smoky and cheesy textures.
    Prep Time 20 minutes
    Cook Time 40 minutes
    Total Time 1 hour
    Servings: 4
    Course: Main Course
    Cuisine: American
    Calories: 350

    Ingredients
      

    • 4 large bell peppers sturdy, sweet peppers that can hold filling
    • 1 lb ground meat or lentils for hearty filling, choose vegetarian or meat as preference
    • 1 cup cooked rice or substitute with quinoa for nuttiness
    • 1 cup chopped tomatoes canned or fresh during summer
    • 1 teaspoon cumin adds smoky warmth
    • 1 teaspoon paprika for depth of flavor
    • 1/2 teaspoon chili powder adjust for heat preference
    • 1 cup shredded cheese cheddar or Monterey Jack
    • 1 small onion finely chopped
    • 2 cloves garlic minced
    • 2 tablespoons olive oil for sautéing
    • to taste salt and pepper seasoning

    Equipment

    • Oven
    • Skillet
    • Spoon
    • Baking dish
    • Aluminum foil

    Method
     

    1. Preheat your oven to 180°C (350°F). Slice off the tops of the peppers and scoop out the seeds and membranes with a spoon, creating a hollow cavity.
    2. Heat olive oil in a skillet over medium heat. Sauté the chopped onion and minced garlic until fragrant, about 3 minutes, until they soften and become translucent.
    3. Add the ground meat or lentils to the skillet. Cook until browned and cooked through, about 8 minutes, breaking apart the meat as it cooks.
    4. Stir in the cooked rice, chopped tomatoes, cumin, paprika, chili powder, salt, and pepper. Mix well and cook for another 5 minutes, allowing the flavors to meld and the mixture to heat thoroughly.
    5. Using a spoon, stuff each hollowed-out pepper with the filling, pressing down lightly to pack it in.
    6. Place the stuffed peppers upright into a baking dish. Cover the dish with aluminum foil to help them cook evenly and retain moisture.
    7. Bake in the preheated oven for 30-35 minutes, until the peppers are tender and slightly charred around the edges, and the filling is bubbling.
    8. Remove the foil and sprinkle shredded cheese evenly over the tops of the peppers. Return to the oven and broil for 2-3 minutes until the cheese is melted and golden brown.
    9. Take the peppers out of the oven and let them rest for 5 minutes. The cheese should be gooey and the peppers tender, with a smoky aroma filling your kitchen.

    Notes

    Ensure peppers are tender and slightly charred for the best flavor and texture. Feel free to customize the filling with your favorite spices or proteins.
    These peppers are a wild card in my kitchen. The smoky, oozy filling paired with the tender, charred pepper skins creates a dance of textures. It’s a dish that feels like a small celebration of the season, perfect for sharing. Make it your own with different fillings or toppings, and enjoy the warm chaos of it all.

  • Witch Hat Cupcakes: A Spellbinding Treat for All Ages

    Witch Hat Cupcakes: A Spellbinding Treat for All Ages

    There’s something endlessly charming about dressing up baked goods. These witch hat cupcakes aren’t just sweet treats—they’re tiny costumes, ready to cast a spell at your next party. I love how they combine the joy of baking with a dash of creativity and a pinch of nostalgia.

    Why I keep baking these little witches

    They remind me of childhood Halloweens, full of mischief and magic. The process is forgiving enough for my rushed mornings but still yields impressive results. Seeing others’ faces light up when they see these tiny hats is always a sweet reward. Plus, they let me play with decorating—no rules, just fun.

    What’s in the spell book?

    • All-purpose flour: The backbone of your cupcakes, gives structure and rise.
    • Cocoa powder: Adds rich chocolate depth, smell of roasted cocoa fills the kitchen.
    • Butter: Creamy and rich, makes frosting smooth and flavorful.
    • Black food coloring: For that dark, mysterious hue in your frosting—use sparingly.
    • Chocolate cookies or waffle cones: Crunchy, slightly sweet, perfect for the hat’s brim and point.
    • Vanilla extract: A touch of warmth and aroma in both cake and frosting.
    • Powdered sugar: Sweetens and thickens the frosting, gives that velvety finish.

    Tools of the magic trade

    • Muffin tin & paper liners: To shape and bake the cupcakes evenly.
    • Mixing bowls: For blending batter and frosting.
    • Electric mixer or whisk: To get fluffy frosting and well-mixed batter.
    • Piping bag & tips: For decorating the cupcakes smoothly.
    • Chocolate cookies or waffle cones: To craft the witch hats’ brims and peaks.

    Step-by-step magic to bring your witch hats to life

    Step 1: Preheat your oven to 180°C (350°F).

    Step 2: Line a muffin tin with paper liners.

    Step 3: Make your cupcake batter: mix flour, sugar, cocoa, baking powder, and salt.

    Step 4: In a separate bowl, beat eggs with milk, oil, and vanilla.

    Step 5: Combine wet and dry ingredients until just blended.

    Step 6: Fill cupcake liners about 2/3 full.

    Step 7: Bake for 18-20 minutes or until a toothpick comes out clean.

    Step 8: Let cupcakes cool in the tin for 5 minutes, then transfer to a wire rack.

    Step 9: Prepare your frosting: beat butter, powdered sugar, and vanilla until fluffy.

    Step 10: Color the frosting with a touch of black food coloring for a moody vibe.

    Step 11: Frost the cooled cupcakes generously.

    Step 12: Use chocolate cookies or waffle cones to create the hat’s brim and point.

    Step 13: Assemble the hats: place the cone on top of the cupcake, secure with frosting.

    Step 14: Add edible decorations like sprinkles or tiny candies for extra charm.

    How to tell if your witch hats are perfect

    • Cupcakes are evenly risen and golden around the edges.
    • Toothpick inserted in the center comes out clean.
    • Frosting is smooth, not melting or sliding off.
    • The cone stands firm without wobbling when placed on top.

    Avoid these common pitfalls

    • Batter is lumpy or uneven.? Use room temperature ingredients for smoother blending.
    • The cone wobbles or slides off.? Chill the cone slightly before placing on cupcake.
    • Frosting tastes flat or overly sweet.? Add a tiny pinch of salt to frosting for depth.
    • Cupcakes are gooey or underdone.? Bake cupcakes until a toothpick comes out clean.

    Witch Hat Cupcakes

    These adorable witch hat cupcakes combine moist chocolate cupcakes with rich, black frosting and crunchy cone-shaped hats made from cookies or waffle cones. The process involves baking the cupcakes, preparing a smooth frosting, and assembling the hats for a charming, spooky treat perfect for Halloween parties. The final result is a delightful, visually striking dessert with a soft, chocolaty crumb and whimsical decorations.
    Prep Time 30 minutes
    Cook Time 20 minutes
    Total Time 50 minutes
    Servings: 12
    Course: Main Course
    Cuisine: Halloween
    Calories: 250

    Ingredients
      

    • 1 3/4 cups all-purpose flour sifted
    • 1/2 cup cocoa powder unsweetened
    • 1 cup granulated sugar
    • 1 tsp baking powder
    • 1/2 tsp salt
    • 2 large eggs room temperature
    • 1/2 cup milk whole or 2%
    • 1/2 cup vegetable oil
    • 2 tsp vanilla extract
    • 1 cup unsalted butter softened
    • 3-4 cups powdered sugar sifted
    • a few drops black food coloring adjust as needed
    • 12 chocolate cookies or waffle cones for hats

    Equipment

    • Muffin tin & paper liners
    • Mixing bowls
    • electric mixer or whisk
    • Piping bag & tips
    • Cooling wire rack

    Method
     

    1. Preheat your oven to 180°C (350°F) and line a muffin tin with paper liners.
    2. In a large bowl, sift together the flour, cocoa powder, baking powder, salt, and sugar to combine evenly.
    3. In a separate bowl, beat the eggs, milk, oil, and vanilla extract until well blended and slightly frothy.
    4. Pour the wet mixture into the dry ingredients and gently fold until just combined, avoiding overmixing.
    5. Divide the batter evenly among the cupcake liners, filling each about two-thirds full.
    6. Bake for 18-20 minutes, or until a toothpick inserted into the center comes out clean. Let the cupcakes cool in the tin for 5 minutes, then transfer to a wire rack to cool completely.
    7. In a mixing bowl, beat the softened butter until creamy, then gradually add sifted powdered sugar, one cup at a time, until the mixture is fluffy. Mix in vanilla extract.
    8. Add a few drops of black food coloring to the frosting and mix until the color is evenly distributed and the frosting is dark enough.
    9. Frost the cooled cupcakes generously with the black frosting using a piping bag for a smooth finish.
    10. Break the chocolate cookies or waffle cones into small pieces to form the brim and point of the witch hats.
    11. Place a cone or cookie piece on top of each frosted cupcake, securing with a dab of frosting at the base.
    12. Decorate with additional sprinkles or tiny candies if desired, then serve and enjoy your charming witch hat cupcakes!

    Notes

    For extra spooky effect, add edible glitter or tiny candy eyes to the hats. Chill the assembled cupcakes briefly to help the hats stay in place.
    These cupcakes aren’t just for Halloween; they’re a whimsical way to bring a little magic into any gathering. The process is straightforward, but the results look like you spent ages on detail. Feel free to tweak the colors or decorations—make them your own charms. Enjoy the baking, and watch as everyone’s faces light up when they see these little spells sitting on your table.

  • Spooky Shepherd’s Pie: A Dark Twist on Comfort Food

    Spooky Shepherd’s Pie: A Dark Twist on Comfort Food

    Shepherd’s pie is comfort food with a soul, but I’ve always wondered how to give it a little edge without losing its heart. This spooky twist came from late-night cravings for something familiar yet different, a bit more daring. It’s perfect for those nights when you want a hearty, satisfying meal that also whispers secrets from the dark.

    Why I keep coming back to this recipe

    The dark, smoky flavors make it feel like a warm secret, perfect for chilly nights. It’s a dish that comforts yet surprises, with every bite revealing something deeper. Plus, it’s simple enough to throw together when chaos is just outside the door, but hearty enough to slow down and savor.

    Breaking down the ingredients

    • Ground beef: The backbone of the dish, juicy and savory, but swap for lentils if you want vegetarian.
    • Potatoes: Creamy, fluffy, the classic topping. Sweet potatoes can add a subtle sweetness.
    • Onions & garlic: Builds flavor with a fragrant, warm aroma. Shallots work well too.
    • Carrots & celery: Add crunch and sweetness, but parsnips can be a good substitute.
    • Beef broth & Worcestershire sauce: Deepens the flavor, smoky and umami-rich, or use mushroom broth for a vegetarian version.
    • Smoked paprika: Adds a smoky depth, brightens with a touch of lemon juice if you like.
    • Butter & cream: Make the mash extra rich and velvety, but olive oil can be a lighter alternative.

    Tools you’ll need for a spooky night in

    • Large skillet: To brown the meat and cook vegetables
    • Mixing bowl: To mash and prepare the potato topping
    • Baking dish: To assemble and bake the shepherd’s pie
    • Wooden spoon: To stir and combine ingredients
    • Oven: To bake and achieve that golden crust

    Step-by-step to a hauntingly good shepherd’s pie

    Step 1: Preheat your oven to 200°C (390°F).

    Step 2: In a large skillet, heat a tablespoon of oil over medium heat.

    Step 3: Add chopped onions and garlic, cook until translucent, about 5 minutes.

    Step 4: Stir in ground beef, cook until browned and fragrant, about 8 minutes.

    Step 5: Drain excess fat, then add chopped carrots and celery, cook for another 5 minutes.

    Step 6: Pour in beef broth, add a splash of Worcestershire sauce, simmer until slightly thickened, about 10 minutes.

    Step 7: Season with salt, pepper, and a pinch of smoked paprika for depth.

    Step 8: Transfer the meat mixture to a baking dish, spread evenly.

    Step 9: Top with mashed potatoes, smoothing out the surface.

    Step 10: Bake in the oven for 25-30 minutes or until the topping is golden and bubbly.

    Step 11: Let sit for 5 minutes before serving.

    Cooking checkpoints to watch for

    • Ensure the beef is browned evenly without burning, which develops flavor and prevents a bitter taste.
    • When simmering the meat mixture, it should thicken slightly and develop a rich aroma, not be watery.
    • The mashed potato topping should be smooth and creamy, not lumpy or runny.
    • The topping should turn a deep golden brown, indicating it’s baked through and caramelized on top.

    Avoid these common pitfalls

    • Adding too much broth at once.? Too watery? Let the filling simmer longer to thicken.
    • Unevenly cooked meat.? Use a spatula to scrape the sides of the pan for even browning.
    • Under-cooked potato topping.? Bake a few extra minutes if the top isn’t golden enough.
    • Burnt topping.? If it’s over-browned, tent with foil and lower oven temp.

    Spooky Smoky Shepherd’s Pie

    This twist on classic shepherd’s pie uses smoky paprika and rich beef broth to deepen its flavor, while the creamy mashed potato topping provides a comforting crown. The dish features a savory meat and vegetable filling finished with a golden, bubbly crust, perfect for a hearty and slightly daring meal. Its layered textures and dark, smoky aroma make it both an inviting and mysterious dinner option.
    Prep Time 15 minutes
    Cook Time 40 minutes
    Total Time 55 minutes
    Servings: 4
    Course: Main Course
    Cuisine: Comfort Food
    Calories: 550

    Ingredients
      

    • 1 lb ground beef or lentils for vegetarian
    • 4 large potatoes for mash, or sweet potatoes
    • 1 large onion chopped
    • 3 cloves garlic minced
    • 2 carrots carrots diced
    • 2 stalks celery diced
    • 1 cup beef broth or mushroom broth for vegetarian
    • 1 dash Worcestershire sauce
    • 1 tsp smoked paprika adds smoky depth
    • 2 tbsp butter for mash
    • 1/4 cup cream for mash, optional
    • Salt and pepper to taste

    Equipment

    • Large skillet
    • Mixing bowl
    • Baking dish
    • Wooden spoon
    • Oven

    Method
     

    1. Peel and chop the potatoes into even chunks. Boil them in salted water until they are soft and easily pierced with a fork, about 15 minutes. Drain and set aside.
    2. While the potatoes are cooking, heat a large skillet over medium heat and add a tablespoon of oil. Once shimmering, add chopped onions and minced garlic, sautéing until fragrant and translucent, about 5 minutes. The aroma should fill the kitchen with a warm, savory scent.
    3. Add the ground beef to the skillet, breaking it apart with a wooden spoon. Cook until browned and fragrant, about 8 minutes, until no pink remains and the meat develops a rich aroma.
    4. Stir in diced carrots and celery, cooking for another 5 minutes until vegetables soften slightly and the mixture becomes fragrant and darker in color.
    5. Pour in beef broth, add a splash of Worcestershire sauce, and stir in smoked paprika. Let it simmer gently for about 10 minutes until the mixture thickens and the flavors meld, releasing a smoky, savory aroma.
    6. While the filling simmers, mash the cooked potatoes with butter, cream, and a pinch of salt and pepper until smooth, creamy, and fluffy. This step creates a velvety topping that contrasts beautifully with the dark filling.
    7. Transfer the meat and vegetable filling into a baking dish, spreading it out evenly. Smooth the mashed potatoes over the top, creating a gentle layer that covers the filling completely.
    8. Bake in a preheated oven at 200°C (390°F) for 25-30 minutes, until the top is golden brown and bubbling around the edges. The aroma will shift to a deep, smoky scent as the top crisps and caramelizes.
    9. Remove from oven and let sit for about 5 minutes to set. The top should be a rich, deep golden color, and the filling underneath hot and steamy. Serve slices with a sprinkle of fresh herbs if desired.

    Notes

    For extra smoky flavor, sprinkle a little more smoked paprika on top before baking. To make it vegetarian, substitute lentils for the beef and mushroom broth for the beef broth.
    This version of shepherd’s pie feels like wrapping your hands around a warm mug on a chilly night, but with a twist that makes it feel a little mysterious. I love how the smoky paprika and savory broth create a dark, rich base, while the fluffy mashed potatoes add a comforting finish. Feel free to add a dash of hot sauce or a sprinkle of herbs to make it your own. It’s a dish that invites you to cozy up and settle in, no matter how spooky the season gets.

  • Black Bean Burgers with a Twist: A Cozy, Unexpected Spin

    Black Bean Burgers with a Twist: A Cozy, Unexpected Spin

    Black bean burgers often get a bad rap for being bland or mushy, but I’ve found that with a few tweaks, they can be deeply satisfying. The secret is in the texture and that smoky, roasted flavor that makes them crave-worthy. This recipe is about transforming humble beans into something you want to hold in your hand, bite after bite.

    Why this recipe keeps calling me back

    It’s the kind of comfort food that surprises with its depth. I love how versatile it is—toppings, buns, even salads. Plus, it’s a reminder that simple pantry staples can become something memorable with a little care and heat.

    Inside the ingredient lineup

    • Canned black beans: Rich, earthy base; I prefer organic for that extra oomph, but dried works too.
    • Onion and garlic: Bring a sweet, savory warmth; sauté until translucent and fragrant.
    • Breadcrumbs: Help hold the burger together; go for panko for extra crunch.
    • Egg: Acts as a binder; skip if vegan and replace with flaxseed meal.
    • Smoked paprika and cumin: Add a smoky, warm depth; they make the flavor sing.
    • Olive oil: For frying; use enough to get a nice crust but not greasy.
    • Toppings like lettuce, tomato, and spicy mustard: Finish with fresh, bright flavors that cut through the richness.

    Tools of the trade for perfect black bean burgers

    • Large mixing bowl: To combine all ingredients comfortably without spilling.
    • Fork or potato masher: To mash the beans to the right texture.
    • Non-stick skillet or cast iron pan: To get a crispy crust without sticking.
    • Spatula: To flip the burgers gently without breaking.
    • Measuring spoons and cups: To keep ingredients balanced.

    Step-by-step guide to smoky, satisfying black bean burgers

    Step 1: Mash the beans until chunky but cohesive. Use a fork or potato masher, leaving some texture.

    Step 2: Sauté onions, garlic, and spices until fragrant, about 5 minutes. The smell should be warm and inviting.

    Step 3: Mix beans, sautéed aromatics, breadcrumbs, and an egg in a big bowl. Stir until combined but not overworked.

    Step 4: Shape into patties, about 3-4 inches wide. Keep them firm but not dense.

    Step 5: Heat a splash of oil in a non-stick pan over medium heat (around 160°C/320°F).

    Step 6: Cook patties for 4-5 minutes each side, until golden and slightly crispy.

    Step 7: Rest on a paper towel for a minute. They firm up as they cool.

    Step 8: Serve on toasted buns, with your favorite toppings. Press slightly to ensure they hold.

    Step 9: Check for doneness: golden crust, firm but not hard, and a fragrant, smoky aroma.

    Cooking checkpoints and tips to keep in mind

    • Ensure the oil is heated enough before adding the patties—listen for a slight crackle.
    • The patties should be golden and slightly crispy on the outside, not burnt.
    • When pressing down, you should see a gentle sizzle and smell toasty beans—don’t rush the flip.

    Common pitfalls and how to fix them

    • Over-mashed beans turn into a paste.? Use a gentle hand when mashing beans; over-mashing makes them mushy.
    • Burgers falling apart during cooking.? Don’t skip resting time; it helps the burgers hold together.
    • Too high heat causing blackened outsides.? Adjust heat if they burn too fast.
    • Mixture is too sticky and won’t shape.? Add a touch more breadcrumbs if mixture feels too loose.

    Smoky Black Bean Burgers

    These black bean burgers are transformed from humble pantry staples into hearty, satisfying patties with a crispy exterior and a tender, flavorful interior. They are seasoned with smoked paprika and cumin, then pan-fried until golden, offering a deliciously smoky and textured vegetarian option. Topped with fresh toppings and served on toasted buns, they make for a comforting, versatile meal.
    Prep Time 15 minutes
    Cook Time 10 minutes
    Total Time 25 minutes
    Servings: 4
    Course: Main Course
    Cuisine: American
    Calories: 350

    Ingredients
      

    • 2 cups canned black beans drained and rinsed
    • 1/2 cup breadcrumbs panko preferred for crunch
    • 1 egg or flaxseed meal for vegan
    • 1/2 cup onion finely chopped
    • 2 cloves garlic minced
    • 1 teaspoon smoked paprika
    • 1/2 teaspoon cumin
    • 2 tablespoons olive oil for frying
    • to taste Toppings lettuce, tomato, spicy mustard, etc.

    Equipment

    • Large mixing bowl
    • Fork or potato masher
    • Non-stick skillet or cast iron pan
    • Spatula
    • Measuring spoons and cups

    Method
     

    1. Place the drained black beans in a large mixing bowl and mash them with a fork or potato masher until chunky but cohesive, leaving some texture for the burgers.
    2. Heat a splash of olive oil in a skillet over medium heat, then add the chopped onion and minced garlic. Sauté for about 5 minutes until fragrant, soft, and translucent, filling your kitchen with warm aromas.
    3. Add the sautéed onion and garlic, smoked paprika, and cumin to the mashed beans. Stir well to combine the smoky spices evenly through the mixture.
    4. Mix in the breadcrumbs and egg (or flaxseed meal), stirring gently until everything is just combined. The mixture should be sticky but manageable; add more breadcrumbs if it feels too loose.
    5. Divide the mixture into four equal portions and shape each into a patty about 3-4 inches wide, pressing firmly to help them hold together.
    6. Heat a tablespoon of olive oil in a non-stick skillet over medium heat until shimmering and beginning to ripple, indicating the right temperature for frying.
    7. Carefully place the patties in the hot skillet, cooking for about 4-5 minutes on each side until they develop a golden-brown, crispy crust and smell smoky and inviting.
    8. Transfer the cooked burgers to a paper towel-lined plate and let them rest for a minute to firm up and finish crisping.
    9. While the burgers rest, toast your buns until golden and ready for stacking.
    10. Assemble the burgers by placing the crispy patties on the toasted buns, then topping with fresh lettuce, tomato slices, spicy mustard, or your favorite toppings.
    11. Press down gently on the burgers to help them hold together, then serve immediately and enjoy the smoky, hearty flavors.

    Notes

    For vegan options, replace the egg with flaxseed meal and water. Adjust spice levels to your taste, and feel free to add cheese or other toppings for variety.
    These burgers are a reminder that a little improvisation can turn simple ingredients into something memorable. They’re perfect for lazy weekends or when you need comfort food that’s hearty but not heavy. Feel free to tweak the spices or toppings—this is your canvas. Enjoy the process and the cozy, smoky bites that follow.

  • Blood-Red Velvet Cake: A Deep Dive into Its Heart and Soul

    Blood-Red Velvet Cake: A Deep Dive into Its Heart and Soul

    Blood-red velvet cake is not your average dessert. It’s rooted in a history of daring color and subtle cocoa, a bit theatrical, a little nostalgic. This version is a little rough around the edges, but deeply satisfying, especially when you’re craving something bold and a little rebellious. It’s about embracing the imperfect beauty of a homemade cake that’s as striking as it is comforting.

    Why This Cake Calls You Back

    Its deep red hue and complex cocoa flavor evoke childhood memories of mischievous baking sessions. The process is simple enough to repeat, yet each bake feels like a small triumph. Plus, the frosting’s tang and the moist crumb make every slice a lingering, satisfying moment. It’s a cake you want to share, to show off, or just keep in the fridge for sneaky bites—whenever the mood strikes.

    Inside the Red Velvet: Ingredient Secrets

    • All-purpose flour: Foundation of the cake—gives structure without weight.
    • Cocoa powder: Adds a subtle richness; use natural for authenticity, Dutch-processed for smoother flavor.
    • Red food coloring: Vivid, almost luminous—use gel for intensity without excess liquid.
    • Buttermilk: Tenderizes and adds a slight tang—swap with milk + lemon if needed.
    • Vinegar: Activates baking soda; gives lift and helps with the velvety crumb.
    • Vegetable oil: Keeps the cake moist and tender—can substitute with melted butter for richer flavor.
    • Cream cheese frosting: Creamy, tangy, and balances the sweetness—go full-fat for best texture.

    Tools of the Trade for a Velvet Masterpiece

    • Mixing bowls: For combining dry and wet ingredients separately.
    • Electric mixer or whisk: To cream butter and sugar thoroughly.
    • Rubber spatula: To fold ingredients gently and scrape down bowls.
    • Cake pan (23cm/9-inch round): The vessel for your cake, shape, and bake.
    • Cooling rack: To cool the cake evenly without sogginess.
    • Toothpick or cake tester: To check doneness in the oven.

    Step-by-Step Guide to Crafting the Perfect Blood-Red Velvet Cake

    Step 1: Preheat your oven to 180°C (350°F). Grease and line a 23cm (9-inch) round cake pan with parchment paper.

    Step 2: In a large bowl, sift together 2 ½ cups (310g) all-purpose flour, 1 teaspoon baking soda, 1 teaspoon cocoa powder, and a pinch of salt.

    Step 3: In another bowl, cream 1 cup (200g) sugar with ½ cup (120ml) vegetable oil until light and fluffy, about 3-4 minutes.

    Step 4: Add 2 large eggs one at a time, beating well after each addition. Mix in 1 teaspoon vanilla extract.

    Step 5: In a small bowl, combine 1 cup (240ml) buttermilk with 2 tablespoons (30ml) white vinegar. Add to creamed mixture alternately with dry ingredients, starting and ending with dry.

    Step 6: Stir in 2 tablespoons (30ml) red food coloring until fully integrated and vivid.

    Step 7: Pour the batter into the prepared pan, smoothing the top.

    Step 8: Bake for 25-30 minutes, or until a toothpick inserted into the center comes out clean.

    Step 9: Let the cake cool in the pan for 10 minutes, then transfer to a wire rack to cool completely.

    Cooking Checks and Tips for the Blood-Red Velvet Cake

    • The cake’s surface should be firm, not cracked, with a deep, even red hue.
    • A toothpick inserted in the center should come out clean—no wet batter.
    • The edges will slightly pull away from the pan when done—look for that visual cue.
    • Ensure the cake is fully cooled before frosting to prevent melting and sliding.

    Common Pitfalls and How to Fix Them

    • Tough, dense crumb.? OVER-MIXING BATTER → Mix just until ingredients are combined to keep the cake tender.
    • Cake sinking or cracking.? BAKING AT WRONG TEMP → Always double-check your oven’s calibration.
    • Frosting melting or sliding.? NOT COOLING CAKE COMPLETELY → Let the cake cool fully to avoid frosting sliding off.
    • Runny or uneven frosting.? FROSTING TOO THIN → Chill the frosting slightly before applying for better texture.

    Blood-Red Velvet Cake

    Blood-red velvet cake is a striking dessert characterized by its deep crimson hue and soft, moist crumb. Made with cocoa powder, buttermilk, and vibrant red food coloring, it features a tender texture and a subtle cocoa flavor, finished with tangy cream cheese frosting. The process involves simple mixing, baking, and decorating, resulting in a bold, nostalgic treat perfect for special occasions or indulgent moments.
    Prep Time 20 minutes
    Cook Time 30 minutes
    Total Time 50 minutes
    Servings: 8
    Course: Main Course
    Cuisine: American
    Calories: 450

    Ingredients
      

    • 2 ½ cups all-purpose flour sifted
    • 1 teaspoon baking soda
    • 1 teaspoon cocoa powder natural preferred
    • pinch salt
    • 1 cup sugar
    • ½ cup vegetable oil
    • 2 large eggs
    • 1 teaspoon vanilla extract
    • 1 cup buttermilk
    • 2 tablespoons white vinegar
    • 2 tablespoons red food coloring gel preferred for vivid color
    • 8oz cream cheese softened
    • ½ cup unsalted butter softened
    • 3-4 cups powdered sugar sifted
    • 1 teaspoon vanilla extract

    Equipment

    • Mixing bowls
    • electric mixer or whisk
    • Rubber spatula
    • Cake pan (23cm/9-inch round)
    • Cooling rack
    • Toothpick or cake tester

    Method
     

    1. Preheat your oven to 180°C (350°F). Grease your cake pan and line it with parchment paper for easy removal.
    2. In a large bowl, sift together the flour, baking soda, cocoa powder, and a pinch of salt. This ensures even distribution and a light batter.
    3. In a separate bowl, combine sugar and vegetable oil, then beat with an electric mixer until the mixture is light and fluffy, about 3-4 minutes. You’ll notice it becomes pale and slightly thickened.
    4. Add eggs one at a time, beating well after each addition. Mix in vanilla extract. The batter should become smooth and slightly glossy.
    5. In a small bowl, whisk together buttermilk and vinegar. Gradually add this to the wet mixture, alternating with the dry ingredients, starting and ending with dry. Mix gently after each addition until just combined.
    6. Stir in the red food coloring until the batter is vividly red and uniform in color. This gives the cake its signature hue.
    7. Pour the batter into the prepared pan, smoothing the top with a spatula. Tap the pan gently on the counter to remove air bubbles.
    8. Bake the cake for 25-30 minutes, or until a toothpick inserted into the center comes out clean. The edges should slightly pull away from the pan, and the surface will be firm to the touch.
    9. Allow the cake to cool in the pan for about 10 minutes, then transfer it to a wire rack to cool completely. Cooling fully prevents frosting from melting.
    10. While the cake cools, beat the softened cream cheese and butter together until creamy and smooth. Gradually add powdered sugar and vanilla, beating until fluffy and spreadable.
    11. Once the cake is completely cooled, spread the cream cheese frosting evenly over the top and sides, creating a smooth or decorative finish as desired.

    Notes

    Ensure the cake is fully cooled before frosting to prevent sliding, and use gel food coloring for vibrant, true-red color without thinning the batter.
    This cake isn’t just about its striking color; it’s about the quiet chaos of mixing, the rich aroma filling your kitchen, and the perfect crumb that’s both tender and moist. Every slice feels like a quiet celebration, a little rebellion against the mundane. Enjoy it as is, or splash it with a dollop of cream cheese frosting—either way, it’s a moment worth savoring.

  • Haunted House Cookies: A Spooky Twist on a Classic Treat

    Haunted House Cookies: A Spooky Twist on a Classic Treat

    I’ve always loved the contrast of crispy edges and chewy centers in cookies. But these haunted house cookies? They turn that love into a playful, spooky experience. They’re perfect for Halloween, or any night you want to turn a simple treat into a little bit of magic.

    Why I Keep Baking Haunted House Cookies

    They’re messy, chaotic, and imperfect—just like Halloween itself. Each batch feels like a little adventure, a chance to get creative with spooky decorations. Plus, nothing beats the sight of kids’ faces lighting up at the sight of their haunted houses.

    Haunted House Cookie Ingredients & Their Secrets

    • Butter: Gives cookies their richness and crisp edges. Swap with margarine if needed.
    • Sugar: Sweetens and helps with spreading. Brown sugar adds a caramel note.
    • Eggs: Bind everything together. For a vegan version, try applesauce or flaxseed.
    • Flour: The base structure. Bread flour will give a chewier texture.
    • Vanilla extract: Adds depth and warmth. Lemon or almond extract can be fun substitutes.
    • Decorations (icing, candies): Bring your haunted house to life with spooky details.

    Tools of the Spooky Trade

    • Rolling pin: To flatten the dough evenly.
    • Cookie cutters or sharp knife: To shape your haunted houses and spooky figures.
    • Baking sheet: To hold the cookies during baking.
    • Parchment paper: To prevent sticking and make cleanup easier.
    • Cooling rack: To cool cookies evenly and prevent sogginess.

    Step-by-Step to Spooky Sweetness

    Step 1: Preheat your oven to 180°C (350°F).

    Step 2: Line a baking sheet with parchment paper.

    Step 3: In a large bowl, cream together 1 cup of softened butter and 1 cup of sugar for about 2 minutes until fluffy.

    Step 4: Add 1 egg and 1 teaspoon vanilla extract. Mix until combined.

    Step 5: In a separate bowl, whisk together 2 ½ cups of all-purpose flour, ½ teaspoon baking soda, and ¼ teaspoon salt.

    Step 6: Gradually add dry ingredients to the wet mixture, stirring until just combined.

    Step 7: Divide dough into two balls. Wrap in plastic and chill for 30 minutes.

    Step 8: On a floured surface, roll out one dough ball to about ¼ inch thick.

    Step 9: Cut into spooky shapes with cookie cutters or freehand with a knife.

    Step 10: Place on prepared baking sheet and bake for 10-12 minutes, until edges are golden.

    Step 11: Let cookies cool on a rack for 10 minutes before decorating.

    Step 12: Decorate with icing, candies, or melted chocolate to create haunted house windows, ghosts, or creepy trees.

    How to Keep Your Haunted Cookies Perfect

    • Cookies should be pale golden around the edges, not dark or burnt.
    • The dough should be firm but pliable, not sticky or crumbly.
    • Decorations should set within 30 minutes to avoid smudging or melting.

    Common Haunted House Cookie Mistakes & How to Fix Them

    • Dough cracks when rolling out.? Use too much flour? Add a teaspoon of milk to loosen the dough.
    • Edges burnt or dark.? Cookies spread too much? Chill the dough 15 minutes longer.
    • Decorations melting or bleeding.? Bake at 160°C (320°F) for 2 minutes less.
    • Cookies sticking to the baking sheet.? Use less icing or let cookies cool completely before decorating.

    Haunted House Cookies

    These playful haunted house cookies combine a crispy edge with a chewy center, crafted through simple baking techniques. The dough is flavored with vanilla and shaped into spooky structures, then decorated with icing and candies for a whimsical Halloween treat. Their imperfect, chaotic appearance adds to the spooky charm and fun of decorating them.
    Prep Time 45 minutes
    Cook Time 12 minutes
    Total Time 57 minutes
    Servings: 12
    Course: Main Course
    Cuisine: American
    Calories: 150

    Ingredients
      

    • 1 cup unsalted butter softened
    • 1 cup granulated sugar
    • 1 large egg at room temperature
    • 1 teaspoon vanilla extract
    • 2.5 cups all-purpose flour
    • ½ teaspoon baking soda
    • ¼ teaspoon salt
    • decorations icing, candies, melted chocolate for decorating

    Equipment

    • Mixing bowls
    • Rolling pin
    • Cookie cutters or sharp knife
    • Baking sheet
    • Parchment paper
    • Cooling rack

    Method
     

    1. Preheat your oven to 180°C (350°F) and line a baking sheet with parchment paper.
    2. In a large mixing bowl, beat the softened butter and sugar together using a hand or stand mixer until the mixture is light, fluffy, and fragrant, about 2 minutes.
    3. Add the egg and vanilla extract to the wet mixture and beat until well combined, ensuring the mixture is smooth and slightly glossy.
    4. In a separate bowl, whisk together the flour, baking soda, and salt to evenly distribute the leavening agents.
    5. Gradually add the dry ingredients to the wet mixture, mixing on low speed or folding gently until just combined. The dough will be soft but manageable.
    6. Divide the dough into two equal parts, shape each into a flat disc, wrap in plastic wrap, and chill in the refrigerator for about 30 minutes to relax the gluten and firm up the dough.
    7. Remove one dough disc from the fridge and place it on a floured surface. Use a rolling pin to roll out the dough to about ¼ inch thickness, keeping it even.
    8. Cut out haunted house shapes or spooky figures using cookie cutters or a sharp knife, then transfer them carefully onto the prepared baking sheet.
    9. Bake the cookies in the preheated oven for 10-12 minutes, or until the edges turn a light golden brown and the cookies are set.
    10. Once baked, transfer the cookies to a cooling rack and let them cool completely for about 10 minutes, which helps prevent smudging decorations later.
    11. Decorate the cooled cookies with icing, candies, or melted chocolate to create spooky windows, ghosts, or creepy trees, adding your personal spooky touch.
    12. Allow the decorations to set for about 30 minutes so they don’t smudge or slide off. Then enjoy your playful, spooky haunted house cookies!

    Notes

    For best results, keep decorations simple and let the cookies cool completely before decorating. Feel free to get creative with your spooky details!
    These haunted house cookies are more than just a treat; they’re a chance to get a little creative and a lot spooky. The aroma of baked dough, mingling with hints of vanilla and sugar, makes the whole house feel like a Halloween scene. Feel free to personalize your haunted houses with different colors and decorations—each one tells its own ghostly story. Don’t rush the decorating part; that’s when the magic really happens.

  • Creepy Stuffed Shells: A Sinister Twist on Comfort Food

    Creepy Stuffed Shells: A Sinister Twist on Comfort Food

    Stuffed shells are a classic for a reason, but I like to twist mine into something a little darker, a little more daring. Think smoky cheese, a hint of heat, and an almost sinister visual appeal. This dish is perfect for when you want comfort but also a little surprise on your plate. It’s my go-to for cozy nights that need a touch of the unexpected.

    Why I keep coming back to this recipe.

    The gooey cheese, the smoky depth of the sauce, and that slightly eerie presentation make it a memorable dish. It’s perfect when I want comfort but also a little edge. Plus, I love how versatile it is—tweaking spices or adding extra herbs keeps it feeling fresh.

    Breaking down the creepy stuffed shells ingredients.

    • Ricotta cheese: Creamy and mild, it binds the filling together, adding richness.
    • Mozzarella cheese: Oozy and stretchy, gives that gooey texture and golden top.
    • Spinach: Wilted and chopped, adds a pop of green and earthy flavor.
    • Garlic: Pungent and aromatic, it’s the backbone of the savory flavor.
    • Red pepper flakes: A little heat to keep things interesting, just enough to spark.
    • Marinara sauce: Tangy and tomatoey, it’s the flavor base that keeps it saucy.
    • Fresh basil or oregano: Bright and fragrant, sprinkled on top for freshness.

    Tools of the trade for creepy stuffed shells.

    • Large pot: Boiling shells and cooking the pasta.
    • Mixing bowl: Combining cheese, herbs, and seasonings.
    • Spoon or piping bag: Filling the shells neatly.
    • Baking dish: Holding the assembled shells for baking.
    • Oven: Getting everything hot and bubbly.

    Step-by-step guide to assembling and baking your creepy stuffed shells.

    Step 1: Preheat your oven to 180°C (350°F).

    Step 2: Cook the shells in boiling salted water until just al dente, about 8 minutes. Drain and set aside.

    Step 3: Make the filling: combine ricotta, shredded mozzarella, chopped spinach, minced garlic, and a pinch of red pepper flakes.

    Step 4: Stuff each shell generously with the cheese mixture, then arrange in a greased baking dish.

    Step 5: Top with marinara sauce and sprinkle with more mozzarella.

    Step 6: Bake uncovered for about 25 minutes until bubbly and golden.

    Step 7: Let cool for 5 minutes before serving to avoid burning your tongue.

    Step 8: Finish with a sprinkle of chopped basil or oregano for that final punch.

    Cooking checkpoints and tips for creepy stuffed shells.

    • Shells should be just tender but not falling apart.
    • Cheese filling should be creamy and slightly stretchy.
    • Baking should produce a bubbly, golden top.

    Common pitfalls and how to fix them.

    • Overstuffed shells collapse or burst.? Use a smaller or larger shell if stuffing feels too tight or loose.
    • Dried-out cheese or sauce.? Add a splash more marinara if filling dries out during baking.
    • Shells turning too dark or cheese burning.? Bake at 180°C (350°F) for the right amount of time—avoid overcooking.
    • Uneven browning or dry edges.? Cover loosely with foil if cheese browns too quickly.

    Smoky Creepy Stuffed Shells

    This dish features large pasta shells filled with a creamy mixture of ricotta, mozzarella, spinach, and garlic, all baked in a smoky marinara sauce until bubbly and golden. The final presentation offers a gooey, slightly charred appearance that’s both comforting and daring, perfect for cozy nights with a twist.
    Prep Time 15 minutes
    Cook Time 30 minutes
    Total Time 45 minutes
    Servings: 4
    Course: Main Course
    Cuisine: Italian-American
    Calories: 450

    Ingredients
      

    • 12 large pasta shells uncooked
    • 1 cup ricotta cheese room temperature
    • 1 cup mozzarella cheese shredded
    • 2 cups fresh spinach chopped and wilted
    • 3 cloves garlic minced
    • 0.5 teaspoon red pepper flakes optional
    • 2 cups marinara sauce
    • 0.25 cup fresh basil or oregano chopped, for garnish

    Equipment

    • Large pot
    • Mixing bowl
    • Spoon or piping bag
    • Baking dish
    • Oven

    Method
     

    1. Bring a large pot of salted water to a boil, then add the shells and cook until just al dente, about 8 minutes. Drain and set aside.
    2. In a mixing bowl, combine ricotta, half of the shredded mozzarella, chopped spinach, minced garlic, and red pepper flakes. Mix until well blended and creamy.
    3. Spoon the cheese mixture into a piping bag or use a small spoon to fill each shell generously, pressing gently to pack the filling inside.
    4. Preheat your oven to 180°C (350°F). Lightly grease a baking dish with a bit of sauce or oil.
    5. Arrange the stuffed shells in the baking dish, open side up, and evenly pour marinara sauce over them. Sprinkle the remaining mozzarella on top.
    6. Bake uncovered for about 25 minutes, or until the sauce is bubbling and the cheese is golden and melted.
    7. Remove from the oven and let sit for 5 minutes. This helps the cheese set slightly and makes serving easier.
    8. Garnish with chopped fresh basil or oregano for a fragrant, fresh finish. Serve hot and enjoy the gooey, smoky, and slightly sinister presentation.

    Notes

    For extra smoky flavor, consider adding a dash of smoked paprika to the cheese filling. To make it spicier, increase the red pepper flakes or add a dash of hot sauce to the marinara.
    Once out of the oven, these shells should be oozy and browned at the edges, with a fragrant basil aroma wafting up. Though they look a little spooky, they’re deeply comforting, with cheesy warmth that melts in your mouth. Feel free to add a dash of chili flakes or a squeeze of lemon to brighten the richness. They’re best enjoyed hot, with a side of crusty bread or a crisp salad to balance the gooey richness.

  • Pumpkin Cheesecake Bars: A Rustic Twist on Fall Classics

    Pumpkin Cheesecake Bars: A Rustic Twist on Fall Classics

    Pumpkin cheesecake bars have become my go-to for fall gatherings. There’s something about combining pumpkin’s earthiness with creamy cheesecake that feels both nostalgic and indulgent. It’s a recipe that’s forgiving enough for a beginner, yet impressive enough to serve to guests.

    Why I Keep Coming Back to This Recipe

    The balance of creamy, spicy, and crunchy keeps me reaching for these bars year after year. They remind me of fall family gatherings and cozy mornings. Plus, the simplicity makes it a no-fuss dessert that still feels special.

    Inside the Pumpkin Cheesecake Bars

    • Graham cracker crumbs: The crunchy base that adds a buttery flavor and texture contrast.
    • Cream cheese: The rich, tangy backbone of the filling, smoothing out the pumpkin.
    • Pumpkin puree: Gives that warm, earthy flavor and vibrant color.
    • Brown sugar: Adds depth and caramel notes, balancing spices.
    • Cinnamon, nutmeg, ginger: The spice trio that makes pumpkin shine.
    • Eggs: Bind the filling together and give it a slight lift.
    • Butter: Helps the crust hold together and adds richness.

    Tools & Equipment for Pumpkin Cheesecake Bars

    • 9×13 inch baking pan: To hold and shape the crust and filling.
    • Parchment paper: Eases removal and cleanup.
    • Mixing bowls: For combining crust and filling ingredients.
    • Electric mixer or whisk: To smooth out the cream cheese and pumpkin mixture.
    • Spatula: To spread crust and filling evenly.
    • Oven: To bake the crust and cheesecake.

    Step-by-Step Guide to Pumpkin Cheesecake Bars

    Step 1: Preheat your oven to 175°C (350°F).

    Step 2: Line a 9×13 inch baking pan with parchment paper, leaving some overhang.

    Step 3: In a bowl, combine crushed graham crackers, melted butter, and a pinch of salt. Press into the bottom of the pan to form a crust.

    Step 4: Bake the crust for 10 minutes until lightly golden. Set aside to cool while you prepare the filling.

    Step 5: In a large mixing bowl, beat cream cheese until smooth, then add pumpkin puree, sugar, spices, and eggs. Mix until well combined.

    Step 6: Pour the filling over the cooled crust. Bake for 40-45 minutes, until the edges are set but the center still jiggles slightly.

    Step 7: Let the bars cool in the pan for at least 2 hours, then refrigerate for another 2 hours before slicing.

    Step 8: Serve chilled, perhaps with a dollop of whipped cream or a sprinkle of cinnamon.

    Cooking Checkpoints & Tips

    • Ensure the crust is evenly pressed and baked until golden for a sturdy base.
    • The filling should be smooth and free of lumps before pouring into the crust.
    • The cheesecake should jiggle slightly in the center when done, not look liquid.
    • Refrigerate for at least 2 hours to let flavors meld and texture set.

    Common Mistakes & How to Fix Them

    • Cracks forming on the cheesecake surface.? Use a water bath to prevent cracks if the top cracks during baking.
    • Lumps in the filling.? Ensure the cream cheese is softened for smooth mixing.
    • Cheesecake becoming dry and crumbly.? Bake until just set; over-baking causes dryness.
    • Bars falling apart when cut.? Refrigerate sufficiently before slicing.

    Pumpkin Cheesecake Bars

    Pumpkin cheesecake bars combine a crunchy graham cracker crust with a rich, spiced pumpkin and cream cheese filling. The recipe involves preparing a crust, blending a smooth filling, and baking until just set, resulting in a creamy, flavorful dessert with a golden topping and vibrant orange hue. These bars are perfect for fall gatherings, offering a balance of indulgence and comfort.
    Prep Time 20 minutes
    Cook Time 50 minutes
    Total Time 1 hour 10 minutes
    Servings: 12
    Course: Main Course
    Cuisine: American
    Calories: 250

    Ingredients
      

    • 1 1/2 cups Graham cracker crumbs about 10 full sheets crushed
    • 6 tablespoons butter melted
    • 16 oz cream cheese softened
    • 1 cup pumpkin puree
    • 1 cup brown sugar
    • 1 1/2 teaspoons ground cinnamon
    • 1/2 teaspoon ground nutmeg
    • 1/2 teaspoon ground ginger
    • 3 eggs large
    • 2 tablespoons flour

    Equipment

    • 9×13 inch baking pan
    • Parchment paper
    • Mixing bowls
    • electric mixer or whisk
    • Spatula
    • Oven

    Method
     

    1. Line your 9×13 inch baking pan with parchment paper, leaving some overhang for easy removal.
    2. Combine graham cracker crumbs and melted butter in a bowl, mixing until the crumbs are evenly coated and resemble wet sand.
    3. Press this crumb mixture firmly into the bottom of the prepared pan to form an even crust. Use the back of a spatula or your fingers to smooth it out.
    4. Bake the crust in a preheated oven at 175°C (350°F) for about 10 minutes until fragrant and lightly golden. Remove and set aside to cool slightly.
    5. In a large mixing bowl, beat the softened cream cheese with an electric mixer until smooth and creamy, about 2-3 minutes.
    6. Add pumpkin puree, brown sugar, cinnamon, nutmeg, and ginger to the cream cheese, mixing until well combined and fragrant, about 1-2 minutes.
    7. Crack in the eggs one at a time, beating well after each addition, until the mixture is smooth and slightly thickened.
    8. Stir in the flour just until incorporated, ensuring a smooth, slightly thick batter.
    9. Pour the pumpkin cheesecake filling over the cooled crust, spreading evenly with a spatula for a smooth top.
    10. Bake the assembled bars in the oven at 175°C (350°F) for about 40-45 minutes, or until the edges are set and the center jiggles slightly when gently shaken.
    11. Allow the bars to cool completely in the pan, then refrigerate for at least 2 hours to set the texture.
    12. Use the parchment paper overhang to lift the bars out of the pan, then cut into squares and serve chilled, perhaps with a dollop of whipped cream or a sprinkle of cinnamon for extra flair.

    Notes

    Ensure the cream cheese is softened for a smooth filling. Do not overbake to prevent cracks. Refrigerate thoroughly for clean cuts and optimal flavor.
    These bars are a great way to showcase pumpkin’s cozy charm without the fuss of a full pie. The creamy filling, contrasted with crunchy crust, makes each bite a comforting treat. Feel free to customize with ginger snap crust or a drizzle of caramel for extra flair. Enjoy them as a dessert or a festive snack, depending on your mood.

  • Monster Pretzel Bites: A Chewy, Oozy Snack for the Brave at Heart

    Monster Pretzel Bites: A Chewy, Oozy Snack for the Brave at Heart

    Pretzel bites are a nostalgic snack, but I love giving them a little twist—adding a touch of smoked paprika or a sprinkle of cheesy spice blend before baking. There’s something oddly satisfying about biting into that chewy, salty crust, especially when it’s still warm. They’re perfect for game nights, casual get-togethers, or just a weekend craving that refuses to be ignored.

    Why I keep coming back to this recipe

    It’s imperfect, a little chaotic, but utterly rewarding. The smell of baking pretzels filling the kitchen is pure comfort. Plus, they’re quick to pull together and disappear fast—perfect for when I want something hearty but not fussed-over.

    What’s really in these monster pretzel bites?

    • Warm water and yeast: The base for a fluffy, chewy dough—activate the yeast with a little sugar for extra lift.
    • Flour: All-purpose works fine; the key is just enough gluten to hold shape without toughness.
    • Baking soda: Creates that characteristic pretzel crust—boil in it to develop that glossy, chewy exterior.
    • Salt: Both in the dough and on top, it’s the backbone of flavor—crystal salt gives that satisfying crunch.
    • Egg wash: Adds shine and color—brush on before baking for that classic pretzel look.
    • Optional toppings: Coarse salt, sesame, or spices—add flavor and texture with a sprinkle before baking.

    Tools and equipment for monster pretzel bites

    • Large pot: For boiling the pretzels in baking soda water.
    • Mixing bowl: Combine ingredients and knead the dough.
    • Baking sheet: Bake the pretzels evenly and prevent sticking.
    • Parchment paper: Line the sheet for easy cleanup.
    • Pastry brush: Brush the pretzels with egg wash for a shiny finish.

    Step-by-step to Monster Pretzel Bites: A Chewy, Oozy Snack

    Step 1: Mix warm water with yeast and sugar, let sit until frothy, about 5 minutes.

    Step 2: Add flour, salt, and melted butter to the yeast mixture. Knead until smooth, about 10 minutes.

    Step 3: Divide dough into small balls, about the size of a walnut.

    Step 4: Bring water to a boil with baking soda in a large pot.

    Step 5: Shape each ball into a pretzel shape, then dip into the boiling soda water for 30 seconds.

    Step 6: Arrange pretzel bites on a baking sheet lined with parchment.

    Step 7: Brush with beaten egg, sprinkle generously with coarse salt.

    Step 8: Bake at 220°C (430°F) for 12-15 minutes until golden brown.

    Step 9: Remove from oven, brush with melted butter if desired.

    Step 10: Serve warm with mustard or cheese sauce.

    Cooking checkpoints and tips for perfect pretzel bites

    • Dough should be smooth and slightly tacky but not sticky.
    • Boiling the pretzels briefly gives them that chewy, shiny crust.
    • Watch for a deep golden color—don’t overbake or they’ll dry out.
    • Salt should be visible and slightly coarse for texture and flavor.

    Common mistakes and how to fix them

    • Using too much water or not enough flour.? Dough is too sticky? Add a sprinkle of flour, a teaspoon at a time.
    • Skipping parchment or oiling the tray.? Pretzels stick to the baking sheet? Use parchment paper or lightly oil the sheet.
    • Underbaking or oven temp too low.? Pretzels are pale? Bake a minute longer, keep an eye on color.
    • Overworking the dough.? Pretzel bites are dense? Don’t over-knead, just enough to combine ingredients.

    Chewy Pretzel Bites with a Spicy Twist

    These pretzel bites are a fun, handheld snack featuring a chewy, salty crust with a glossy finish. The dough is boiled briefly in baking soda water before baking to develop that characteristic pretzel exterior, then seasoned with smoked paprika or cheesy spice blends for added flavor. Once baked to golden perfection, they’re delightfully soft inside with a satisfying crunch on the outside.
    Prep Time 20 minutes
    Cook Time 15 minutes
    Total Time 35 minutes
    Servings: 8
    Course: Main Course
    Cuisine: American
    Calories: 150

    Ingredients
      

    • 1 packet dry active yeast about 2 1/4 teaspoons
    • 1 cup warm water around 110°F (43°C)
    • 1 teaspoon sugar
    • 3 cups all-purpose flour plus extra for dusting
    • 1 teaspoon salt
    • 2 tablespoons unsalted butter melted
    • 1/4 cup baking soda for boiling water
    • 1 egg egg beaten, for egg wash
    • to taste coarse salt for sprinkling
    • to taste smoked paprika or cheesy spice blend optional toppings

    Equipment

    • Large pot
    • Mixing bowl
    • Baking sheet
    • Parchment paper
    • Pastry brush

    Method
     

    1. Mix the warm water with yeast and sugar in a bowl, then let sit for about 5 minutes until frothy and bubbling—this activates the yeast and signals it’s ready.
    2. Add the melted butter, salt, and flour to the yeast mixture. Knead the dough until smooth and slightly tacky, about 8-10 minutes, until it feels elastic and springs back when pressed.
    3. Divide the dough into small portions, rolling each into a ball roughly the size of a walnut; this makes the pretzel bites easy to shape and bake.
    4. Bring a large pot of water to a boil, then add the baking soda carefully—this water will be used to give the pretzels their shiny, chewy crust.
    5. Shape each dough ball into a small pretzel shape or simply leave as balls, then carefully dip each into the boiling baking soda water for about 30 seconds, which helps develop that characteristic shiny, chewy exterior.
    6. Use a slotted spoon to remove the pretzel bites from the water, and place them on a parchment-lined baking sheet, spacing them evenly.
    7. Brush each pretzel bite with the beaten egg to give them a glossy, golden finish, then sprinkle generously with coarse salt and optional spices.
    8. Bake in a preheated oven at 430°F (220°C) for about 12-15 minutes, watching for a deep golden brown color that signals they’re perfectly baked.
    9. Once out of the oven, brush the pretzel bites with melted butter if desired for extra richness, and let them cool slightly before serving warm with your favorite dips.

    Notes

    For extra flavor, add smoked paprika or cheesy spice blends before baking. Be sure not to overbake to keep the pretzels soft inside. Use fresh ingredients for the best chew and shine.
    These bites are a messy, satisfying treat that makes any snack plate feel special. Don’t stress about perfect shapes; the irregularities add to their charm. Once out of the oven, they’re best enjoyed hot, with a glass of cold beer or a simple dip. Feel free to double the recipe if a crowd is coming—these won’t last long.

  • Candy Corn Fudge: A Nostalgic Fall Twist with a Modern Bite

    Candy Corn Fudge: A Nostalgic Fall Twist with a Modern Bite

    Candy corn fudge is a reminder of all the chaos and charm of fall holidays. Its bright colors and sweet, buttery aroma make it irresistible, especially when you’re craving a nostalgic treat but want to elevate it with a bit of homemade craft. It’s one of those recipes that feels both precise and forgiving, with room for your own tweaks and flavors.

    Why I Keep Coming Back to This Recipe

    It captures that fleeting childhood joy, the chaos of fall, and the simple pleasure of homemade sweets. Every batch feels like a small victory, a messy but rewarding project. Plus, it’s quick, forgiving, and endlessly customizable — a perfect way to make a holiday feel special without fuss.

    Deep Dive into the Ingredients

    • Candy corn: Provides a sweet, chewy texture with a festive orange and yellow pop. Swap for autumnal sprinkles or chopped nuts for variety.
    • Marshmallow fluff: Adds fluffiness and a melt-in-your-mouth quality, balancing the richness of butter.
    • Sweetened condensed milk: Creamy and sweet, it binds everything together; for less sweetness, try evaporated milk, but you’ll lose some gooeyness.
    • Butter: Gives the fudge its tender, buttery base; salted butter enhances flavor, but unsalted works just fine.
    • Vanilla extract: A splash brightens the sweetness; omit if you prefer a more intense candy corn flavor.
    • Salt: A pinch heightens the sweetness and balances flavors; sea salt flakes add a nice crunch.
    • Optional add-ins (nuts, sprinkles): For texture contrast and visual flair — don’t skip if you’re feeling fancy.

    Tools of the Trade for Perfect Fudge

    • Heavy-bottomed saucepan: Ensures even heat distribution and prevents scorching.
    • Silicone spatula: For stirring smoothly and scraping down the sides.
    • Candy thermometer: To monitor the fudge’s temperature accurately.
    • Parchment paper: Eases removal and clean-up of the set fudge.
    • Sharp knife: To cut clean slices once set.

    Step-by-Step: Making Candy Corn Fudge

    Step 1: Gather your ingredients and equipment before starting — nothing worse than digging for a spoon mid-melt.

    Step 2: Line a square pan (20×20 cm or 8×8 inches) with parchment paper, leaving some overhang for easy lifting.

    Step 3: In a heavy-bottomed saucepan, melt butter over low heat until shiny and smooth, about 2 minutes.

    Step 4: Add marshmallow fluff and stir until fully melted and integrated. This smells like childhood.

    Step 5: Pour in sweetened condensed milk, stirring constantly until the mixture is creamy and just begins to bubble.

    Step 6: Drop in candy corn, stirring gently so they don’t all sink. Watch for the oozy, bright orange color to meld into the buttery base.

    Step 7: Cook on low, stirring, until the mixture reaches 115°C (240°F) on a candy thermometer or thickens slightly. It should be glossy and smooth.

    Step 8: Pour the hot fudge into your prepared pan, smoothing the top with a spatula. Let it set at room temperature for about an hour.

    Step 9: Once firm, lift out the fudge using the parchment overhang. Slice into squares or rectangles.

    Step 10: Let the pieces cool completely before serving. They should be firm but still chewy, with a bit of a sticky bite.

    Cooking Checkpoints and Tips

    • Ensure your candy thermometer is accurate for perfect temperature control.
    • Stir constantly when adding condensed milk to prevent burning or sticking.
    • Watch for the fudge to reach a glossy, slightly thickened stage — that’s when it’s ready to pour.
    • If the fudge crystallizes or becomes grainy, gently reheat and stir in a splash of milk to smooth it out.

    Common Mistakes and How to Fix Them

    • Incorrect temperature readings can lead to under- or over-cooked fudge.? Use a fresh candy thermometer to avoid inaccurate readings.
    • High heat or infrequent stirring can scorch the mixture.? Stir continuously and keep heat low to prevent burning.
    • Fudge becoming grainy or hard from overcooking.? Reheat gently if mixture firms up before pouring.
    • Crystallization or graininess in the fudge.? Add a splash of milk if fudge crystallizes during stirring.

    Candy Corn Fudge

    Candy corn fudge is a vibrant, sweet treat that combines chewy candy corn with a creamy, buttery base. Made by melting marshmallow fluff, sweetened condensed milk, and butter, then mixing in candy corn and allowing the mixture to set, it results in a colorful, chewy square with a glossy finish and festive appearance.
    Prep Time 10 minutes
    Cook Time 15 minutes
    Total Time 25 minutes
    Servings: 16
    Course: Main Course
    Cuisine: American
    Calories: 180

    Ingredients
      

    • 2 cups candy corn bright orange and yellow pop
    • 1 cup marshmallow fluff adds fluffiness and melt-in-your-mouth texture
    • 1 can (14 oz) sweetened condensed milk binds ingredients and adds sweetness
    • 1/2 cup butter salted or unsalted
    • 1 teaspoon vanilla extract brightens the flavor
    • a pinch salt enhances sweetness

    Equipment

    • Heavy-bottomed saucepan
    • Silicone spatula
    • Candy thermometer
    • Parchment paper
    • Square pan (20×20 cm or 8×8 inches)
    • Sharp knife

    Method
     

    1. Line your square pan with parchment paper, leaving some overhang for easy removal. Set aside.
    2. Melt the butter in a heavy-bottomed saucepan over low heat until shiny and smooth, about 2 minutes. Use a silicone spatula to stir gently, releasing a warm, buttery aroma.
    3. Add marshmallow fluff to the melted butter and stir constantly until completely melted and integrated. The mixture will become thick, shiny, and fragrant, resembling a fluffy, golden paste.
    4. Pour in the sweetened condensed milk and continue stirring rapidly until the mixture is creamy, bubbling gently, and smooth. This creates a rich, gooey base.
    5. Gently fold in the candy corn, stirring carefully so they don’t sink completely. Watch as the bright orange and yellow colors begin to meld into the mixture, creating a colorful swirl.
    6. Continue to cook on low heat, stirring constantly, until the mixture reaches 115°C (240°F) on a candy thermometer or thickens slightly and becomes glossy. It should feel thick and smooth when stirred.
    7. Immediately pour the hot fudge into your prepared pan, smoothing the top with a spatula. The mixture will spread and settle into an even layer. Let it cool at room temperature for about an hour until set and firm.
    8. Once the fudge is firm and glossy, lift it out of the pan using the parchment overhang. Place it on a cutting board and cut into squares or rectangles with a sharp knife, revealing the vibrant colors and chewy texture.
    9. Enjoy your colorful candy corn fudge! Serve at room temperature for the perfect chewy, buttery bite with a festive look.

    Notes

    Ensure your candy thermometer is accurate for perfect temperature control. Stir constantly when adding condensed milk to prevent burning. Watch for the fudge to reach a glossy, slightly thickened stage before pouring. If fudge becomes grainy, gently reheat and stir in a splash of milk to smooth it out.
    This fudge isn’t just a treat; it’s a little piece of fall in every bite. The candy corn adds a nostalgic crunch, balanced by the rich, buttery sweetness of the fudge. Feel free to swap out candy for seasonal sprinkles or chopped nuts for variety. Making this pulls me right back to childhood Halloweens, and it’s perfect for sharing with friends or just savoring solo.