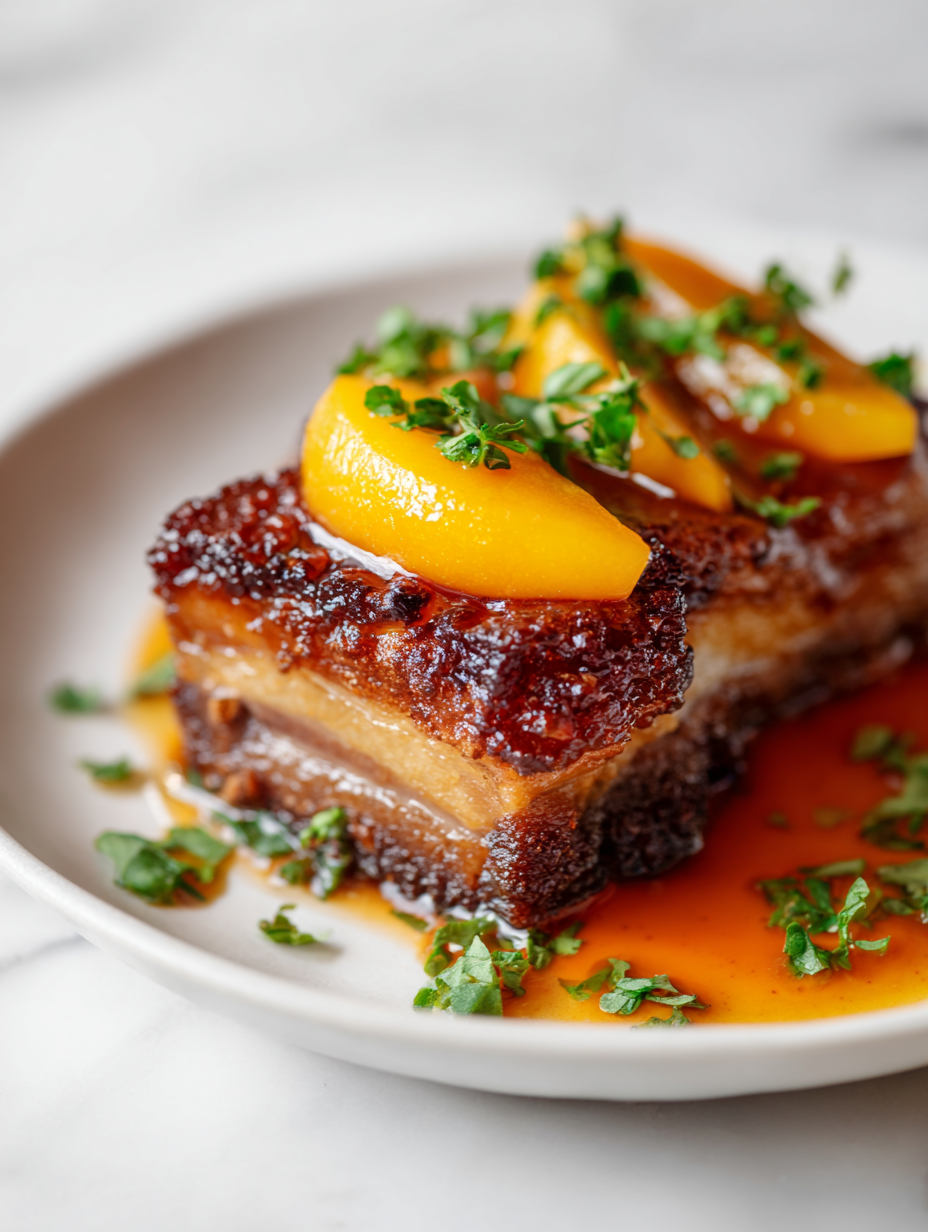
Category: Main Course

  • Bloody Beet Gnocchi: A Rustic Twist on a Classic Pasta

    Bloody Beet Gnocchi: A Rustic Twist on a Classic Pasta

    Beets are often relegated to salads or roasted sides, but I love turning them into something unexpected—bright, playful gnocchi. It’s a way to celebrate their earthy sweetness in a form that’s both comforting and vibrant. Plus, the process of transforming a root vegetable into tender dumplings feels a little rebellious in the kitchen.

    Why I Keep Making Bloody Beet Gnocchi

    Its bold color and earthy flavor make me smile every time. It’s a reminder that simple ingredients, when handled with care, can surprise you. Plus, it’s a playful dish that sparks conversations and makes the table lively. I love how adaptable it is—serve it with a simple herb butter or a tangy vinaigrette.

    Getting to Know Your Beet Gnocchi Ingredients

    • Beets: Vivid, earthy, and sweet—use fresh, firm beets for the brightest flavor.
    • Flour: All-purpose is fine; add gradually until dough feels just right—starchy and tender.
    • Egg: Acts as a binder, giving the gnocchi structure and a slight richness.
    • Salt: Enhances all the natural flavors and balances the sweetness.
    • Olive oil or butter: For finishing—adds a glossy shine and a savory touch.
    • Herbs (optional): Fresh thyme or parsley can lift the dish with herbal brightness.
    • Vinegar or lemon (optional): A splash brightens the flavor—keep it subtle, just enough to zing.

    Tools of the Beet Gnocchi Trade

    • Oven or grill: Roast the beets for smoky sweetness.
    • Food processor or blender: Puree the cooled beets into a smooth, uniform mash.
    • Pot for boiling: Cook the gnocchi quickly and evenly.
    • Slotted spoon: Retrieve gnocchi from boiling water without breaking them.
    • Knife and cutting board: Shape and portion the gnocchi.

    Crafting the Vibrant Beet Gnocchi

    Step 1: Start by roasting the beets—wrap them in foil, 200°C (390°F), for about 50 minutes until tender and smoky-sweet.

    Step 2: Peel the beets while still warm; their vivid red flesh is a sign you’re on the right track.

    Step 3: Puree the roasted beets until smooth, then let cool while you prepare the dough.

    Step 4: Mix the beet puree with flour, egg, and a pinch of salt; knead gently into a soft, slightly sticky dough.

    Cooking with Eye and Nose: Key Checkpoints

    • Gnocchi should be tender but hold their shape when boiled—test one in simmering water.
    • The dough should be soft but not sticky—add flour sparingly if needed.
    • Beet purée should be bright, smooth, and oozy—don’t rush the cooling process.
    • Watch for a slight crackle or puffing sound when boiling—signs they’re cooked through.

    Troubleshooting the Beet Gnocchi

    • Dough feels greasy or overly sticky.? Add a little more flour if the dough is too sticky.
    • Gnocchi are tough or chewy.? Don’t overwork the dough, or gnocchi will be dense.
    • Gnocchi disintegrate in water.? Reduce boiling time slightly if gnocchi fall apart.
    • Puree is too hot, making dough sticky.? Ensure beets are cooled enough before blending.

    Vibrant Beet Gnocchi

    Beet gnocchi are tender, colorful dumplings made by blending roasted beets into a smooth mash and folding them into a soft dough with flour and egg. The dish features a bright red hue and earthy sweetness, with a delicate, melt-in-your-mouth texture once boiled and finished with a drizzle of olive oil or butter. It’s a playful, visually striking twist on traditional gnocchi that’s both comforting and lively.
    Prep Time 20 minutes
    Cook Time 1 hour
    Total Time 1 hour 20 minutes
    Servings: 4
    Course: Main Course
    Cuisine: Italian
    Calories: 220

    Ingredients
      

    • 4 medium fresh beets firm and unblemished
    • 1 cup all-purpose flour plus more if needed
    • 1 large egg beaten
    • 1/2 teaspoon salt to enhance flavor
    • 2 tablespoons olive oil or butter for serving

    Equipment

    • Oven or grill
    • Food processor or blender
    • Pot for boiling
    • Slotted spoon
    • Knife and cutting board

    Method
     

    1. Wrap the beets tightly in aluminum foil and roast in a preheated 200°C (390°F) oven for about 50 minutes until they are tender and release a sweet, earthy aroma.
    2. Carefully remove the beets from the oven, unwrap, and let them cool slightly until they’re easy to handle but still warm.
    3. Peel the beets using your fingers or a small knife, revealing their bright red flesh. This process helps prevent staining your hands and keeps the flesh vibrant.
    4. Place the peeled beets into a food processor or blender and pulse until you get a smooth, velvety puree. Let the puree cool slightly to prevent it from making the dough sticky.
    5. Transfer the cooled beet puree into a mixing bowl and create a well in the center. Crack the egg into the well and sprinkle with salt.
    6. Gradually add the flour to the beet mixture, mixing gently with your hands or a spoon until a soft, slightly sticky dough forms. Add more flour if needed to achieve the right consistency.
    7. Divide the dough into 4 portions and roll each into a long, thin rope about 1 inch in diameter. Cut each rope into 1-inch pieces to form individual gnocchi.
    8. Bring a large pot of salted water to a gentle boil. Carefully drop the gnocchi into the water, working in batches if necessary.
    9. Cook the gnocchi until they float to the surface, about 2-3 minutes. Use a slotted spoon to gently lift them out and transfer to a serving dish.
    10. Drizzle the hot gnocchi with olive oil or melted butter, and toss gently to coat. Add fresh herbs if desired for extra flavor and brightness.
    11. Serve immediately, enjoying the vibrant color and tender texture of these playful beet gnocchi, perfect as a main course or a lively side dish.

    Notes

    For an extra touch, sprinkle with grated Parmesan or garnish with fresh herbs before serving.
    This gnocchi isn’t just a pretty plate. It’s a reminder that a simple vegetable can shine in unexpected ways, especially when roasted and mashed into tender pillows. Each bite is a burst of earthy sweetness and a splash of color that makes serving dinner feel like an event. Feel free to toss them in browned butter, sprinkle with fresh herbs, or keep it minimalist to let the beets do all the talking.

  • Monster Meatloaf: A Hearty Twist for the Bold at Heart

    Monster Meatloaf: A Hearty Twist for the Bold at Heart

    This monster meatloaf started as a silly idea in my kitchen—something to make the kids laugh and the adults nostalgic. It’s a way to turn a humble dish into a centerpiece that’s both fun and comforting. The secret’s in the spice blend and the shape, which makes every slice feel like a little adventure.

    Why You’ll Keep Coming Back to This Monster

    It’s a dish that invites chaos and creativity, perfect for lazy weekends or game days. The odd shape makes it a fun centerpiece that sparks conversation. Plus, the smoky, savory flavors hold up through leftovers, making it a comfort that sticks around.

    Breaking Down the Monster’s Ingredients

    • Ground beef: I use 80/20 for juiciness—swap with turkey for leaner, or lamb for a richer flavor.: Adds a hearty, beefy base with enough fat to keep it tender.
    • Ground pork: I love the fatty punch—skip if you want it leaner, but it keeps everything moist.: Gives richness and a slight sweetness.
    • Crackers: I prefer plain saltines—crushed for binding, but Ritz can add a buttery note.: Creates a tender, cohesive loaf.
    • Tomato sauce: I go for smoky, sweet canned sauce—sub with ketchup mixed with smoked paprika.: Adds moisture and a tangy, sweet contrast.
    • Onion & garlic: Aromatic staples—use shallots or leek for a milder twist.: Builds depth and flavor.
    • Smoked paprika: For that smoky, slightly spicy flavor—adjust to taste.: Gives a subtle, smoky kick.
    • Spices & herbs: Thyme, black pepper, a pinch of cayenne—tweak to your heat preference.: Layered flavor that complements the meats.

    Tools & Equipment for the Monster

    • Mixing bowls: Combine all ingredients evenly.
    • Loaf pan or baking sheet: Shape and bake the meatloaf.
    • Meat thermometer: Check internal temperature for doneness.
    • Basting brush: Apply sauces and keep the top moist.
    • Cooling rack: Rest the meatloaf to retain juices.

    Step-by-Step: Crafting the Monster

    Step 1: Preheat your oven to 175°C (350°F).

    Step 2: In a large mixing bowl, combine 1 lb ground beef, 1/2 lb ground pork, and 1 cup crushed crackers.

    Step 3: Add 1 small can of tomato sauce, 1 chopped onion, 2 cloves minced garlic, and a splash of smoked paprika.

    Step 4: Mix everything until just combined—don’t overdo it, or the loaf gets dense.

    Step 5: Shape into a rough monster shape on a greased baking sheet or loaf pan.

    Step 6: Bake for about 60 minutes, until the edges are crispy and the internal temp hits 70°C (160°F).

    Step 7: Let it rest for 10 minutes before slicing. This keeps it juicy and less crumbly.

    Step 8: Finish with a drizzle of homemade ketchup or a smear of smoky BBQ sauce.

    Cooking Checkpoints & Tips

    • The top should be golden and slightly crispy, not burnt.
    • Internal temperature should reach 70°C (160°F) — no guessing.
    • Juices run clear when you pierce the thickest part.
    • The shape should hold together without falling apart.

    Common Mistakes & How to Fix Them

    • Overmixing the meat.? Too dense? Don’t overmix—just enough to combine ingredients.
    • Not enough moisture.? Dry meatloaf? Add a splash of beef broth or a beaten egg.
    • Burnt edges.? Surface burning? Cover loosely with foil after 45 minutes.
    • Cutting too soon.? Crumbled slices? Let it rest longer before cutting.

    Monster Meatloaf

    This fun and hearty meatloaf is shaped into a whimsical monster, combining ground beef and pork for a juicy, flavorful centerpiece. The dish is baked until golden and crispy on top, with a tender, moist interior that slices easily, perfect for game days or casual gatherings. The secret lies in the smoky spice blend and playful shape that sparks joy at the table.
    Prep Time 20 minutes
    Cook Time 1 hour
    Total Time 1 hour 20 minutes
    Servings: 4
    Course: Main Course
    Cuisine: American
    Calories: 350

    Ingredients
      

    • 1 lb ground beef 80/20 for juiciness
    • 0.5 lb ground pork adds moisture and richness
    • 1 cup crushed saltine crackers binds the loaf together
    • 1 small can tomato sauce smoky, sweet canned sauce or ketchup with smoked paprika
    • 1 small onion chopped
    • 2 cloves garlic minced
    • 1 teaspoon smoked paprika adjust to taste
    • 1 pinch cayenne pepper for heat
    • 1 teaspoon thyme dried or fresh
    • Black pepper to taste

    Equipment

    • Mixing bowls
    • Baking sheet or loaf pan
    • Meat thermometer
    • Basting brush
    • Cooling rack

    Method
     

    1. Preheat your oven to 175°C (350°F).
    2. In a large mixing bowl, combine the ground beef, ground pork, and crushed saltine crackers. Use your hands or a spoon to gently mix until evenly distributed.
    3. Add the chopped onion, minced garlic, tomato sauce, smoked paprika, cayenne, thyme, and black pepper. Mix everything just until combined—avoid overmixing to keep the meatloaf tender.
    4. Shape the mixture into a playful monster shape on a greased baking sheet or place it into a loaf pan for a more traditional look. Feel free to add extra features like eyes or teeth with small bits of cheese or sliced vegetables for fun.
    5. Bake the meatloaf in the oven for about 60 minutes, until the edges are crispy and golden brown. Use a meat thermometer to check that the internal temperature reaches 70°C (160°F).
    6. Once baked, remove the meatloaf from the oven and carefully transfer it to a cooling rack. Let it rest for 10 minutes to allow the juices to settle, making it easier to slice.
    7. Slice the monster meatloaf into thick, even pieces, revealing its juicy interior. Serve with a drizzle of smoky barbecue sauce or a dollop of ketchup for extra flavor.

    Notes

    For added fun, decorate your monster with cheese eyes or veggie features before baking. Cover loosely with foil if edges brown too quickly during baking.
    Once out of the oven, the smell of roasted meat and smoky spices fills the air, promising something satisfying. This isn’t just about feeding a crowd—it’s about embracing a bit of chaos and fun in your cooking. Play with the shapes, add your favorite toppings, and make it your own. Enjoy every bite, knowing you’ve turned a simple meal into a memorable experience.

  • Spooky Stuffed Peppers: A Nighttime Bites Adventure

    Spooky Stuffed Peppers: A Nighttime Bites Adventure

    Stuffed peppers have a way of feeling like comfort wrapped in a bit of mischief. But this version leans into the thrill of the unknown—spooky, savory, and a little unexpected. It’s a dish that celebrates the chaos of flavors and textures, perfect for an autumn evening or any night that needs a bit of extra punch.

    Why I Keep Coming Back to This Dish

    It’s a reminder that simple ingredients can turn into something unexpectedly thrilling. The smoky aroma when baking, the ooze of melted cheese, that slight char—this dish hits all the right notes after a long day. It’s customizable, forgiving, and always a little wild.

    Inside the Ingredients for Spooky Stuffed Peppers

    • Bell peppers: Large, sturdy peppers with a sweet, smoky flavor. Swap for poblano for a spicier, earthier bite.
    • Ground meat or lentils: Adds hearty richness. Lentils are great for a vegetarian spin, and soak up spices nicely.
    • Cooked rice: Feeds the filling and adds a mild, chewy texture. Quinoa can be a good alternative for nuttiness.
    • Chopped tomatoes: Juicy and bright, they give moisture. Canned tomatoes work perfectly, fresh during summer.
    • Spices (cumin, paprika, chili powder): Build smoky, warm layers. Adjust to your heat preference.
    • Cheese (cheddar, Monterey Jack): Melts into a gooey topping. Use vegan cheese if you want dairy-free.
    • Onion & garlic: Base flavor builders, fragrant and essential for depth.

    Tools of the Trade for Spooky Stuffed Peppers

    • Oven: To bake the peppers until tender and slightly charred.
    • Skillet: To sauté the filling ingredients and build flavor.
    • Spoon: To scoop out seeds and stuff the peppers.
    • Baking dish: To hold the stuffed peppers during baking.
    • Aluminum foil: To cover peppers for even cooking.

    Step-by-Step to Spooky Perfection

    Step 1: Preheat your oven to 180°C (350°F).

    Step 2: Slice the tops off the peppers and scoop out seeds and membranes.

    Step 3: In a skillet, heat olive oil over medium. Sauté chopped onions and garlic until fragrant, about 3 minutes.

    Step 4: Add ground meat or lentils, cook until browned, about 8 minutes.

    Step 5: Mix in cooked rice, chopped tomatoes, and spices. Season with salt and pepper.

    Step 6: Stuff the peppers with the filling, pressing down lightly.

    Step 7: Place stuffed peppers in a baking dish, cover with foil.

    Step 8: Bake for 30-35 minutes, until peppers are tender and filling is bubbling.

    Step 9: Remove foil, sprinkle cheese on top, and broil for 2-3 minutes until golden.

    Step 10: Let rest for 5 minutes before serving.

    Cooking Tips & Checkpoints

    • Peppers should be tender and slightly charred around the edges.
    • Filling should be hot and bubbling when you remove it from the oven.
    • Cheese on top should be melted and golden, not burnt.
    • Use a thermometer to check that the filling’s internal temp hits 75°C (165°F).

    Common Mistakes & How to Fix Them

    • Peppers are getting too dark before cooking through.? Add a splash of water or broth when peppers start to burn.
    • Filling is drying out or burning.? Reduce oven temperature to 160°C (320°F).
    • Cheese on top burns before peppers are tender.? Cover with foil if cheese is browning too quickly.
    • Peppers remain too firm after baking.? Use a sharp knife to gently check if peppers are soft.

    Spooky Stuffed Peppers

    This dish features bell peppers filled with a savory mixture of ground meat or lentils, rice, tomatoes, and spices, then baked until tender with a bubbly, golden cheese topping. The peppers develop a slight char and the filling becomes rich and flavorful, creating a comforting yet exciting main course with a play of smoky and cheesy textures.
    Prep Time 20 minutes
    Cook Time 40 minutes
    Total Time 1 hour
    Servings: 4
    Course: Main Course
    Cuisine: American
    Calories: 350

    Ingredients
      

    • 4 large bell peppers sturdy, sweet peppers that can hold filling
    • 1 lb ground meat or lentils for hearty filling, choose vegetarian or meat as preference
    • 1 cup cooked rice or substitute with quinoa for nuttiness
    • 1 cup chopped tomatoes canned or fresh during summer
    • 1 teaspoon cumin adds smoky warmth
    • 1 teaspoon paprika for depth of flavor
    • 1/2 teaspoon chili powder adjust for heat preference
    • 1 cup shredded cheese cheddar or Monterey Jack
    • 1 small onion finely chopped
    • 2 cloves garlic minced
    • 2 tablespoons olive oil for sautéing
    • to taste salt and pepper seasoning

    Equipment

    • Oven
    • Skillet
    • Spoon
    • Baking dish
    • Aluminum foil

    Method
     

    1. Preheat your oven to 180°C (350°F). Slice off the tops of the peppers and scoop out the seeds and membranes with a spoon, creating a hollow cavity.
    2. Heat olive oil in a skillet over medium heat. Sauté the chopped onion and minced garlic until fragrant, about 3 minutes, until they soften and become translucent.
    3. Add the ground meat or lentils to the skillet. Cook until browned and cooked through, about 8 minutes, breaking apart the meat as it cooks.
    4. Stir in the cooked rice, chopped tomatoes, cumin, paprika, chili powder, salt, and pepper. Mix well and cook for another 5 minutes, allowing the flavors to meld and the mixture to heat thoroughly.
    5. Using a spoon, stuff each hollowed-out pepper with the filling, pressing down lightly to pack it in.
    6. Place the stuffed peppers upright into a baking dish. Cover the dish with aluminum foil to help them cook evenly and retain moisture.
    7. Bake in the preheated oven for 30-35 minutes, until the peppers are tender and slightly charred around the edges, and the filling is bubbling.
    8. Remove the foil and sprinkle shredded cheese evenly over the tops of the peppers. Return to the oven and broil for 2-3 minutes until the cheese is melted and golden brown.
    9. Take the peppers out of the oven and let them rest for 5 minutes. The cheese should be gooey and the peppers tender, with a smoky aroma filling your kitchen.

    Notes

    Ensure peppers are tender and slightly charred for the best flavor and texture. Feel free to customize the filling with your favorite spices or proteins.
    These peppers are a wild card in my kitchen. The smoky, oozy filling paired with the tender, charred pepper skins creates a dance of textures. It’s a dish that feels like a small celebration of the season, perfect for sharing. Make it your own with different fillings or toppings, and enjoy the warm chaos of it all.

  • Spooky Shepherd’s Pie: A Dark Twist on Comfort Food

    Spooky Shepherd’s Pie: A Dark Twist on Comfort Food

    Shepherd’s pie is comfort food with a soul, but I’ve always wondered how to give it a little edge without losing its heart. This spooky twist came from late-night cravings for something familiar yet different, a bit more daring. It’s perfect for those nights when you want a hearty, satisfying meal that also whispers secrets from the dark.

    Why I keep coming back to this recipe

    The dark, smoky flavors make it feel like a warm secret, perfect for chilly nights. It’s a dish that comforts yet surprises, with every bite revealing something deeper. Plus, it’s simple enough to throw together when chaos is just outside the door, but hearty enough to slow down and savor.

    Breaking down the ingredients

    • Ground beef: The backbone of the dish, juicy and savory, but swap for lentils if you want vegetarian.
    • Potatoes: Creamy, fluffy, the classic topping. Sweet potatoes can add a subtle sweetness.
    • Onions & garlic: Builds flavor with a fragrant, warm aroma. Shallots work well too.
    • Carrots & celery: Add crunch and sweetness, but parsnips can be a good substitute.
    • Beef broth & Worcestershire sauce: Deepens the flavor, smoky and umami-rich, or use mushroom broth for a vegetarian version.
    • Smoked paprika: Adds a smoky depth, brightens with a touch of lemon juice if you like.
    • Butter & cream: Make the mash extra rich and velvety, but olive oil can be a lighter alternative.

    Tools you’ll need for a spooky night in

    • Large skillet: To brown the meat and cook vegetables
    • Mixing bowl: To mash and prepare the potato topping
    • Baking dish: To assemble and bake the shepherd’s pie
    • Wooden spoon: To stir and combine ingredients
    • Oven: To bake and achieve that golden crust

    Step-by-step to a hauntingly good shepherd’s pie

    Step 1: Preheat your oven to 200°C (390°F).

    Step 2: In a large skillet, heat a tablespoon of oil over medium heat.

    Step 3: Add chopped onions and garlic, cook until translucent, about 5 minutes.

    Step 4: Stir in ground beef, cook until browned and fragrant, about 8 minutes.

    Step 5: Drain excess fat, then add chopped carrots and celery, cook for another 5 minutes.

    Step 6: Pour in beef broth, add a splash of Worcestershire sauce, simmer until slightly thickened, about 10 minutes.

    Step 7: Season with salt, pepper, and a pinch of smoked paprika for depth.

    Step 8: Transfer the meat mixture to a baking dish, spread evenly.

    Step 9: Top with mashed potatoes, smoothing out the surface.

    Step 10: Bake in the oven for 25-30 minutes or until the topping is golden and bubbly.

    Step 11: Let sit for 5 minutes before serving.

    Cooking checkpoints to watch for

    • Ensure the beef is browned evenly without burning, which develops flavor and prevents a bitter taste.
    • When simmering the meat mixture, it should thicken slightly and develop a rich aroma, not be watery.
    • The mashed potato topping should be smooth and creamy, not lumpy or runny.
    • The topping should turn a deep golden brown, indicating it’s baked through and caramelized on top.

    Avoid these common pitfalls

    • Adding too much broth at once.? Too watery? Let the filling simmer longer to thicken.
    • Unevenly cooked meat.? Use a spatula to scrape the sides of the pan for even browning.
    • Under-cooked potato topping.? Bake a few extra minutes if the top isn’t golden enough.
    • Burnt topping.? If it’s over-browned, tent with foil and lower oven temp.

    Spooky Smoky Shepherd’s Pie

    This twist on classic shepherd’s pie uses smoky paprika and rich beef broth to deepen its flavor, while the creamy mashed potato topping provides a comforting crown. The dish features a savory meat and vegetable filling finished with a golden, bubbly crust, perfect for a hearty and slightly daring meal. Its layered textures and dark, smoky aroma make it both an inviting and mysterious dinner option.
    Prep Time 15 minutes
    Cook Time 40 minutes
    Total Time 55 minutes
    Servings: 4
    Course: Main Course
    Cuisine: Comfort Food
    Calories: 550

    Ingredients
      

    • 1 lb ground beef or lentils for vegetarian
    • 4 large potatoes for mash, or sweet potatoes
    • 1 large onion chopped
    • 3 cloves garlic minced
    • 2 carrots carrots diced
    • 2 stalks celery diced
    • 1 cup beef broth or mushroom broth for vegetarian
    • 1 dash Worcestershire sauce
    • 1 tsp smoked paprika adds smoky depth
    • 2 tbsp butter for mash
    • 1/4 cup cream for mash, optional
    • Salt and pepper to taste

    Equipment

    • Large skillet
    • Mixing bowl
    • Baking dish
    • Wooden spoon
    • Oven

    Method
     

    1. Peel and chop the potatoes into even chunks. Boil them in salted water until they are soft and easily pierced with a fork, about 15 minutes. Drain and set aside.
    2. While the potatoes are cooking, heat a large skillet over medium heat and add a tablespoon of oil. Once shimmering, add chopped onions and minced garlic, sautéing until fragrant and translucent, about 5 minutes. The aroma should fill the kitchen with a warm, savory scent.
    3. Add the ground beef to the skillet, breaking it apart with a wooden spoon. Cook until browned and fragrant, about 8 minutes, until no pink remains and the meat develops a rich aroma.
    4. Stir in diced carrots and celery, cooking for another 5 minutes until vegetables soften slightly and the mixture becomes fragrant and darker in color.
    5. Pour in beef broth, add a splash of Worcestershire sauce, and stir in smoked paprika. Let it simmer gently for about 10 minutes until the mixture thickens and the flavors meld, releasing a smoky, savory aroma.
    6. While the filling simmers, mash the cooked potatoes with butter, cream, and a pinch of salt and pepper until smooth, creamy, and fluffy. This step creates a velvety topping that contrasts beautifully with the dark filling.
    7. Transfer the meat and vegetable filling into a baking dish, spreading it out evenly. Smooth the mashed potatoes over the top, creating a gentle layer that covers the filling completely.
    8. Bake in a preheated oven at 200°C (390°F) for 25-30 minutes, until the top is golden brown and bubbling around the edges. The aroma will shift to a deep, smoky scent as the top crisps and caramelizes.
    9. Remove from oven and let sit for about 5 minutes to set. The top should be a rich, deep golden color, and the filling underneath hot and steamy. Serve slices with a sprinkle of fresh herbs if desired.

    Notes

    For extra smoky flavor, sprinkle a little more smoked paprika on top before baking. To make it vegetarian, substitute lentils for the beef and mushroom broth for the beef broth.
    This version of shepherd’s pie feels like wrapping your hands around a warm mug on a chilly night, but with a twist that makes it feel a little mysterious. I love how the smoky paprika and savory broth create a dark, rich base, while the fluffy mashed potatoes add a comforting finish. Feel free to add a dash of hot sauce or a sprinkle of herbs to make it your own. It’s a dish that invites you to cozy up and settle in, no matter how spooky the season gets.

  • Black Bean Burgers with a Twist: A Cozy, Unexpected Spin

    Black Bean Burgers with a Twist: A Cozy, Unexpected Spin

    Black bean burgers often get a bad rap for being bland or mushy, but I’ve found that with a few tweaks, they can be deeply satisfying. The secret is in the texture and that smoky, roasted flavor that makes them crave-worthy. This recipe is about transforming humble beans into something you want to hold in your hand, bite after bite.

    Why this recipe keeps calling me back

    It’s the kind of comfort food that surprises with its depth. I love how versatile it is—toppings, buns, even salads. Plus, it’s a reminder that simple pantry staples can become something memorable with a little care and heat.

    Inside the ingredient lineup

    • Canned black beans: Rich, earthy base; I prefer organic for that extra oomph, but dried works too.
    • Onion and garlic: Bring a sweet, savory warmth; sauté until translucent and fragrant.
    • Breadcrumbs: Help hold the burger together; go for panko for extra crunch.
    • Egg: Acts as a binder; skip if vegan and replace with flaxseed meal.
    • Smoked paprika and cumin: Add a smoky, warm depth; they make the flavor sing.
    • Olive oil: For frying; use enough to get a nice crust but not greasy.
    • Toppings like lettuce, tomato, and spicy mustard: Finish with fresh, bright flavors that cut through the richness.

    Tools of the trade for perfect black bean burgers

    • Large mixing bowl: To combine all ingredients comfortably without spilling.
    • Fork or potato masher: To mash the beans to the right texture.
    • Non-stick skillet or cast iron pan: To get a crispy crust without sticking.
    • Spatula: To flip the burgers gently without breaking.
    • Measuring spoons and cups: To keep ingredients balanced.

    Step-by-step guide to smoky, satisfying black bean burgers

    Step 1: Mash the beans until chunky but cohesive. Use a fork or potato masher, leaving some texture.

    Step 2: Sauté onions, garlic, and spices until fragrant, about 5 minutes. The smell should be warm and inviting.

    Step 3: Mix beans, sautéed aromatics, breadcrumbs, and an egg in a big bowl. Stir until combined but not overworked.

    Step 4: Shape into patties, about 3-4 inches wide. Keep them firm but not dense.

    Step 5: Heat a splash of oil in a non-stick pan over medium heat (around 160°C/320°F).

    Step 6: Cook patties for 4-5 minutes each side, until golden and slightly crispy.

    Step 7: Rest on a paper towel for a minute. They firm up as they cool.

    Step 8: Serve on toasted buns, with your favorite toppings. Press slightly to ensure they hold.

    Step 9: Check for doneness: golden crust, firm but not hard, and a fragrant, smoky aroma.

    Cooking checkpoints and tips to keep in mind

    • Ensure the oil is heated enough before adding the patties—listen for a slight crackle.
    • The patties should be golden and slightly crispy on the outside, not burnt.
    • When pressing down, you should see a gentle sizzle and smell toasty beans—don’t rush the flip.

    Common pitfalls and how to fix them

    • Over-mashed beans turn into a paste.? Use a gentle hand when mashing beans; over-mashing makes them mushy.
    • Burgers falling apart during cooking.? Don’t skip resting time; it helps the burgers hold together.
    • Too high heat causing blackened outsides.? Adjust heat if they burn too fast.
    • Mixture is too sticky and won’t shape.? Add a touch more breadcrumbs if mixture feels too loose.

    Smoky Black Bean Burgers

    These black bean burgers are transformed from humble pantry staples into hearty, satisfying patties with a crispy exterior and a tender, flavorful interior. They are seasoned with smoked paprika and cumin, then pan-fried until golden, offering a deliciously smoky and textured vegetarian option. Topped with fresh toppings and served on toasted buns, they make for a comforting, versatile meal.
    Prep Time 15 minutes
    Cook Time 10 minutes
    Total Time 25 minutes
    Servings: 4
    Course: Main Course
    Cuisine: American
    Calories: 350

    Ingredients
      

    • 2 cups canned black beans drained and rinsed
    • 1/2 cup breadcrumbs panko preferred for crunch
    • 1 egg or flaxseed meal for vegan
    • 1/2 cup onion finely chopped
    • 2 cloves garlic minced
    • 1 teaspoon smoked paprika
    • 1/2 teaspoon cumin
    • 2 tablespoons olive oil for frying
    • to taste Toppings lettuce, tomato, spicy mustard, etc.

    Equipment

    • Large mixing bowl
    • Fork or potato masher
    • Non-stick skillet or cast iron pan
    • Spatula
    • Measuring spoons and cups

    Method
     

    1. Place the drained black beans in a large mixing bowl and mash them with a fork or potato masher until chunky but cohesive, leaving some texture for the burgers.
    2. Heat a splash of olive oil in a skillet over medium heat, then add the chopped onion and minced garlic. Sauté for about 5 minutes until fragrant, soft, and translucent, filling your kitchen with warm aromas.
    3. Add the sautéed onion and garlic, smoked paprika, and cumin to the mashed beans. Stir well to combine the smoky spices evenly through the mixture.
    4. Mix in the breadcrumbs and egg (or flaxseed meal), stirring gently until everything is just combined. The mixture should be sticky but manageable; add more breadcrumbs if it feels too loose.
    5. Divide the mixture into four equal portions and shape each into a patty about 3-4 inches wide, pressing firmly to help them hold together.
    6. Heat a tablespoon of olive oil in a non-stick skillet over medium heat until shimmering and beginning to ripple, indicating the right temperature for frying.
    7. Carefully place the patties in the hot skillet, cooking for about 4-5 minutes on each side until they develop a golden-brown, crispy crust and smell smoky and inviting.
    8. Transfer the cooked burgers to a paper towel-lined plate and let them rest for a minute to firm up and finish crisping.
    9. While the burgers rest, toast your buns until golden and ready for stacking.
    10. Assemble the burgers by placing the crispy patties on the toasted buns, then topping with fresh lettuce, tomato slices, spicy mustard, or your favorite toppings.
    11. Press down gently on the burgers to help them hold together, then serve immediately and enjoy the smoky, hearty flavors.

    Notes

    For vegan options, replace the egg with flaxseed meal and water. Adjust spice levels to your taste, and feel free to add cheese or other toppings for variety.
    These burgers are a reminder that a little improvisation can turn simple ingredients into something memorable. They’re perfect for lazy weekends or when you need comfort food that’s hearty but not heavy. Feel free to tweak the spices or toppings—this is your canvas. Enjoy the process and the cozy, smoky bites that follow.

  • Creepy Stuffed Shells: A Sinister Twist on Comfort Food

    Creepy Stuffed Shells: A Sinister Twist on Comfort Food

    Stuffed shells are a classic for a reason, but I like to twist mine into something a little darker, a little more daring. Think smoky cheese, a hint of heat, and an almost sinister visual appeal. This dish is perfect for when you want comfort but also a little surprise on your plate. It’s my go-to for cozy nights that need a touch of the unexpected.

    Why I keep coming back to this recipe.

    The gooey cheese, the smoky depth of the sauce, and that slightly eerie presentation make it a memorable dish. It’s perfect when I want comfort but also a little edge. Plus, I love how versatile it is—tweaking spices or adding extra herbs keeps it feeling fresh.

    Breaking down the creepy stuffed shells ingredients.

    • Ricotta cheese: Creamy and mild, it binds the filling together, adding richness.
    • Mozzarella cheese: Oozy and stretchy, gives that gooey texture and golden top.
    • Spinach: Wilted and chopped, adds a pop of green and earthy flavor.
    • Garlic: Pungent and aromatic, it’s the backbone of the savory flavor.
    • Red pepper flakes: A little heat to keep things interesting, just enough to spark.
    • Marinara sauce: Tangy and tomatoey, it’s the flavor base that keeps it saucy.
    • Fresh basil or oregano: Bright and fragrant, sprinkled on top for freshness.

    Tools of the trade for creepy stuffed shells.

    • Large pot: Boiling shells and cooking the pasta.
    • Mixing bowl: Combining cheese, herbs, and seasonings.
    • Spoon or piping bag: Filling the shells neatly.
    • Baking dish: Holding the assembled shells for baking.
    • Oven: Getting everything hot and bubbly.

    Step-by-step guide to assembling and baking your creepy stuffed shells.

    Step 1: Preheat your oven to 180°C (350°F).

    Step 2: Cook the shells in boiling salted water until just al dente, about 8 minutes. Drain and set aside.

    Step 3: Make the filling: combine ricotta, shredded mozzarella, chopped spinach, minced garlic, and a pinch of red pepper flakes.

    Step 4: Stuff each shell generously with the cheese mixture, then arrange in a greased baking dish.

    Step 5: Top with marinara sauce and sprinkle with more mozzarella.

    Step 6: Bake uncovered for about 25 minutes until bubbly and golden.

    Step 7: Let cool for 5 minutes before serving to avoid burning your tongue.

    Step 8: Finish with a sprinkle of chopped basil or oregano for that final punch.

    Cooking checkpoints and tips for creepy stuffed shells.

    • Shells should be just tender but not falling apart.
    • Cheese filling should be creamy and slightly stretchy.
    • Baking should produce a bubbly, golden top.

    Common pitfalls and how to fix them.

    • Overstuffed shells collapse or burst.? Use a smaller or larger shell if stuffing feels too tight or loose.
    • Dried-out cheese or sauce.? Add a splash more marinara if filling dries out during baking.
    • Shells turning too dark or cheese burning.? Bake at 180°C (350°F) for the right amount of time—avoid overcooking.
    • Uneven browning or dry edges.? Cover loosely with foil if cheese browns too quickly.

    Smoky Creepy Stuffed Shells

    This dish features large pasta shells filled with a creamy mixture of ricotta, mozzarella, spinach, and garlic, all baked in a smoky marinara sauce until bubbly and golden. The final presentation offers a gooey, slightly charred appearance that’s both comforting and daring, perfect for cozy nights with a twist.
    Prep Time 15 minutes
    Cook Time 30 minutes
    Total Time 45 minutes
    Servings: 4
    Course: Main Course
    Cuisine: Italian-American
    Calories: 450

    Ingredients
      

    • 12 large pasta shells uncooked
    • 1 cup ricotta cheese room temperature
    • 1 cup mozzarella cheese shredded
    • 2 cups fresh spinach chopped and wilted
    • 3 cloves garlic minced
    • 0.5 teaspoon red pepper flakes optional
    • 2 cups marinara sauce
    • 0.25 cup fresh basil or oregano chopped, for garnish

    Equipment

    • Large pot
    • Mixing bowl
    • Spoon or piping bag
    • Baking dish
    • Oven

    Method
     

    1. Bring a large pot of salted water to a boil, then add the shells and cook until just al dente, about 8 minutes. Drain and set aside.
    2. In a mixing bowl, combine ricotta, half of the shredded mozzarella, chopped spinach, minced garlic, and red pepper flakes. Mix until well blended and creamy.
    3. Spoon the cheese mixture into a piping bag or use a small spoon to fill each shell generously, pressing gently to pack the filling inside.
    4. Preheat your oven to 180°C (350°F). Lightly grease a baking dish with a bit of sauce or oil.
    5. Arrange the stuffed shells in the baking dish, open side up, and evenly pour marinara sauce over them. Sprinkle the remaining mozzarella on top.
    6. Bake uncovered for about 25 minutes, or until the sauce is bubbling and the cheese is golden and melted.
    7. Remove from the oven and let sit for 5 minutes. This helps the cheese set slightly and makes serving easier.
    8. Garnish with chopped fresh basil or oregano for a fragrant, fresh finish. Serve hot and enjoy the gooey, smoky, and slightly sinister presentation.

    Notes

    For extra smoky flavor, consider adding a dash of smoked paprika to the cheese filling. To make it spicier, increase the red pepper flakes or add a dash of hot sauce to the marinara.
    Once out of the oven, these shells should be oozy and browned at the edges, with a fragrant basil aroma wafting up. Though they look a little spooky, they’re deeply comforting, with cheesy warmth that melts in your mouth. Feel free to add a dash of chili flakes or a squeeze of lemon to brighten the richness. They’re best enjoyed hot, with a side of crusty bread or a crisp salad to balance the gooey richness.

  • Black Pasta with Squid Ink: A Bold Play in Darkness and Depth

    Black Pasta with Squid Ink: A Bold Play in Darkness and Depth

    Squid ink pasta feels like a secret handshake among cooks. It’s dramatic, yes, but also surprisingly simple to pull off at home. There’s something satisfying about turning a humble pantry staple into a dish that looks like it belongs in a seaside trattoria.

    Why This Recipe Calls Me Back

    The bold visual impact and the complex sea-salty flavor make every attempt feel like a small adventure. It reminds me that cooking can be both dramatic and simple, a dance of ingredients meeting heat. Plus, the inky darkness feels like a secret shared with anyone who dares to try it.

    Ingredients & Their Secrets

    • Squid ink: Provides that striking black color and a complex umami flavor; use fresh or good quality canned.
    • Black pasta: The canvas for the ink; opt for high-quality dried pasta for the best texture.
    • Garlic: Adds aromatic depth; minced finely so it cooks evenly.
    • Chili flakes: For a gentle heat; adjust to taste.
    • White wine or lemon: Brightens the dish; use fresh lemon for a zesty lift.
    • Parsley: Fresh herb for color and freshness; chop just before adding.
    • Olive oil: Brings richness and helps meld flavors; use a good extra virgin.

    Tools of the Trade for Black Pasta with Squid Ink

    • Large pot: Boiling pasta evenly and efficiently.
    • Wide pan or skillet: Creating a large surface area for tossing pasta with sauce.
    • Ladle or small cup: Reserving pasta water for adjusting sauce consistency.
    • Tongs or pasta fork: Handling and serving the pasta without breaking the noodles.

    Step-by-Step for the Deep, Dark Pasta

    Step 1: Bring a large pot of water to a boil, salt generously, about 10g per liter. This is your pasta’s only chance to soak up flavor.

    Step 2: Add the black pasta, stir well so it doesn’t stick, and cook for 8-10 minutes. Keep an eye on the color—deep, inky black is what you want.

    Step 3: While the pasta cooks, heat a splash of olive oil in a wide pan over medium heat, about 160°C (320°F).

    Step 4: Add minced garlic and a pinch of chili flakes, cook until fragrant, about 30 seconds. It should smell smoky and inviting.

    Step 5: Pour in a splash of white wine or a squeeze of lemon for brightness, let it reduce slightly.

    Step 6: Drain the pasta, reserving a cup of starchy cooking water.

    Step 7: Toss pasta into the pan with the garlic, add squid ink, and a little reserved water to loosen the sauce.

    Step 8: Stir everything together, cook for another minute until glossy and dark.

    Step 9: Finish with chopped parsley, a drizzle of good olive oil, and a sprinkle of sea salt.

    Cooking Checkpoints & Tips to Keep in Mind

    • The pasta should be al dente — firm to the bite, with a slight chew.
    • The sauce should be glossy and cling to the noodles, not watery or greasy.
    • The squid ink should have dispersed evenly, giving a rich, uniform black coating.

    Common Mistakes & How to Fix Them

    • Cooking pasta too long.? OVERCOOKED PASTA → Rinse immediately and toss with sauce to prevent mush.
    • Adding all ink at once.? SPLATTERED INK → Lower heat and add ink gradually to control color.
    • Sauce becoming too thick or sticky.? SAUCY GLOSSYNESS → Add a splash more pasta water to loosen if sauce is too thick.
    • Under-seasoning.? LACK OF FLAVOR → Season with more salt or lemon for brightness.

    Black Pasta with Squid Ink

    This striking dish features black pasta coated in a rich, umami-laden squid ink sauce. The process involves cooking the pasta to al dente, creating a fragrant garlic and chili oil base, and tossing everything together with fresh parsley and a splash of lemon or white wine for brightness. The final dish has a glossy, dark appearance with a tender yet slightly chewy texture that captures the essence of seaside dining.
    Prep Time 10 minutes
    Cook Time 15 minutes
    Total Time 25 minutes
    Servings: 4
    Course: Main Course
    Cuisine: Seafood
    Calories: 450

    Ingredients
      

    • 400 g black pasta (squid ink pasta) preferably dried for best texture
    • 2 cloves garlic finely minced
    • 1/2 teaspoon chili flakes adjust to taste
    • 1/4 cup white wine or lemon juice for brightness
    • 2 tablespoons olive oil extra virgin recommended
    • 1/4 cup chopped parsley fresh, added at the end
    • to taste sea salt for seasoning
    • 1 tsp squid ink use fresh or canned quality ink

    Equipment

    • Large pot
    • Wide pan or skillet
    • Ladle or small cup
    • Tongs or pasta fork

    Method
     

    1. Bring a large pot of salted water to a rolling boil. Add the black pasta and cook for 8-10 minutes, stirring occasionally, until it reaches al dente and turns a deep, inky black.
    2. While the pasta cooks, heat olive oil in a wide skillet over medium heat. Add the minced garlic and chili flakes, cooking until fragrant and slightly golden, about 30 seconds. The garlic should smell aromatic and the oil will shimmer.
    3. Pour in the white wine or a squeeze of lemon juice and let it simmer, reducing slightly and filling the kitchen with a bright, citrusy aroma.
    4. Drain the pasta, reserving about a cup of the starchy cooking water. This will help loosen the sauce if needed.
    5. Add the cooked pasta directly into the skillet with the garlic and chili oil. Stir to coat the noodles evenly with the fragrant oil.
    6. Stir in the squid ink, dispersing it gradually into the pasta, and add a splash of reserved pasta water if the sauce feels too thick or sticky. Mix thoroughly until the noodles are glossy and evenly coated with the inky black sauce.
    7. Cook everything together for another minute, allowing the flavors to meld and the sauce to cling beautifully to each strand of pasta.
    8. Remove from heat, then toss in chopped parsley and drizzle with a little more olive oil. Season with sea salt to taste, adjusting for flavor.
    9. Serve immediately on warm plates, showcasing the glossy, dark noodles topped with fresh parsley and a hint of olive oil. Enjoy the dramatic, seaside-inspired flavors!
    This dish isn’t just about the striking color; it’s about the umami punch from the ink and the briny sweetness of the seafood. It’s a reminder that sometimes, the boldest flavors come from the most unexpected ingredients. Enjoy customizing it with a squeeze of lemon or a dash of chili to match your mood.

  • Halloween Tacos: A Playful Spook on Classic Flavors

    Halloween Tacos: A Playful Spook on Classic Flavors

    Halloween isn’t just about costumes and candy anymore. It’s about making food fun and memorable, even for the busiest weeknights. These tacos turn simple ingredients into a playful, visual feast that kids and adults alike can enjoy. They’re a little messy, a little silly, and totally adaptable.

    Why I Keep Coming Back to These Halloween Tacos

    They’re imperfect, playful, and forgiving. Every batch feels like a tiny celebration, especially with kids. Plus, they’re quick to throw together, perfect for chaotic weeknights or last-minute spooky cravings.

    Ingredients Breakdown for Spooky Goodness

    • Tortillas: Soft, warm, and flexible, they form the base. Whole wheat or corn—your call.
    • Ground meat or veggie mix: Rich, savory, or veggie-packed for a hearty bite. Use leftover chili for instant flavor.
    • Cheese: Oozy, gooey, with a sharp tang. Cheddar or Monterey Jack melt well and look spooky.
    • Toppings (lettuce, sour cream, salsa): Fresh, zesty, and cool contrast. Brighten up with chopped herbs or hot sauce.
    • Shapes (cheese or tortilla cut-outs): Add visual fun with ghost or bat shapes—makes every bite a little more festive.
    • Seasonings: Taco seasoning brings smoky, spicy warmth—use your favorite blend.
    • Oil or butter: For warming tortillas and crisping shapes, just enough for a shimmer.

    Tools of the Trade for Spooky Tacos

    • Skillet: To warm tortillas and cook fillings evenly.
    • Cookie cutters: To cut fun shapes from cheese or tortillas.
    • Spoons and spatulas: For filling and shaping the tacos.
    • Serving platter: To display the finished spooky tacos.

    Step-by-Step Guide to Spooky Tacos

    Step 1: Start by prepping your fillings: cook ground meat or veggie mix with taco seasoning until fragrant, about 8 minutes.

    Step 2: Warm your tortillas in a dry skillet over medium heat until soft and pliable, just 30 seconds per side.

    Step 3: Assemble the tacos: spoon the filling into each tortilla, then add your favorite toppings like shredded cheese, lettuce, and sour cream.

    Step 4: For the finishing touch, cut out small shapes (ghosts, bats) from cheese or tortillas, and place on top for a spooky effect.

    Step 5: Serve immediately, letting everyone customize their own with toppings and shapes.

    Cooking Checkpoints & Tips for Perfect Halloween Tacos

    • Ensure tortillas are warm enough to fold without cracking.
    • Check the filling’s internal temperature if using meat—aim for 75°C (165°F).
    • Look for a crispy, golden cheese topping for added texture and flavor.

    Common Mistakes and How to Fix Them

    • Tortillas crack when folding.? Use a non-stick skillet to prevent tortillas from sticking and tearing.
    • Filling is too dry or crumbly.? Warm tortillas thoroughly before filling to keep them pliable.
    • Cheese or shapes fall off easily.? Add a splash of water or broth to moisten the filling if it dries out.
    • Overcooking the fillings.? Secure shapes with a touch of melted cheese or a toothpick.

    Halloween Spooky Tacos

    These playful tacos combine seasoned ground meat or veggie mixture with warm tortillas, topped with gooey cheese and fresh toppings. The addition of fun-shaped cheese or tortilla cut-outs adds a festive, spooky touch, making them both visually appealing and deliciously satisfying. Perfect for quick weeknight dinners with a fun Halloween twist.
    Prep Time 10 minutes
    Cook Time 15 minutes
    Total Time 25 minutes
    Servings: 4
    Course: Main Course
    Cuisine: American
    Calories: 350

    Ingredients
      

    • 8 pieces tortillas whole wheat or corn
    • 1 pound ground meat or veggie mix use leftover chili for extra flavor
    • 1 cup shredded cheese cheddar or Monterey Jack
    • 1 cup lettuce chopped
    • 0.5 cup sour cream for topping
    • 0.5 cup salsa optional
    • to taste taco seasoning your favorite blend
    • 1 tablespoon oil or butter for warming tortillas and crisping shapes
    • as needed cheese or tortilla cut-outs ghost or bat shapes

    Equipment

    • Skillet
    • Cookie cutters
    • Spoons and spatulas
    • Serving platter

    Method
     

    1. Cook the ground meat or veggie mixture in a skillet over medium heat, breaking it apart with a spoon, until fragrant and cooked through, about 8 minutes. Stir in taco seasoning and a splash of water if needed, then simmer until thickened.
    2. Warm the tortillas in a dry skillet over medium heat for about 30 seconds per side until soft and pliable, making them easier to fold without cracking.
    3. Spoon the seasoned filling evenly into each tortilla, then top with shredded cheese, chopped lettuce, a dollop of sour cream, and salsa if using. The cheese should melt slightly from the warmth of the filling.
    4. Use cookie cutters to cut fun shapes like ghosts or bats from cheese slices or tortillas. Carefully place these shapes on top of the assembled tacos for a spooky effect, pressing gently to adhere.
    5. Heat a small amount of oil or butter in a skillet, then crisp the cheese or tortilla shapes until golden and slightly crispy, about 1-2 minutes per side.
    6. Arrange the finished tacos on a serving platter, garnish with extra toppings if desired, and serve immediately for a fun, festive meal.

    Notes

    For extra visual fun, encourage kids to create their own shapes and customize toppings. Keep tortillas warm to prevent cracking and handle shapes gently while crisping.
    These Halloween tacos aren’t just fun, they’re a way to make a simple dinner feel like a celebration. Use whatever fillings you have—spicy sausage, roasted sweet potatoes, or even leftover chili. The shapes and toppings add that extra dash of mischief and charm, perfect for a casual spooky night. Get creative, and don’t stress—sometimes the mess makes the best memories.

  • Halloween Lasagna: A Spooky Twist on a Comfort Classic

    Halloween Lasagna: A Spooky Twist on a Comfort Classic

    Lasagna often feels like a straightforward comfort food, but turn it into a Halloween-themed dish and it takes on a playful, spooky edge. I love how the layers mimic a haunted house, with dark tomato sauce and cheesy ghosts peeking through. It’s imperfect, a little chaotic, but always satisfying to pull together at the last minute.

    Why I Keep Coming Back to This Dish

    It’s imperfect, chaotic, and unpretentious—just like Halloween itself. Every time I make it, I remember how fun it is to throw together something spooky and comforting at once. Plus, it’s a perfect way to sneak in extra veggies or plant-based ingredients without fuss.

    What’s in This Haunted Layered Dish?

    • Lasagna noodles: Al dente and sturdy, these form the backbone of the dish. Swap for zucchini slices if you want to cut carbs.
    • Ground beef or plant-based protein: Adds hearty richness and a smoky flavor. Use lentils for a vegetarian twist.
    • Tomato sauce: The dark, flavorful base, simmered with garlic and onions. For a richer taste, add a splash of red wine.
    • Cheese (mozzarella, ricotta, Parmesan): Creates gooey layers and a crispy top. Use vegan cheese if needed, but add a bit more for stretch.
    • Onions and garlic: Builds depth and aroma, essential for that savory kick.
    • Spooky toppings (optional): Black olives, chopped peppers, or edible eyes for decoration. Use what’s on hand to amp up the creep.

    Tools of the Trade for Spooky Lasagna

    • Large pot: Boil noodles efficiently.
    • Skillet: Sauté aromatics and meat.
    • 9×13 inch baking dish: Layer and bake your lasagna.
    • Aluminum foil: Cover during baking to prevent drying out.
    • Cheese grater: Shred cheese for topping.

    Step-by-Step Guide to Spooky Good Lasagna

    Step 1: Preheat your oven to 180°C (350°F).

    Step 2: Cook the lasagna noodles according to package instructions until al dente, about 8 minutes. Drain and set aside.

    Step 3: Prepare the filling: sauté chopped onions and garlic until fragrant, then add ground beef or plant-based substitute, cook until browned. Mix in tomato sauce, season with salt, pepper, and a pinch of smoked paprika.

    Step 4: Layer your lasagna: spread a thin layer of meat sauce at the bottom of a 9×13 inch baking dish, add noodles, then cheese mixture, repeating until ingredients are used, ending with a top layer of sauce and shredded cheese.

    Step 5: Cover with foil and bake for 40 minutes. Remove foil, bake another 10 minutes until bubbly and golden.

    Step 6: Let it rest for 10 minutes before slicing. Serve with a side of greens or crusty bread.

    Cooking Checkpoints and Tips

    • Noodles should be cooked just al dente, not mushy, to hold their shape.
    • Sauce should be thick but still pourable, not watery or gloopy.
    • Cheese topping should be golden and bubbly, not burnt or pale.
    • Lasagna needs to rest to set properly, avoid slicing immediately after baking.

    Common Mistakes and How to Fix Them

    • Over-salted sauce.? Use too much salt in the sauce? Rinse the excess with a splash of cold water.
    • Clumped boiled noodles.? Noodles sticking together? Rinse with cold water and toss with a bit of olive oil.
    • Cheese not bubbly.? Cheese isn’t melting properly? Cover with foil during baking to trap heat.
    • Soggy lasagna.? Lasagna is watery? Let it rest, or cook off excess moisture before layering.

    Spooky Halloween Lasagna

    This Halloween-themed lasagna features dark tomato sauce layered with hearty meat or plant-based protein, melted cheese, and spooky toppings like olives and peppers. The dish is assembled in layers, baked until bubbly and golden, with a playful haunted house appearance that’s perfect for celebrating the holiday. Its cheesy, saucy layers create a satisfying, comforting texture with a fun, spooky twist.
    Prep Time 20 minutes
    Cook Time 50 minutes
    Total Time 1 hour 10 minutes
    Servings: 8
    Course: Main Course
    Cuisine: Halloween
    Calories: 450

    Ingredients
      

    • 12 oz lasagna noodles preferably oven-ready or cook al dente
    • 1 lb ground beef or plant-based protein for vegetarian, use lentils or mushrooms
    • 24 oz tomato sauce preferably rich and flavorful
    • 2 cups mozzarella cheese shredded
    • 1 cup ricotta cheese for creamy layers
    • 0.5 cup Parmesan cheese grated
    • 1 large onion chopped
    • 3 cloves garlic minced
    • to taste salt and pepper for seasoning
    • black olives for spooky eyes and decorations sliced or whole
    • chopped peppers for spooky toppers red or green

    Equipment

    • Large pot
    • Skillet
    • 9×13 inch baking dish
    • Aluminum foil
    • Cheese grater

    Method
     

    1. Preheat your oven to 180°C (350°F). Prepare all your ingredients and gather your tools for an easy assembly.
    2. Cook the lasagna noodles in a large pot of boiling salted water until just al dente, about 8 minutes. Drain and set aside to cool slightly.
    3. In a skillet, sauté chopped onions and minced garlic until fragrant and translucent, about 3-4 minutes. Add the ground beef or plant-based protein, cooking until browned and cooked through, about 5-7 minutes. Stir in tomato sauce, season with salt, pepper, and a pinch of smoked paprika if desired. Let simmer for 5 minutes until thickened.
    4. Mix ricotta cheese with half of the grated Parmesan for a creamy layer. Set aside.
    5. Spread a thin layer of the meat sauce at the bottom of your baking dish. Layer with cooked noodles, then spread a layer of the ricotta mixture, followed by a sprinkle of shredded mozzarella. Repeat these layers until all ingredients are used, finishing with a top layer of sauce and cheese.
    6. Cover the assembled lasagna tightly with aluminum foil and bake in the preheated oven for 40 minutes. Remove the foil and bake for an additional 10 minutes until bubbling and golden on top.
    7. Let the lasagna rest for at least 10 minutes before slicing. During this time, prepare spooky toppings like sliced black olives for eyes, chopped peppers for decorations, or other fun creepy elements.
    8. Decorate the top with olives, peppers, or edible eyes to create spooky faces and haunted house effects. Slice and serve hot, accompanied by greens or crusty bread for a complete fall feast.

    Notes

    For extra creepiness, use black food coloring in the sauce or add more spooky toppings. Resting the lasagna helps it set for cleaner slices. Feel free to get creative with your decorations for a fun Halloween presentation.
    This Halloween lasagna isn’t just about the look; it’s about the layered comfort that sneaks up on you with every bite. A bit chaotic, a little messy, but totally worth it. Feel free to swap ingredients—vegan cheese, spicy sausage, or even a sprinkle of black sesame seeds for extra flair. It’s a dish that invites play, mess, and hearty satisfaction, perfect for turning a simple dinner into a festive occasion.

  • Pumpkin Risotto: A Cozy Fall Classic with a Twist

    Pumpkin Risotto: A Cozy Fall Classic with a Twist

    Pumpkin risotto is a dish that whispers autumn, with its warm, earthy aroma and comforting texture. I’ve always loved how it balances richness with a touch of sweetness from the pumpkin. It’s a recipe that feels indulgent but comes together in under an hour, making it a go-to for cozy dinners.
    What makes this version different is the addition of a splash of sage and a hint of crispy pancetta on top. It’s like a warm hug in a bowl, perfect for those chilly evenings when you want something hearty but elegant. Plus, it’s a good way to use up that leftover pumpkin purée from last week’s pie.

    Why I Keep Coming Back to Pumpkin Risotto

    Its comforting warmth feels grounding, especially in fall. The balance of sweet pumpkin and savory depth keeps surprising me. It’s simple, yet every batch can be tweaked—more herbs, a dash of spice, a splash of cream. It’s honest food that makes me slow down and savor each bite.

    Breaking Down the Key Ingredients

    • Pumpkin purée: Adds sweetness and vibrant color; opt for smooth, canned pumpkin for convenience.
    • Arborio rice: Starchy and creamy when cooked; don’t substitute with long-grain or jasmine.
    • Butter and Parmesan: Create richness and depth; use good-quality butter and freshly grated cheese.
    • Onion and garlic: Builds the savory base; skip garlic if you prefer a milder flavor.
    • Broth: Enriches the risotto and helps develop flavor; use homemade or good-quality stock.
    • Sage and pancetta: Add herbal aroma and crunch; fresh sage is best, but dried works too.
    • Olive oil or infused oil: A finishing drizzle for shimmer and extra flavor.

    Tools of the Trade for Risotto

    • Heavy-bottomed saucepan: Ensures even heat and prevents rice from sticking or burning.
    • Ladle: Helps add broth gradually and stir gently.
    • Wooden spoon: Stirs without breaking down the rice; good for scraping the pan.
    • Measuring cups and spoons: Accurate ingredient portions for perfect texture.

    Step-by-Step to the Perfect Pumpkin Risotto

    Step 1: Start by heating 1 liter of chicken or veggie broth in a pot on medium heat. Keep it warm; you’ll add it gradually.

    Step 2: In a large pan, melt 2 tablespoons of butter over medium heat. Add 1 finely chopped onion and cook until translucent, about 5 minutes.

    Step 3: Stir in 1 cup of Arborio rice. Cook for 2 minutes, until the rice is just starting to toast and smell nutty.

    Step 4: Add 1 cup of pumpkin purée, stirring well, and cook for another minute.

    Step 5: Begin adding the warm broth, ladle by ladle, stirring constantly. Wait until the liquid is mostly absorbed before adding more.

    Step 6: Continue this process for about 20 minutes, until the rice is creamy and tender but still has a slight bite.

    Key Checks for Risotto Success

    • The rice should be tender but still slightly firm to the bite, not mushy.
    • The risotto should be creamy and slightly loose, not stiff or dry.
    • A gentle crackle when stirring indicates proper starch release and heat.

    Common Pitfalls and How to Fix Them

    • Cooking on too high or too low heat, leading to uneven doneness.? Use high heat initially to toast rice, then lower to maintain simmer.
    • Not stirring enough, resulting in less creamy risotto.? Stir constantly when adding broth to release starch.
    • Over-salting or under-seasoning at the end.? Taste often to adjust seasoning during cooking.
    • Overcooking, turning risotto mushy.? Remove from heat before rice is fully tender.

    Pumpkin Risotto with Sage and Pancetta

    This pumpkin risotto showcases a creamy, velvety texture achieved through slow addition of warm broth to Arborio rice, infused with sweet pumpkin purée and savory aromatics. Topped with fragrant sage and crispy pancetta, it’s a comforting dish that balances richness with a touch of herbal brightness, finished with a drizzle of olive oil for shimmer.
    Prep Time 10 minutes
    Cook Time 30 minutes
    Total Time 40 minutes
    Servings: 4
    Course: Main Course
    Cuisine: Italian
    Calories: 420

    Ingredients
      

    • 1 liter chicken or vegetable broth keep warm
    • 2 tablespoons butter for sautéing and finishing
    • 1 finely chopped onion yellow or white onion
    • 1 cup Arborio rice starchy rice for creaminess
    • 1 cup pumpkin purée smooth, canned pumpkin
    • 1/4 cup Parmesan cheese freshly grated
    • 2 cloves garlic minced
    • 4 slices pancetta diced and cooked until crispy
    • 4 leaves sage fresh leaves, chopped
    • to taste salt and pepper for seasoning
    • 1 tablespoon olive oil for finishing

    Equipment

    • Heavy-bottomed saucepan
    • Ladle
    • Wooden spoon
    • Measuring cups and spoons

    Method
     

    1. Heat the broth in a saucepan over medium heat until simmering, then keep it warm on low.
    2. Melt 1 tablespoon of butter in a large heavy-bottomed pan over medium heat. Add the chopped onion and sauté until translucent, about 5 minutes, until it becomes soft and fragrant.
    3. Stir in the minced garlic and cook for another minute until fragrant, filling the kitchen with a warm aroma.
    4. Add the Arborio rice to the pan, stirring constantly for 2 minutes until the edges become translucent and the rice starts to toast lightly.
    5. Mix in the pumpkin purée, stirring well to coat every grain, and cook for another minute to warm through.
    6. Begin adding the warm broth, one ladleful at a time, stirring constantly. Wait until most of the liquid is absorbed before adding the next ladleful. Continue this process for about 20 minutes, until the rice is tender but still has a slight bite.
    7. While the risotto cooks, cook the diced pancetta in a separate pan until crispy, then set aside. Chop the fresh sage leaves finely.
    8. Once the risotto is creamy and the rice is al dente, remove it from heat. Stir in the remaining butter, grated Parmesan, chopped sage, and season with salt and pepper to taste.
    9. Transfer the risotto to serving bowls, top with crispy pancetta slices, and drizzle with a splash of olive oil for shine and added flavor.
    10. Serve immediately, enjoying the rich, velvety texture contrasted with crispy pancetta and fragrant herbs.

    Notes

    For extra depth, add a splash of cream or a pinch of nutmeg. Ensure to stir constantly when adding broth to achieve that signature creamy risotto texture.
    As the risotto reaches that velvety, slightly runny consistency, taste and adjust salt or seasoning. Let it rest off the heat for a few minutes to settle. Serve warm, perhaps with a sprinkle of toasted pumpkin seeds or a drizzle of sage-infused oil. This dish is a quiet celebration of fall’s bounty, perfect for cozy nights or last-minute gatherings. Play around with toppings or cheese, but the creamy pumpkin base is what makes it special.