These no bake chocolate oat bars are my cheat for when I need a little sweetness without the fuss of turning on the oven. They come together in one bowl, which means less mess and more time enjoying the chewy, chocolaty bite. Plus, they’re a reminder that sometimes, simple ingredients can give you the most satisfying treats.
Honestly, I keep a batch in the fridge for those afternoons when the craving hits and I want something quick but genuinely good. The best part? No melting chocolate or complicated layering—just oats, a bit of honey, and rich cocoa coming together to make a snack that feels like a small act of kindness. They’re my pantry’s secret weapon for busy days.
This recipe is my secret weapon for quick comfort during hectic weeks. I love how these bars come together with a few pantry staples, no oven needed. They’re my go-to when I crave something sweet but want to keep it simple and honest.
The story behind this recipe
- This recipe was born out of a hectic afternoon when I realized I had no time for baking but needed something sweet and satisfying. I remembered my grandmother’s no-bake energy bites, but wanted something more indulgent—more chocolate, more oats, less fuss.
- One day, I threw together what I had in the pantry—oats, cocoa, honey, and a splash of vanilla—and pressed it all into a pan. The aroma of melting chocolate and toasted oats hit me immediately, and that simple, sticky mixture became my new go-to snack.
- Now, I keep a batch in the fridge almost always. It’s my little act of rebellion against busy days, a reminder that sometimes, the best treats are the ones you don’t have to cook.
Key ingredients and tips
- Rolled oats: I love how their hearty texture gives these bars substance, but if you prefer a softer bite, try quick oats instead.
- Unsweetened cocoa powder: The deep, rich flavor is my secret to that chocolate punch; for a milder taste, swap with dark cocoa or carob powder.
- Honey: It adds sticky sweetness and helps bind everything; if you’re after a more neutral flavor, maple syrup works but with a slightly different chew.
- Nut butter: I use peanut butter for its creamy, savory note, but almond or cashew butter can add a different richness and aroma.
- Vanilla extract: Just a splash brightens everything up with a warm note; skip it if you want a more intense chocolate flavor, or add a pinch of sea salt instead.
- Chocolate chips: I love the melty bursts they create, but chopped dark chocolate or cacao nibs give a more rustic, less sweet crunch.
- Optional add-ins: Dried fruit or seeds can elevate the texture and flavor—think cranberries or sunflower seeds for extra crunch and tang.
Spotlight on key ingredients
Rolled oats and cocoa powder:
- Rolled oats: I love how their hearty texture gives these bars substance, but if you prefer a softer bite, try quick oats instead.
- Unsweetened cocoa powder: The deep, rich flavor is my secret to that chocolate punch; for a milder taste, swap with dark cocoa or carob powder.
Notes for ingredient swaps
- Dairy-Free: Swap regular butter with coconut oil or vegan margarine. The texture stays rich, but the flavor gains a subtle tropical note.
- Sweetener: Replace honey with maple syrup or agave nectar. They provide similar sticky sweetness, though the flavor might be slightly different and less floral.
- Nut Butters: Use sunflower seed butter or tahini if nuts are an issue. Expect a different aroma—less peanutty, more earthy—yet still creamy and binding.
- Oats: For a gluten-free version, opt for certified gluten-free oats. The texture remains hearty, but be aware of potential slight differences in chewiness.
- Chocolate: Dark chocolate chunks can be swapped with chopped milk chocolate or cacao nibs. Cacao nibs add a smoky crunch, while milk chocolate softens the bite.
- Add-ins: Dried fruit like cranberries or chopped dates can replace seeds or nuts. They add chew and tang, boosting that chewy, fruity surprise.
- Flavor Boost: A pinch of sea salt or espresso powder can enhance the chocolate depth, giving a richer, more complex flavor profile.
Equipment & Tools
- 20cm (8-inch) square pan: To hold and shape the mixture
- Parchment paper: For easy lifting and cleanup
- Microwave-safe bowl: To melt and mix the ingredients
- Spatula: To stir and press the mixture
- Sharp knife: To cut into bars
Step-by-step guide to no bake bars
- Line a 20cm (8-inch) square baking pan with parchment paper, leaving some overhang for easy removal.
- In a large microwave-safe bowl, combine 1/2 cup (120g) unsweetened cocoa powder, 1/4 cup (60ml) honey, 1/4 cup (65g) nut butter, and 1 teaspoon vanilla extract. Microwave in 30-second bursts, stirring after each, until smooth and glossy, about 1-2 minutes.
- Add 2 1/2 cups (200g) rolled oats and 1/2 cup (90g) chocolate chips to the chocolate mixture. Stir well until evenly coated and sticky.
- Transfer the mixture to the prepared pan. Use a spatula or your fingers (dampened slightly) to press the mixture firmly into an even layer. Work quickly before it sets.
- Once pressed, smooth the top with the spatula. For a cleaner edge, run a flat spatula or the back of a knife around the edges.
- Place the pan in the fridge and chill for at least 2 hours, or until the mixture is firm and set. For best results, leave overnight.
- Use the parchment overhang to lift the bars out of the pan. Slice into 8-10 squares with a sharp knife. Wipe the knife clean between cuts for neat edges.
- Serve immediately or store in an airtight container in the fridge. They keep well for up to a week, or freeze for up to a month.
Chill the bars in the fridge for at least 2 hours until firm. Slice into squares and serve or store in an airtight container. For cleaner cuts, wipe the knife between slices.
How to Know It’s Done
- Bars are firm and hold shape when sliced.
- Chocolate chips are slightly melted but not fully gooey.
- Top looks glossy and rich, with no wet patches or looseness.
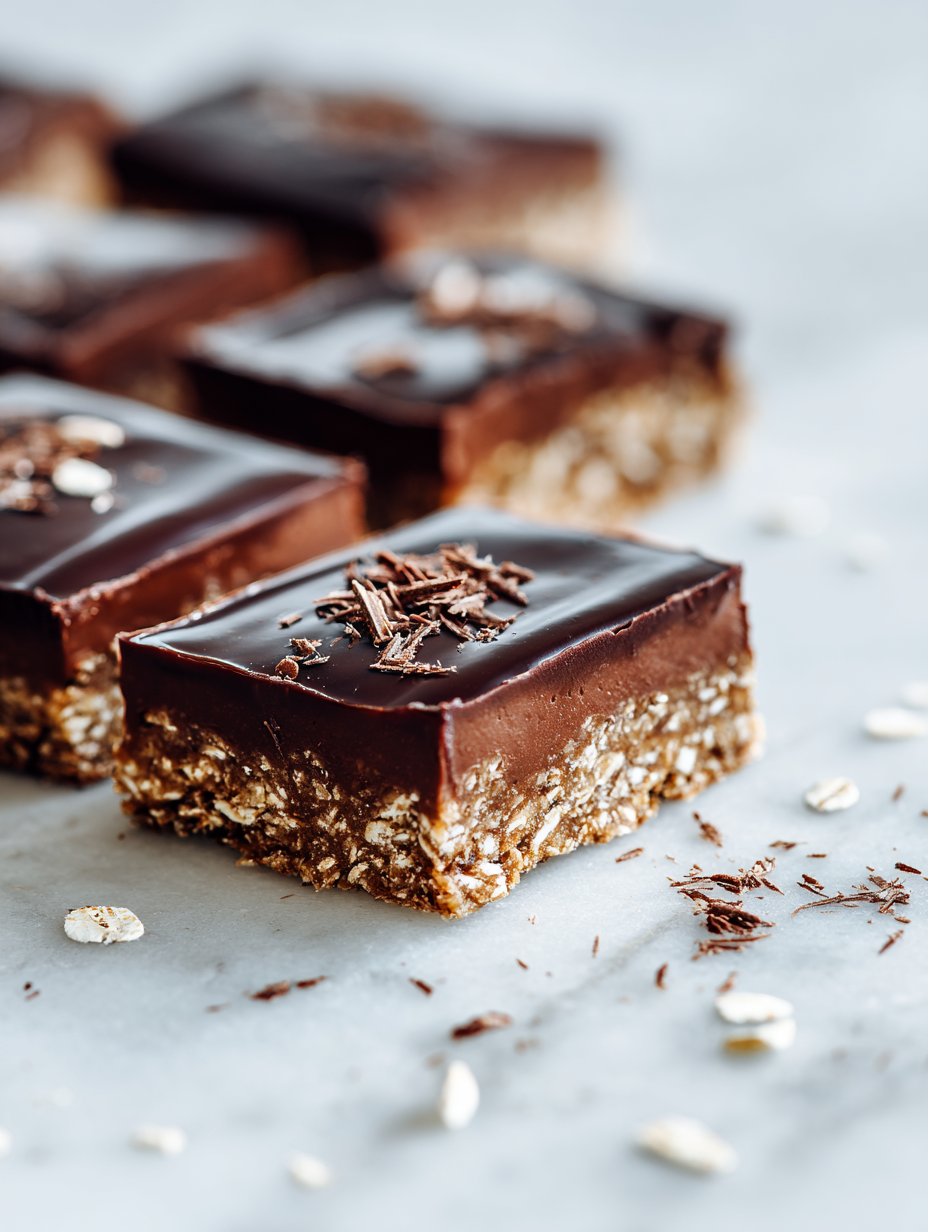
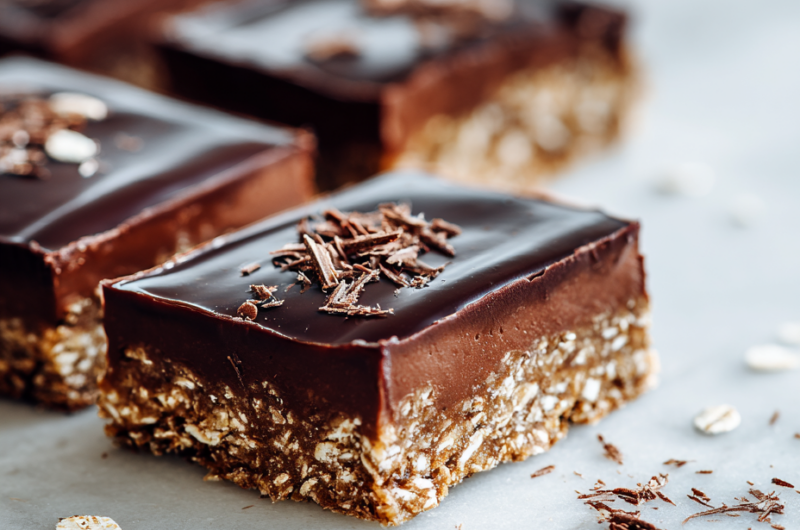
No Bake Chocolate Oat Bars
Ingredients
Equipment
Method
- Line your square pan with parchment paper, leaving some overhang for easy lifting.
- In a microwave-safe bowl, combine the cocoa powder, honey, nut butter, and vanilla. Microwave in 30-second bursts, stirring after each, until the mixture is smooth, glossy, and fragrant—about 1 to 2 minutes.
- Add the rolled oats and chocolate chips to the melted mixture. Stir well with a spatula until everything is evenly coated and sticky, and the oats are starting to soften.
- Transfer the mixture into your prepared pan. Use a spatula or damp fingers to press it down firmly into an even layer—this helps the bars hold together nicely.
- Smooth the top with your spatula or the back of a clean knife for a clean finish. This also helps create a flat surface for slicing later.
- Place the pan in the fridge and chill for at least 2 hours, or until the mixture is firm and set. For best results, leave it overnight.
- Once set, lift the block out of the pan using the parchment overhang. Use a sharp knife to slice into 8 to 10 bars, wiping the knife clean between cuts for neat, clean slices.
- Enjoy your chewy, chocolaty bars straight from the fridge or at room temperature. Store leftovers in an airtight container in the fridge for up to a week or freeze for longer storage.
Top tips for perfect bars
- Bolded mini-head: Use a silicone spatula → It bends easily, making mixing and pressing into the pan smoother.
- Bolded mini-head: Chill thoroughly → Let the bars sit in the fridge for at least 2 hours to achieve perfect firmness.
- Bolded mini-head: Don’t skip pressing → Press firmly to ensure the bars hold together and cut cleanly.
- Bolded mini-head: Melt in short bursts → Microwave chocolate and honey in 30-second intervals, stirring until glossy and smooth.
- Bolded mini-head: Check texture before slicing → Bars should be firm but slightly tacky; if too soft, chill longer.
- Bolded mini-head: Use parchment overhang → Helps lift the entire block easily and prevents sticking when slicing.
- Bolded mini-head: Add a pinch of salt → Enhances the chocolate flavor and balances sweetness, especially if using sweet add-ins.
Common mistakes and how to fix them
- FORGOT to evenly press mixture → Use a flat spatula for uniform thickness.
- DUMPED too much chocolate → Reduce chocolate chips for better texture.
- OVER-TORCHED mixture → Remove from heat once ingredients are glossy and combined.
- MISSED chill time → Chill at least 2 hours for proper setting and slicing.
Quick fixes and pantry swaps
- When mixture is too stiff, splash in a little hot water and stir until smoother.
- If bars crumble, patch with a thin layer of melted chocolate and chill again.
- Splash a tiny bit of oil if chocolate seizes or stiffens during melting.
- When the mixture sticks to your hands, dampen fingers to press evenly in the pan.
- Patch cracks or uneven edges by pressing down the mixture and smoothing with a damp spatula.
Prep, store, and reheat tips
- Prep the mixture ahead by melting and mixing the ingredients. It can be stored in the fridge for up to 24 hours before pressing into the pan, which helps develop the flavors and makes assembly easier.
- Once set, these bars can be kept in an airtight container in the fridge for up to a week. The cool environment keeps them firm and fresh, with a chewy texture and shiny, rich chocolate aroma.
- For longer storage, freeze the bars wrapped tightly in plastic wrap and then in foil. They keep well for up to a month, and thaw at room temperature for about 10 minutes for optimal softness.
- Reheating isn’t necessary—these bars are best enjoyed chilled or at room temperature. If you prefer a softer bite, leave them out for 10-15 minutes and they’ll become slightly gooey and irresistible.
Top questions about no bake bars
1. Can I use quick oats instead of rolled oats?
Use quick oats if you want a softer, less chewy texture. They blend more smoothly with the chocolate.
2. What if I don’t have honey?
Yes, you can swap honey with maple syrup or agave nectar. The texture stays sticky, but the flavor might be slightly different.
3. How long should I chill the bars?
Chill the mixture for at least 2 hours until firm. If it’s too soft, it’ll be hard to cut cleanly and may fall apart.
4. Can I add salt or other flavor enhancers?
Add a pinch of sea salt or espresso powder to enhance the chocolate flavor and add depth.
5. How do I prevent the bars from crumbling?
Make sure to press the mixture firmly into the pan to avoid crumbling. Using damp hands helps.
6. How should I store these bars?
Store in an airtight container in the fridge for up to a week, or freeze for up to a month. Thaw at room temperature for best texture.
7. How do I get clean slices?
Use a sharp knife, wiped clean between cuts, to get neat, clean slices. Wiping prevents sticking and squashing.
8. What if the mixture is too thick or stiff?
If the mixture is too stiff to stir, warm it slightly in the microwave or add a tiny splash of hot water.
9. Can I add other ingredients?
For extra flavor, fold in dried fruits, seeds, or chopped nuts before pressing into the pan. Just don’t overmix.
10. What if the chocolate seizes while melting?
If the chocolate seizes or stiffens during melting, add a small splash of coconut oil or milk to smooth it out.
Making these no bake chocolate oat bars is like having a secret stash of comfort in your fridge. They remind me that simple ingredients can create something deeply satisfying without any fuss.
Whenever I need a quick sweet fix, I just reach for these bars. They’re a little act of kindness that’s always ready to go, especially on busy days or when cravings hit unexpectedly.

Hi, I’m Grace Morgan, and welcome to my kitchen. This is a space shaped by family meals, curious hands reaching for snacks, paws under the table, and recipes that come together in the middle of real life. I’m a food blogger, a mother, and a passionate pet keeper. Most days, I’m cooking with one eye on the stove and the other on someone who needs me, whether that’s a child asking for a taste or a dog hoping something might fall.


