There’s something oddly comforting about the idea of eating cookie dough straight from the bowl, isn’t there? This recipe lets you indulge in that childhood craving without the worry of raw eggs or raw flour, which I used to fret about. Instead, it’s a no-bake, bite-sized version that captures all the buttery, chocolatey goodness in a safe, manageable form.
What I love most is how quick this comes together—no oven, no fuss. It’s perfect for when that sweet craving hits but you’re not in the mood to turn on the stove or clean a mountain of dishes. Plus, it’s a sneaky way to bring some nostalgia into your day, reminding you of those impulsive spoonfuls of cookie dough that always seemed just a little too tempting to resist.
Focusing on the nostalgic appeal of childhood treats, this recipe transforms the messy, impulsive act of eating raw cookie dough into a safe, controlled snack that captures that instant sweet, buttery, chocolatey joy without the risk.
Nostalgia in Every Bite
- Eating raw cookie dough always felt like a guilty pleasure I shouldn’t indulge in, but this recipe makes it safe and satisfying.
- The smell of melting chocolate and buttery dough reminds me of lazy afternoons in my childhood kitchen, chaos and comfort intertwined.
- I love how these bites turn a quick craving into a small, manageable treat I can share or keep to myself, whenever I need a sweet moment.
- There’s a quiet pride in making something so indulgent without any oven time—just simple mixing and chilling, that’s all.
Nostalgia in Every Bite
- This recipe came about during a late-night craving for something sweet and familiar, but I wanted to skip the usual baking chaos. One evening, I threw together whatever ingredients I had—no eggs, no flour—and these little bites turned out better than I expected. They’re a reminder that sometimes, improvising in the kitchen leads to the best surprises, especially when you’re after comfort in a hurry.
- I’ve always loved the idea of capturing that raw, indulgent cookie dough experience in a safe, snackable form. Sharing these bites with friends became a small tradition—quick, no fuss, and utterly addictive. It’s funny how a simple tweak—no bake, small bites—can transform a childhood craving into a go-to treat that’s both nostalgic and practical.
- heading: Nostalgic Comfort in a Bite
Historical & Cultural Tidbits
- These bites stem from a 1970s trend of creating safer, snackable versions of childhood favorites.
- Cookie dough recipes like this gained popularity as a way to enjoy the flavor without raw eggs or flour — risky ingredients avoided.
- They’re inspired by the classic ‘cookie dough’ flavor that’s been a comfort food staple for generations, adapted into a quick, no-bake treat.
- The idea of bite-sized snacks made from cookie dough emerged from the need for portable, mess-free indulgence at parties and gatherings.
Ingredient breakdown: key components
- Butter: I use unsalted butter for that rich, creamy backdrop; it melts smoothly and makes the bites feel indulgent. Feel free to swap in coconut oil for a dairy-free version, but watch out—coconut oil might make the texture a tad firmer.
- Brown Sugar: Adds a deep, caramel-like sweetness I love, especially when it’s slightly gooey. You can replace it with maple syrup if you prefer a more nuanced, liquid sweetness—just cut back the moisture elsewhere.
- Chocolate Chips: I prefer semi-sweet for balance, but dark chocolate chips give a more intense cocoa punch. Try swapping with chopped roasted nuts for crunch, or white chocolate for a sweeter twist.
- Vanilla Extract: This is the secret to making everything taste more like real cookie dough. Use pure vanilla for the best flavor, or a splash of almond extract if you want a different aromatic kick.
- Flour (or substitute): I opt for all-purpose flour, but almond flour works well if you’re going grain-free. Just note it makes the bites a bit denser and nuttier—less like dough, more like a nutty treat.
- Milk (or alternative): I stick with whole milk for creaminess, but coconut or oat milk keeps things vegan. Adjust a splash if the mixture feels too thick or crumbly—aim for that sticky, moldable feel.
- Salt: Just a pinch enhances all the sweet and chocolate flavors. If you’re watching sodium, you can skip it, but a tiny sprinkle really pulls everything together.
Spotlight on key ingredients
Butter and Chocolate Chips:
- Butter: I use unsalted butter for that rich, creamy backdrop; it melts smoothly and makes the bites feel indulgent. Feel free to swap in coconut oil for a dairy-free version, but watch out—coconut oil might make the texture a tad firmer.
- Chocolate Chips: I prefer semi-sweet for balance, but dark chocolate chips give a more intense cocoa punch. Try swapping with chopped roasted nuts for crunch, or white chocolate for a sweeter twist.
Notes for ingredient swaps
- Dairy-Free: Swap butter for coconut oil or margarine. Expect a slightly different richness and a hint of coconut aroma.
- Sugar Alternatives: Use maple syrup or honey instead of brown sugar for a more pronounced caramel flavor, but reduce the liquid slightly.
- Chocolate Variations: Replace semi-sweet chips with dark, white, or dairy-free chips to suit your taste or dietary needs.
- Flour Choices: Almond flour or gluten-free blends work well if you want a grain-free or gluten-free version, though texture may change.
- Milk Options: Coconut milk or almond milk can replace regular milk, adding subtle nutty or coconut notes and maintaining moisture.
- Sweetener Boost: Add a dash of espresso powder to intensify chocolate flavor or vanilla bean paste for a richer aroma.
- Add-ins: Chopped nuts, dried fruit, or shredded coconut can be mixed in for extra texture and flavor variations.
Equipment & Tools
- Mixing bowl: To combine and mix ingredients thoroughly.
- Spatula: For mixing and folding ingredients smoothly.
- Small cookie scoop or tablespoon: To portion out even-sized bites.
- Parchment paper: To prevent sticking and make cleanup easier.
- Refrigerator: To chill and set the cookie dough bites.
Step-by-step guide to cookie dough bites
- Gather everything: a mixing bowl, a spatula, a small baking sheet or plate, and parchment paper. Keep the ingredients nearby for quick assembly.
- In the bowl, combine 1/2 cup (115g) unsalted butter (softened) and 1/2 cup (100g) brown sugar. Mix until smooth and creamy, about 2 minutes.
- Stir in 1 teaspoon vanilla extract and a pinch of salt. Smell the sweet, fragrant aroma as you go.
- Add 1 1/4 cups (150g) all-purpose flour gradually. Mix until the dough is thick, crumbly but holds together when pressed.
- Fold in 1/2 cup (90g) chocolate chips. Listen for the gentle crackle of chocolate as it disperses into the dough.
- If the mixture feels too dry, splash in a teaspoon of milk; if too sticky, dust lightly with extra flour. Aim for a moldable, slightly sticky dough that doesn’t stick excessively to your fingers.
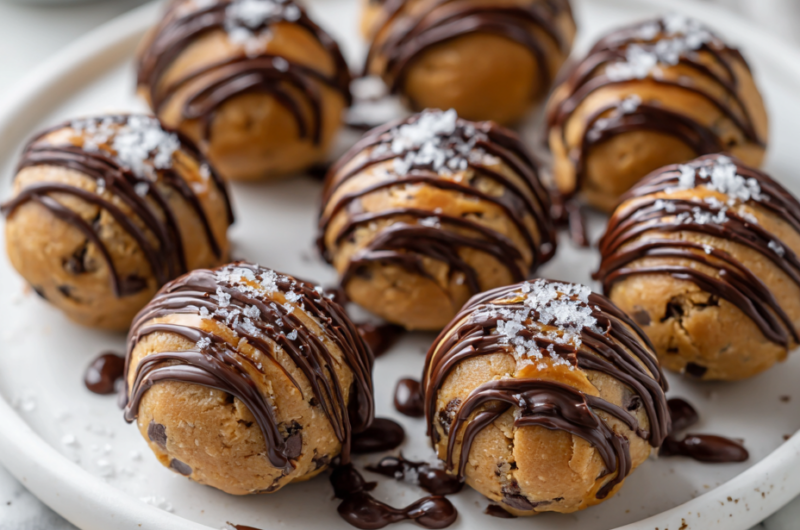
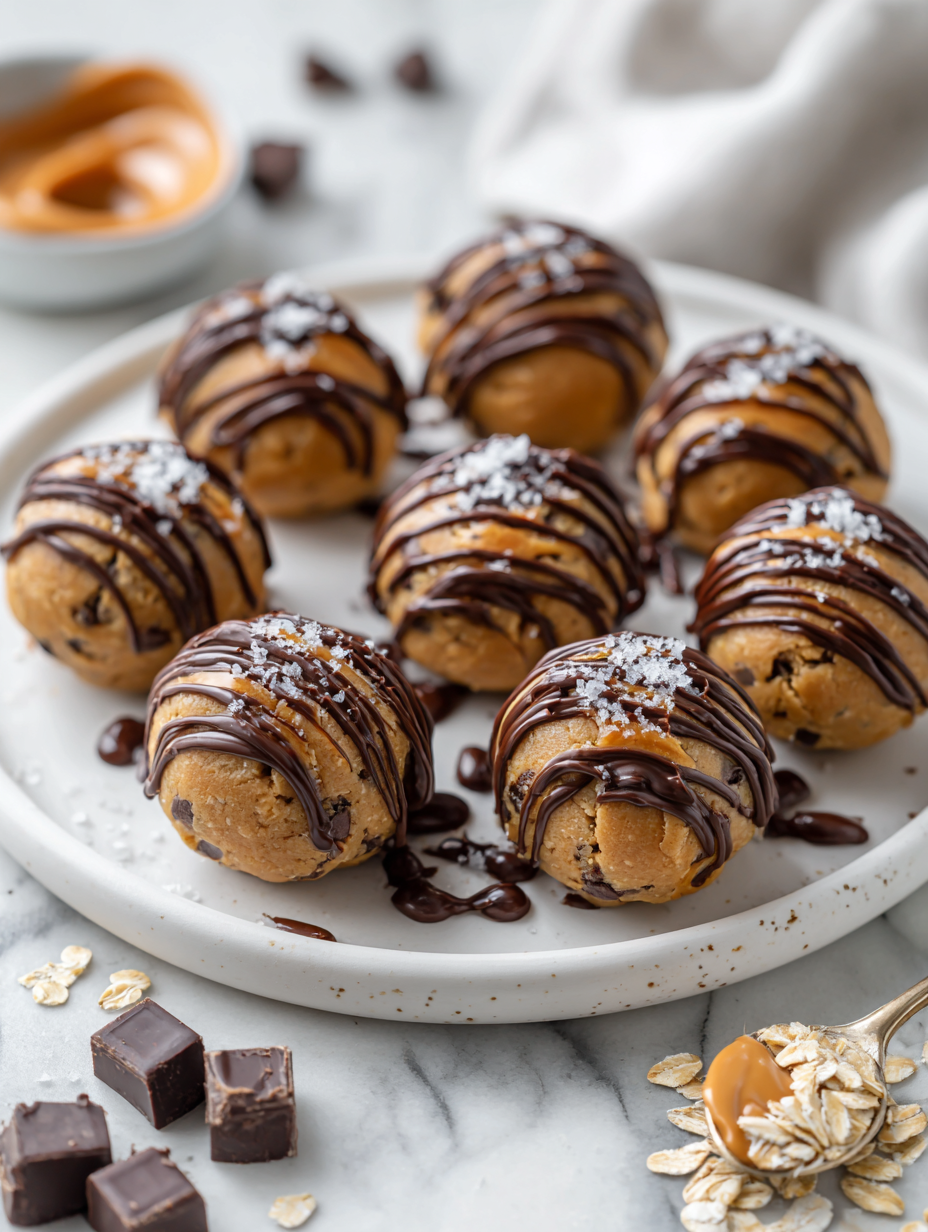
- Use a tablespoon or small cookie scoop to portion out the dough. Roll into balls about 1 inch diameter. Place them on your prepared sheet or plate, spaced apart.
- Chill in the fridge for at least 30 minutes, or until firm. The bites will set and develop flavor as they rest.
- Once chilled, they’re ready to serve. No baking needed—just enjoy the rich, chocolatey scent and chewy texture.
- Store leftovers in an airtight container in the fridge for up to 5 days. For longer storage, freeze for up to a month. Return to room temperature or give a quick 10-second zap in the microwave to soften before eating.
Chill the formed bites for at least 30 minutes to allow flavors to meld and texture to firm up. Serve directly from the fridge for a chewy, cold treat, or let sit at room temperature for a softer bite. Plate them on a small dish or store in an airtight container.
How to Know It’s Done
- Dough should be firm enough to roll without sticking excessively.
- Chocolate chips are evenly dispersed and slightly softened from chilling.
- Bites are uniformly sized, about 1 inch in diameter, with a glossy, inviting appearance.
No-Bake Cookie Dough Bites
Ingredients
Equipment
Method
- In a mixing bowl, beat together the softened butter and brown sugar using a spatula until the mixture is smooth, creamy, and slightly fluffy, about 2 minutes. You should see a pale, cohesive texture and smell the sweet aroma of butter and sugar blending.
- Stir in the vanilla extract and a pinch of salt, mixing well until fragrant. This adds depth to the sweet, buttery base.
- Gradually add the flour, mixing until the dough becomes thick and crumbly but still moldable. The mixture should hold together when pressed but not be sticky.
- Fold in the chocolate chips gently, distributing them evenly throughout the dough. You’ll hear a slight crackle as the chips settle into the mixture.
- If the dough feels too dry or crumbly to shape, add a teaspoon of milk and knead gently until it becomes sticky enough to mold.
- Using a small cookie scoop or tablespoon, portion out the dough and roll into 1-inch balls. Place each bite on a parchment-lined tray, spacing them slightly apart.
- Transfer the tray to the refrigerator and chill for at least 30 minutes, allowing the bites to firm up and flavors to meld.
- Once chilled, the cookie dough bites are ready to enjoy! Serve straight from the fridge for a chewy, cool treat, or let sit at room temperature for a softer bite. Store leftovers in an airtight container in the fridge for up to 5 days.
Notes
Quick tips for perfect bites
- Use room temperature butter for smooth mixing and better texture.
- Chill the dough thoroughly to prevent sticking and make rolling easier.
- Fold in chocolate chips gently to distribute evenly without breaking them.
- Slightly under-mix the dough to keep it tender and prevent overworking.
- When adding milk, do so gradually until the dough is just sticky enough to mold.
- Freeze the bites for 10-15 minutes if you want a firmer, more chilled texture.
- Use a small cookie scoop for uniform bites and easier portioning.
Common mistakes and how to fix them
- FORGOT to thoroughly chill the dough before rolling, resulting in sticky bites—chill longer.
- DUMPED in too much flour, which made the bites dry—add ingredients gradually and check texture.
- OVER-TORCHED the chocolate chips, causing a burnt taste—fold in chips at the end, off heat.
- UNDER-mixed the dough, leading to uneven chocolate distribution—mix until ingredients are well combined.
Quick fixes and pantry swaps
- If dough is too sticky, dust with a little more flour and chill again for 5 minutes.
- When chocolate chips melt or burn, lower heat or fold in chips at the end off heat.
- Splash a teaspoon of milk if bites feel dry or crumbly, then knead gently until cohesive.
- Patch cracks in the dough with a tiny bit of water or milk, press to seal before rolling.
- Shield bites from freezer burn by storing in airtight containers, and wrap tightly if freezing.
Prep, store, and reheat tips
- Prepare the dough mixture ahead of time and keep it covered in the fridge for up to 24 hours; it firms up and becomes easier to handle.
- Form the cookie dough bites and store them in an airtight container in the fridge for up to 5 days; the flavors deepen and texture stays chewy.
- For longer storage, freeze the bites on a baking sheet first, then transfer to a freezer bag; they’ll keep for up to a month. Thaw briefly at room temp before eating.
- Refrigerated bites can be enjoyed straight from the fridge, but for a softer, more indulgent texture, let them sit at room temp for 10-15 minutes. Expect a chewy, slightly warm bite with a rich aroma.
Top questions about no bake cookie dough bites
1. Are these cookie dough bites safe to eat raw?
Yes, they’re completely safe to eat since they use heat-treated flour and no raw eggs, so no risk of salmonella.
2. Can I use a different fat instead of butter?
You can swap out the butter for coconut oil or margarine, but expect a slightly different texture and flavor.
3. Can I add other mix-ins to the dough?
Yes, you can replace chocolate chips with chopped nuts, dried fruit, or white chocolate for variety.
4. How long should I chill the dough?
Chill the dough for at least 30 minutes until it’s firm enough to roll, which helps prevent sticking.
5. What if the dough is too dry to roll?
If the mixture is too crumbly, add a splash of milk and mix until it sticks together nicely.
6. How should I store these bites?
Store leftovers in an airtight container in the fridge for up to 5 days or freeze for longer storage.
7. Should I chill the bites before serving?
Chill the formed bites for 30 minutes or longer for a firmer texture, or enjoy immediately for a softer chew.
8. How do I make the bites uniform?
Use a small cookie scoop to get uniform sizes, which helps them set evenly and look tidy.
9. Can I reheat these bites?
For a softer, warmer bite, microwave the chilled bites for 10 seconds before eating.
10. Can I make these gluten-free?
Yes, you can substitute almond flour for regular flour, but the texture will be slightly denser and nuttier.
These no-bake cookie dough bites are a quick fix for that irresistible craving, especially when you want something sweet and familiar without the fuss. They come together in minutes and pack a nostalgic punch that’s hard to beat.
Plus, they’re a handy treat to keep around—ready in the fridge, perfect for spontaneous moments. A little indulgence that’s honest, simple, and just right for whenever you need a quick sweet escape.

Hi, I’m Grace Morgan, and welcome to my kitchen. This is a space shaped by family meals, curious hands reaching for snacks, paws under the table, and recipes that come together in the middle of real life. I’m a food blogger, a mother, and a passionate pet keeper. Most days, I’m cooking with one eye on the stove and the other on someone who needs me, whether that’s a child asking for a taste or a dog hoping something might fall.


