There’s something about the simplicity of peanut butter balls that always feels like a warm hug from childhood. No fuss, no baking, just quick ingredients coming together into a treat that’s both nostalgic and deeply satisfying. Making these feels like a small act of kindness, a moment to pause and enjoy something homemade without the hassle.
I often keep the ingredients on hand for those days when I need a little comfort or a spontaneous sweet fix. The smell of peanut butter melting into chocolate, the slight crunch of oats, and that sticky, gooey texture—it all takes me back to lazy afternoons and little victories in the kitchen.
These no-bake peanut butter balls are my go-to for quick gatherings, post-work snacks, or just when I want something sweet that’s honest, straightforward, and honestly, pretty addictive. They remind me that sometimes, the best treats don’t need elaborate steps—just good ingredients, a little patience, and a taste of home.
Focusing on the nostalgic comfort of childhood treats, this recipe emphasizes the joy of simple ingredients and effortless assembly, reminding us that sometimes the best desserts are the ones we can whip up quickly, without fuss, yet still feel indulgent.
A Nostalgic Twist on a Classic
- These little bites remind me of carefree afternoons spent baking with my grandma.
- I get a rush of pride every time I make these — they look simple, but they’re so satisfying to assemble.
- Whenever I need a quick pick-me-up, these peanut butter balls are my secret weapon.
- Making these feels like a small act of kindness—something sweet I can whip up in minutes and share with friends.
- There’s a comforting nostalgia in the sticky, peanut-buttery aroma that fills the kitchen while I roll these into balls.
A Nostalgic Twist on a Classic
One afternoon, I was rummaging through my grandmother’s old recipe box and found a crumpled note about these peanut butter balls. It was her handwriting, scribbled with a note about how they were her secret comfort food after long days. That moment made me realize how simple ingredients can carry so much history, comfort, and a little bit of love. Now, whenever I make them, I feel connected to her, to my childhood, and to those quiet, sweet moments in the kitchen.
Contextual origin, trivia, or history
- These peanut butter balls have roots in 1950s American home baking, where simple ingredients and quick treats were prized.
- They gained popularity during the rise of no-bake recipes in the 1970s, aligning with busy lifestyles and a preference for fuss-free desserts.
- Some say this recipe was originally a way to use up leftover peanut butter and oats during rationing periods, making it a practical kitchen hack.
- The concept of sweet, bite-sized, no-bake confections echoes traditions from various cultures, adapted into a uniquely American comfort food.
Ingredient breakdown: key components
- Peanut butter: I prefer creamy, smooth peanut butter because it melts into the mixture and gives a luscious, sticky texture. If yours is chunky, it’ll add a bit of crunch, which isn’t a bad thing—just watch out for bigger bits cracking the smoothness.
- Honey or maple syrup: Adds just enough sweetness and helps everything stick together. If you want a less sweet version, skip it or reduce. The syrup also gives a slight glossy sheen—like the balls are giving a little wink.
- Oats: Old-fashioned rolled oats are my go-to—they give a nice chew and hold the shape well. For a softer bite, try quick oats, but avoid instant oats—they tend to get too mushy.
- Chocolate: Melting good-quality chocolate chips or chopped bars makes the coating shiny and rich. For a nutty twist, sprinkle crushed nuts or coconut before the chocolate sets. The aroma of chocolate melting is the best part.
- Butter or coconut oil: I use a little to make the chocolate glossy and to help it set smoothly. If you’re dairy-free, coconut oil works just as well, adding a faint coconut scent that pairs nicely with peanut butter.
- Vanilla extract: Just a splash brightens everything up. Skip it if you want a more straightforward peanut flavor, but I find it adds a subtle warmth that rounds out the sweetness.
- Optional add-ins: Dried cranberries or mini marshmallows can bring a fun, chewy surprise. Just fold them in at the end—watch for extra moisture if you add marshmallows, though.
Spotlight on key ingredients
Peanut butter:
- I prefer creamy, smooth peanut butter because it melts into the mixture and gives a luscious, sticky texture. If yours is chunky, it’ll add a bit of crunch, which isn’t a bad thing—just watch out for bigger bits cracking the smoothness.
- Honey or maple syrup: Adds just enough sweetness and helps everything stick together. If you want a less sweet version, skip it or reduce. The syrup also gives a slight glossy sheen—like the balls are giving a little wink.
Chocolate:
- Melting good-quality chocolate chips or chopped bars makes the coating shiny and rich. For a nutty twist, sprinkle crushed nuts or coconut before the chocolate sets. The aroma of chocolate melting is the best part.
- Butter or coconut oil: I use a little to make the chocolate glossy and to help it set smoothly. If you’re dairy-free, coconut oil works just as well, adding a faint coconut scent that pairs nicely with peanut butter.
Notes for ingredient swaps
- Dairy-Free: Use almond or cashew butter instead of traditional peanut butter; it changes the flavor slightly, adding nuttiness without dairy.
- Sweetener Swap: Maple syrup can replace honey for a different, smoky sweetness—perfect for vegans or those avoiding honey.
- Oats: Swap rolled oats for quick oats if you’re in a hurry; they blend in faster but might make the texture a little softer.
- Chocolate: Dark chocolate chips can be substituted with white chocolate or even carob for a different flavor profile—watch for sweetness levels.
- Oil: Coconut oil can replace butter to keep the coating glossy and firm—adds a faint coconut aroma that pairs well with peanut butter.
- Add-ins: Dried cranberries or mini marshmallows can be folded in for a chewy or fruity surprise; just keep an eye on moisture levels.
- Nut butters: Sunflower seed butter works as a nut-free alternative, though it’s a bit less rich and may have a different texture.
Equipment & Tools
- Mixing bowl: Combine ingredients and mix thoroughly.
- Spatula: Scrape and mix ingredients smoothly.
- Cookie scoop or hands: Portion out uniform-sized balls.
- Parchment paper: Prevent sticking and easy cleanup.
- Microwave-safe bowl: Melt chocolate evenly.
- Fork: Dip and coat the balls in chocolate.
Step-by-step guide to peanut butter balls
- Gather all ingredients and equipment. Chill the mixing bowl and spatula if possible, for easier handling.
- In a large mixing bowl, combine 1 cup of creamy peanut butter, 1/4 cup of honey, and 1 teaspoon vanilla. Mix until smooth and slightly fluffy, about 2 minutes.
- Add 2 cups of rolled oats to the peanut butter mixture. Stir until evenly coated. The mixture should be sticky but manageable. If too dry, add a teaspoon of milk or water; if too wet, sprinkle in a little more oats.
- Using a small cookie scoop or your hands, portion out the mixture into 1-inch balls. Place them on a parchment-lined tray. Chill in the fridge for 20 minutes to set the shape.
- While the balls chill, prepare the chocolate coating. Melt 1 cup of chocolate chips with 1 tablespoon of coconut oil in a microwave-safe bowl, heating in 20-second bursts and stirring until smooth. Let it cool slightly, about 3 minutes, so it doesn’t melt the balls.
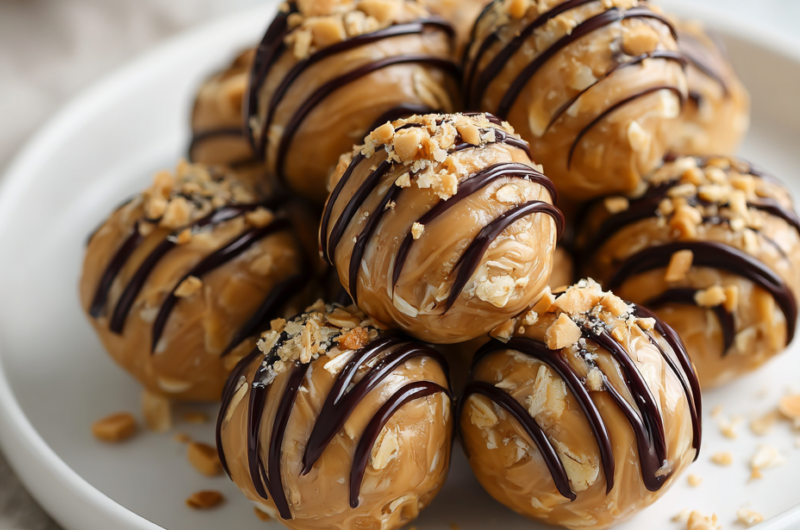
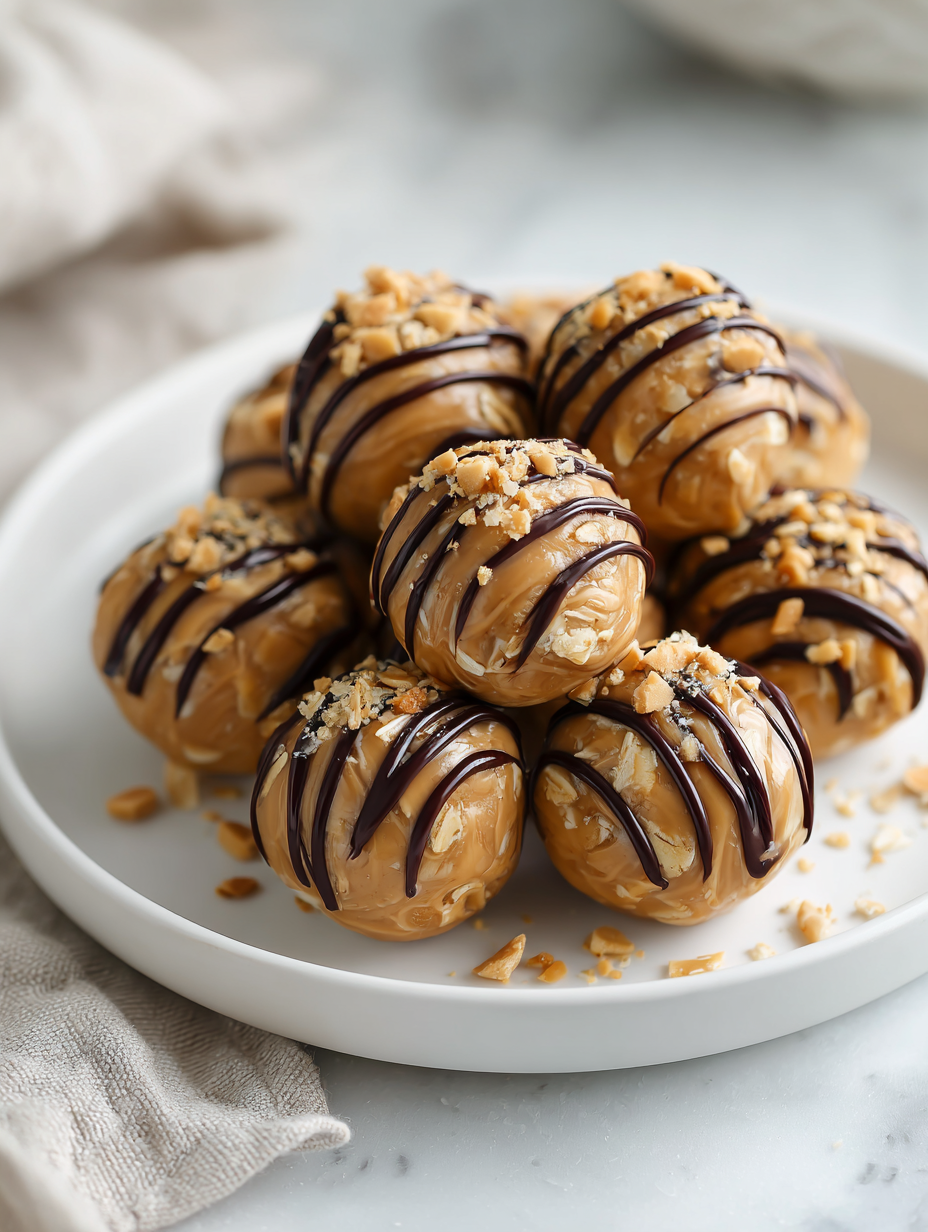
- Dip each peanut butter ball into the melted chocolate. Use a fork to help lift and let excess drip off. Place back on the parchment-lined tray. If desired, sprinkle with crushed nuts or coconut before the chocolate sets.
- Refrigerate the coated balls for at least 30 minutes until the chocolate is firm and glossy. For the best texture, serve chilled or at room temperature (about 20°C/68°F).
- Once set, store in an airtight container in the fridge for up to a week, or freeze for longer. Let thaw slightly at room temperature before serving if frozen.
Chill the coated peanut butter balls for at least 30 minutes. Serve straight from the fridge for a firm bite or at room temperature for a softer, gooey experience. Plate them on a nice tray or in small paper cups for easy sharing.
How to Know It’s Done
- Chocolate coating is shiny and firm after refrigeration.
- Balls hold shape firmly when gently pressed.
- Center of the ball is slightly firm but not crumbly.
No-Bake Peanut Butter Balls
Ingredients
Equipment
Method
- In a large mixing bowl, combine the peanut butter, honey, and vanilla extract. Stir until the mixture is smooth, creamy, and slightly fluffy, releasing a sweet aroma.
- Add the rolled oats to the bowl and fold them into the wet mixture until everything is evenly coated. The mixture should be sticky and chewy; if it's too dry, add a splash of milk, or if too wet, sprinkle in extra oats.
- Using a cookie scoop or your hands, portion out small, roughly 1-inch diameter balls and place them on a parchment-lined tray. Chill them in the refrigerator for about 20 minutes to firm up.
- While the balls chill, melt the chocolate chips with the coconut oil in a microwave-safe bowl, heating in short 20-second bursts. Stir well after each burst until smooth and glossy, then let it cool slightly so it doesn't melt the balls.
- Dip each chilled peanut butter ball into the melted chocolate, using a fork to help lift and coat evenly. Gently tap the fork on the side of the bowl to remove excess chocolate, then place the coated ball back on the parchment paper. For added visual appeal, sprinkle crushed nuts or coconut on top while the chocolate is still soft.
- Refrigerate the coated balls for at least 30 minutes until the chocolate is set and shiny. Once ready, remove from the fridge and serve chilled or at room temperature for a chewy, chocolatey bite.
Notes
Pro tips for perfect peanut butter balls
- Use room temperature ingredients for easier mixing and smoother texture.
- Chill your mixing bowl and spatula beforehand to prevent sticking and keep everything cold.
- Melt chocolate slowly in short bursts to avoid burning and ensure a silky finish.
- Dip balls with a fork for a clean, even coat and let excess drip off gently.
- Add a pinch of salt to your chocolate coating to enhance flavor and reduce sweetness.
- Refrigerate the balls for at least 30 minutes to ensure they set firm and glossy.
- Work in small batches when coating to prevent chocolate from solidifying before use.
Common mistakes and how to fix them
- FORGOT to chill ingredients → Keep ingredients cold for easier handling and better texture.
- DUMPED too much chocolate → Use only enough to coat, excess can cause sogginess.
- OVER-TORCHED the chocolate → Melt slowly at low heat; remove from heat once smooth.
- MISSED the refrigeration step → Chill balls until firm; prevents melting or sticking during coating.
Quick fixes and pantry swaps
- When mixture feels too sticky, splash with a tiny bit of milk to loosen.
- If chocolate seizes or becomes lumpy, patch with a few drops of coconut oil and stir.
- Splash cold water on your hands when rolling to prevent sticking and make shaping easier.
- When chocolate isn’t glossy, gently reheat with a quick 10-second burst in the microwave.
- Patch cracks in coating with a thin layer of warm chocolate for a smooth finish.
Prep, store, and reheat tips
- You can prepare the peanut butter mixture and shape the balls a day in advance; keep covered in the fridge for up to 24 hours. The texture stays soft but still holds shape.
- Store the finished chocolate-coated balls in an airtight container in the fridge for up to a week. The chocolate stays glossy, but the texture becomes slightly firmer.
- For longer storage, freeze the balls on a tray until solid, then transfer to a freezer bag. They’ll keep for up to 3 months. Thaw in the fridge or at room temperature for 20 minutes before serving.
- Reheating isn’t necessary—serve chilled or at room temp. If you want a softer bite, leave them out for 10 minutes and enjoy the melt-in-your-mouth feel. The aroma of cocoa and peanut butter will beckon as they warm slightly.
Top questions about peanut butter balls
1. Can I use natural peanut butter?
Yes! Use natural peanut butter for a richer, more intense flavor. Just stir it well first.
2. Can I make these vegan?
Absolutely. Just reduce the honey or syrup slightly, as natural peanut butter can be sweeter or oilier.
3. Are these vegan-friendly?
Yes. Use dairy-free chocolate and a plant-based butter alternative if you want a vegan version.
4. How long do I need to chill the mixture?
Chill the mixture until it’s firm enough to roll, about 30 minutes in the fridge.
5. How do I get a shiny chocolate coating?
Dip the balls in warm, melted chocolate for a shiny coating. Let them set in the fridge for best results.
6. How do I store leftover peanut butter balls?
Store in an airtight container in the fridge for up to a week. Freeze for longer storage.
7. Can I freeze these?
You can freeze them beforehand, then let them sit at room temperature for 10-15 minutes before serving.
8. What if my chocolate coating cracks?
If the chocolate cracks, re-melt with a splash of coconut oil and dip again for a smooth finish.
9. How can I make all the balls the same size?
Use a small cookie scoop for uniform size, which helps them set evenly and look neat.
10. Should I add salt?
Add a pinch of sea salt to enhance the chocolate and peanut butter flavors and balance sweetness.
These no-bake peanut butter balls are a little reminder that sometimes, the simplest ingredients make the best treats. There’s a genuine satisfaction in rolling them out and watching that glossy chocolate set perfectly. It’s funny how a quick handful of goodies can bring a moment of calm and a sweet little victory.
Whenever I make these, I think about how a handful of ingredients can connect us to memories, comfort, and even a bit of chaos in the kitchen. They’re not just a dessert—they’re a small act of kindness, a way to slow down, and a reminder that good things don’t have to be complicated.

Hi, I’m Grace Morgan, and welcome to my kitchen. This is a space shaped by family meals, curious hands reaching for snacks, paws under the table, and recipes that come together in the middle of real life. I’m a food blogger, a mother, and a passionate pet keeper. Most days, I’m cooking with one eye on the stove and the other on someone who needs me, whether that’s a child asking for a taste or a dog hoping something might fall.


