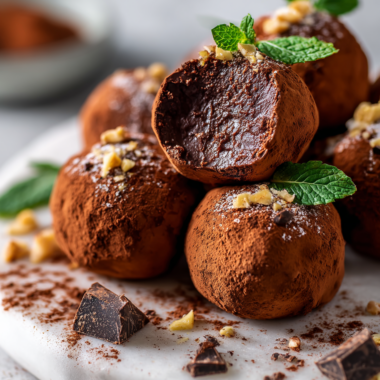
Blog

  • Chill Out with a Vanilla Slushie: The Secret to Summer Coolness

    Chill Out with a Vanilla Slushie: The Secret to Summer Coolness

    Every summer, I find myself craving something icy and sweet, but with a twist. That’s when I started experimenting with vanilla slushies—simple, nostalgic, and surprisingly sophisticated. The scent of vanilla beans melting into icy water is my tiny escape from the heat.

    Making it at home transforms a regular hot afternoon into a mini celebration. The best part? It’s effortless and requires just a handful of pantry ingredients. Plus, it’s endlessly customizable to suit your mood or whatever ingredients you have on hand.

    Vanilla Slushie

    A vanilla slushie is a chilled beverage made by blending icy water or ice with vanilla beans or extract to create a smooth, icy texture with a fragrant vanilla flavor. The mixture results in a refreshing, scoopable frozen drink that has a velvety consistency and a visually appealing pale, creamy color.
    Prep Time 5 minutes
    Total Time 5 minutes
    Servings: 2
    Course: Main Course
    Cuisine: American
    Calories: 80

    Ingredients
      

    • 1 cup water cold, preferably filtered
    • 1 cup ice cubes adjust for desired consistency
    • 1 teaspoon vanilla extract or vanilla bean seeds, scraped from 1 bean

    Equipment

    • Blender
    • Measuring spoons

    Method
     

    1. Pour the cold water into the blender and add the ice cubes.
    2. Add the vanilla extract or scraped vanilla bean seeds to the blender.
    3. Secure the lid on the blender and blend on high speed until the mixture is smooth and slushy, about 30-40 seconds. You should see a thick, icy texture with no large ice chunks.
    4. Stop the blender and check the consistency. If it’s too thick, add a splash more water and blend briefly to loosen it slightly.
    5. Pour the vanilla slushie into chilled glasses. It should resemble a creamy, icy beverage that is soft enough to scoop with a spoon.
    6. Enjoy immediately with a straw or spoon for a cool, refreshing treat.

    Notes

    For an extra creamy texture, blend in a small splash of milk or plant-based milk. You can also add a touch of honey or sugar if you prefer it sweeter.

    With its creamy vanilla aroma and refreshing chill, this slushie is your new go-to for quick cooling. It’s perfect for lazy afternoons or unexpectedly warm evenings. No fuss, just pure, frosty fun in a glass.

    As the seasons shift, this recipe remains a trusty friend—offering sweet relief and a hint of childhood joy. Keep the blender handy, and you’ll always have a cool treat waiting to happen. Cheers to simple pleasures that brighten the hottest days.

  • Spookier Yet Sweeter: Halloween Pumpkin Rice Krispie Treats

    Spookier Yet Sweeter: Halloween Pumpkin Rice Krispie Treats

    Halloween is the perfect time to embrace playful chaos in the kitchen, especially with treats that look as fun as they taste. These Pumpkin Rice Krispie Treats combine nostalgic crunch with a festive twist that sparks joy and curiosity. The scent of toasted marshmallow mingling with pumpkin spice is a little whiff of autumn magic.

    But what sets this recipe apart is its unconventional charm—an edible tribute to the jack-o’-lantern. Perfect for parties or a spooky movie night, these treats invite both kids and adults into the creative costume of confectionery. They’re a simple project with a big impact, making your giggles and gasps part of the season’s atmosphere.

    Pumpkin Rice Krispie Treats

    Pumpkin Rice Krispie Treats are no-bake confections combining sweet marshmallow binding with crunchy rice cereal, flavored with pumpkin puree and warm spices. The mixture is pressed into a pan to set, resulting in a soft yet crispy treat with a festive orange hue and autumnal aroma. These treats have a chewy exterior with a melt-in-your-mouth texture and a colorful, pumpkin-inspired appearance.
    Prep Time 10 minutes
    Cook Time 5 minutes
    Total Time 15 minutes
    Servings: 16
    Course: Main Course
    Cuisine: American
    Calories: 120

    Ingredients
      

    • 4 cups mini marshmallows preferably fluffier for easier melting
    • 3 tablespoons unsalted butter
    • 1 cup canned pumpkin puree pure pumpkin, not pie filling
    • 1 teaspoon ground cinnamon
    • 1/2 teaspoon ground nutmeg
    • 1/4 teaspoon ground cloves
    • 6 cups rice cereal (such as Rice Krispies)

    Equipment

    • Large mixing bowl
    • Saucepan
    • Rubber spatula
    • 8×8 inch pan
    • Parchment paper

    Method
     

    1. Grease an 8×8 inch pan lightly with butter or line it with parchment paper for easy removal.
    2. In a large saucepan, melt the butter over medium heat until it begins to foam and smells nutty.
    3. Add the mini marshmallows to the melted butter, stirring constantly until completely melted and the mixture is smooth and glossy.
    4. Stir in the pumpkin puree along with the cinnamon, nutmeg, and cloves until well combined and fragrant.
    5. Remove the saucepan from heat and add the rice cereal, folding gently until all the cereal is coated with the pumpkin-y marshmallow mixture.
    6. Quickly transfer the mixture into the prepared pan and press it evenly with a spatula or your fingers—this helps the treats stay together and creates a smooth top.
    7. Allow the mixture to cool at room temperature for about 20–30 minutes or until set.
    8. Once cooled and firm, cut into squares or fun shapes with a sharp knife or cookie cutter.
    9. Serve and enjoy your festive Pumpkin Rice Krispie Treats, perfect for Halloween celebrations or autumn gatherings.

    Notes

    For added fun, decorate the treats with orange and black icing or candy eyes.

    As the bowl empties and the last piece is devoured, I find myself smiling at these tiny pumpkin treasures. The vibrant orange hue and crispy bite add a special cheer to any Halloween spread. It’s a reminder that sometimes, the simplest ingredients make the most memorable moments.

    This recipe is more than just a treat; it’s a little piece of the holiday spirit, easy to make and even easier to enjoy. Whether you’re baking with little hands or just craving a seasonal snack, these pumpkin Krispie treats bring a playful sweetness to the spooky season without fuss. Enjoy every crunchy, marshmallowy bite.

  • Peach Crumble: A Dessert As Bright As Summer Itself

    Peach Crumble: A Dessert As Bright As Summer Itself

    Imagine the scent of ripe peaches mingling with cinnamon and buttery oats, filling the kitchen like a warm summer breeze. This peach crumble isn’t just a dessert; it’s a nostalgic trip back to lazy Sunday afternoons and sun-drenched orchards. The secret is in how the fruit caramelizes perfectly under a crispy, golden topping.

    Layered with fresh, juicy peaches and topped with a crumbly mixture of oats, nuts, and spices, this dessert offers an irresistible contrast of textures. As the juices bubble and thicken, each spoonful delivers a burst of sunshine wrapped in cozy warmth. Perfect for fleeting peach seasons or when you need a comforting treat that blooms with bright flavor.

    Peach Crumble

    Peach crumble is a baked dessert featuring juicy, ripe peaches topped with a crispy, golden-brown oat and nut mixture. The dish combines tender fruit with a crunchy topping, resulting in a warm, bubbly dessert with contrasting textures and sweet, spiced aroma.
    Prep Time 15 minutes
    Cook Time 40 minutes
    Total Time 55 minutes
    Servings: 6
    Course: Main Course
    Cuisine: American
    Calories: 220

    Ingredients
      

    • 4 cups fresh peaches, sliced peeled and pitted
    • 1/2 cup granulated sugar for the fruit
    • 1 tablespoon lemon juice to enhance flavor and prevent browning
    • 1 teaspoon ground cinnamon optional, for flavor
    • 1 cup old-fashioned oats for the crumble topping
    • 1/2 cup all-purpose flour part of topping mixture
    • 1/2 cup brown sugar for the topping
    • 1/2 cup unsalted butter cold, cut into small pieces
    • 1/2 cup chopped nuts (such as pecans or walnuts) optional, adds crunch

    Equipment

    • Mixing bowls
    • Baking dish
    • Oven
    • Measuring cups and spoons
    • Peeler or knife (for peeling peaches)
    • Pastry cutter or fork (for crumb topping)

    Method
     

    1. Preheat your oven to 350°F (175°C). In a large mixing bowl, combine sliced peaches with sugar, lemon juice, and cinnamon. Toss gently to coat the fruit evenly and set aside to allow the flavors to meld.
    2. Transfer the fruit mixture into a baking dish, spreading it out into an even layer. This creates the juicy base for your crumble.
    3. In a separate bowl, combine oats, flour, and brown sugar. Use a pastry cutter or fork to cut the cold butter into the mixture until it resembles coarse crumbs. Stir in chopped nuts if using, for added crunch and flavor.
    4. Sprinkle the crumble mixture evenly over the peaches, covering the entire surface. This topping will become crispy and golden as it bakes.
    5. Place the baking dish in the preheated oven and bake for about 40 minutes, or until the topping is golden-brown and the peach juices are bubbling around the edges.
    6. Remove the crumble from the oven and let it cool slightly for 10 minutes. The topping will firm up while cooling, creating a satisfying crunchy texture.
    7. Scoop servings of the warm peach crumble onto plates, and enjoy the contrast of soft fruit and crispy topping. It pairs wonderfully with a dollop of whipped cream or vanilla ice cream if desired.

    This recipe is a celebration of simplicity, elegance, and the fleeting beauty of seasonal fruit. Its vibrant flavor can brighten a weekday dinner or crown a weekend gathering. Once you’ve made it, you’ll find yourself craving that contrasting crunch and juicy warmth again and again.

    It embodies the kind of dessert that’s both familiar and exciting—an homage to summer’s brief, shining moments. Keep it in mind, especially as peaches hit their peak; it’s a reminder that some classics only get better with age and a little added flair.

  • Bewitching Halloween Poison Apple Martini: A Spooky Sip You Can’t Resist

    Bewitching Halloween Poison Apple Martini: A Spooky Sip You Can’t Resist

    Every October, the air thickens with anticipation and a touch of mischief. This year, I wanted to craft a cocktail that would turn heads and ignite conversations at any Halloween gathering. Enter the Poison Apple Martini—an eerily beautiful drink with a crisp, tart flavor and a mysterious green glow.

    The secret lies in its visual charm: a shimmering, translucent green liquid that looks like it belongs in a witch’s potion cabinet. As you sip, hints of apple and citrus dance on your tongue, balanced by a bold, spirited kick. It’s a beverage that combines the nostalgia of childhood candy apples with adult sophistication and a wicked edge.

    Poison Apple Martini

    The Poison Apple Martini is a visually striking cocktail featuring a translucent green liquid with a tart apple and citrus flavor profile. It combines shaken spirits with a luminous green glow, creating a smooth, chilled beverage with a shimmering appearance resembling a witch’s potion. The final drink is crisp and refreshing, with a slightly tart bite and an alluring, mysterious hue.
    Prep Time 5 minutes
    Total Time 5 minutes
    Servings: 1
    Course: Main Course
    Cuisine: Beverages
    Calories: 200

    Ingredients
      

    • 2 oz vodka
    • 1 oz green apple schnapps
    • 0.5 oz fresh lemon juice about half a lemon
    • 0.5 oz simple syrup for balance and sweetness
    • a few drops blue curaçao for extra glow effect
    • ice cubes ice enough to fill the shaker

    Equipment

    • Cocktail shaker
    • Strainer
    • Martini glass

    Method
     

    1. Fill your cocktail shaker halfway with ice cubes to chill the mixture effectively.
    2. Pour in the vodka, green apple schnapps, freshly squeezed lemon juice, and simple syrup into the shaker.
    3. Secure the lid tightly and shake vigorously for about 15 seconds until the mixture is well chilled and slightly frothy.
    4. Strain the mixture into a chilled martini glass, ensuring a smooth, clear liquid with a faint shimmer.
    5. Gently add a few drops of blue curaçao on top; it will settle and create a glowing, eerie effect in the green liquid.
    6. Serve immediately to enjoy the cocktail’s shimmering, translucent green appearance and tart flavor.

    Notes

    For an extra spooky effect, you can rim the glass with green sugar or add a thin apple slice for garnish.

    This Poison Apple Martini isn’t just a drink; it’s a story in a glass. Perfect for haunted house parties or a quiet night of self-indulgence, it captures the spirit of Halloween’s playful chaos.

    With its vivid color and layered flavors, it sparks a bit of witchy nostalgia while elevating your cocktail game. Whether you’re dressed as a vampire or a witch, this drink adds a dash of magic and mischief to the evening. Cheers to a spooky season full of amazing sips and memorable moments.

  • The Art of the Unexpected Vodka Slushie

    The Art of the Unexpected Vodka Slushie

    Imagine a summer day where a traditional frozen treat feels too predictable. Enter the vodka slushie, a concoction that dances between icy sweetness and a subtle, spirited kick. This recipe isn’t just about chilling; it’s about turning an ordinary beverage into a memorable experience with a hint of rebellion.

    What makes this version unique is its focus on unexpected flavor pairings—like fiery jalapeño or aromatic basil—that elevate your standard slushie to something extraordinary. It’s perfect for those who crave something cool but crave a tiny thrill too. Summer’s here, and this recipe offers a refreshing escape with a daring twist.

    Vodka Fruit Slushie

    A frozen cocktail featuring fruit juice and vodka blended into a smooth, icy slushie. The mixture results in a vibrant, icy treat with a refreshing texture, often garnished with fresh herbs or spicy peppers for added flavor complexity.
    Prep Time 10 minutes
    Total Time 10 minutes
    Servings: 4
    Course: Main Course
    Cuisine: American
    Calories: 140

    Ingredients
      

    • 2 cups fruit juice (e.g., watermelon, cranberry, or orange) preferably cold
    • 1 cup vodka choose a good quality vodka
    • 1 cup fresh fruit or fruit chunks such as berries or mango, optional
    • 1 tablespoon honey or simple syrup adjust to taste
    • 1 cup ice cubes or as needed for desired consistency

    Equipment

    • Blender
    • Measuring cups and spoons

    Method
     

    1. Measure out the fruit juice and pour it into your blender.
    2. Add the vodka to the blender with the fruit juice, ensuring an even mix of spirits and flavors.
    3. If using fresh fruit, chop it into smaller pieces and add to the blender for extra flavor and texture.
    4. Drizzle in honey or simple syrup to sweeten and balance the acidity of the fruit juice.
    5. Add the ice cubes last, filling the blender about halfway to create a thick, icy mixture.
    6. Secure the lid on the blender and blend on high speed until the mixture is smooth and slushy, about 30-60 seconds.
    7. Stop the blender and check the consistency; add more ice if you want a thicker, firmer slushie, then blend again briefly.
    8. Once the mixture is evenly blended and has a vibrant, icy appearance, pour it into glasses.
    9. Garnish with fresh herbs like basil or a slice of fruit for presentation and added aroma.
    10. Serve immediately with a straw or small spoon, and enjoy this cool, spirited treat.

    Notes

    For an extra kick, add a slice of jalapeño or a sprig of fresh basil to the blender for bold flavor variations.

    This drink is all about moments of surprise and refreshment. It pairs perfectly with a lazy afternoon or a lively gathering where everyone’s in search of something cooling yet thrilling. As summer fades into fall, these slushies remind us to find joy in the simplest, most spirited forms.

    They’re a reminder that a little chaos in the kitchen can create something delightfully unexpected. Sometimes, all it takes is a splash of vodka and a dash of daring to turn an ordinary day into something memorable.

  • Enchanting Black Magic Margarita for a Spooky Celebration

    Enchanting Black Magic Margarita for a Spooky Celebration

    Every October, I find myself craving unexpected twists on classic cocktails. This Halloween, I decided to embrace the darkness with a Black Magic Margarita that turns your party into a mysterious ritual. The deep, inky color is mesmerizing and sets an eerie tone for any spooky gathering.

    What makes this cocktail truly magical is the way it balances the smoky allure of activated charcoal with the tangy punch of lime. It’s not just about aesthetics; the flavors create a dance on your palate that surprises and delights at the same time. Plus, it’s a conversation starter that sparks curiosity and laughter among guests.

    As I mixed up this potion, I realized how much fun it is to serve something so visually stunning yet simple to prepare. A splash of black liquid, a squeeze of fresh citrus, and a sprig of spooky garnish transform ordinary ingredients into a jaw-dropping Halloween drink.

    Black Magic Margarita

    The Black Magic Margarita is a visually striking cocktail featuring a deep inky color achieved with activated charcoal. It combines the smoky flavor of charcoal with tart lime juice, resulting in a smooth, slightly frothy beverage with a mysterious appearance. The drink balances boldness with refreshment, making it perfect for spooky themed gatherings.
    Prep Time 5 minutes
    Total Time 5 minutes
    Servings: 2
    Course: Main Course
    Cuisine: beverage
    Calories: 200

    Ingredients
      

    • 2 oz tequila blanco preferably silver for a clean taste
    • 1 oz lime juice freshly squeezed
    • 0.5 tsp activated charcoal powder food grade, easily available online or at health stores
    • 0.5 oz triple sec orange liqueur for balanced sweetness
    • 0.5 oz simple syrup adjust to taste for sweetness
    • ice cubes Ice for shaking and serving

    Equipment

    • Cocktail shaker
    • Juicer
    • Measuring jigger
    • Strainer

    Method
     

    1. Fill your cocktail shaker halfway with ice cubes to chill the mixture effectively.
    2. Add the tequila, freshly squeezed lime juice, triple sec, and simple syrup to the shaker.
    3. Add the activated charcoal powder into the shaker, which will give the cocktail its striking black hue.
    4. Secure the lid tightly and shake vigorously for about 15 seconds until the mixture is well combined and slightly frothy.
    5. Remove the shaker lid and strain the cocktail into chilled glasses to remove ice shards and charcoal sediment.
    6. Garnish with a lime wedge or a spooky garnish, such as a black straw or a sprig of rosemary, to enhance the eerie effect.
    7. Serve immediately and enjoy the captivating darkness and tangy flavor of your Black Magic Margarita.

    Notes

    Ensure the activated charcoal powder is food grade and used in moderation. Adjust the sweetness with simple syrup to taste; the color may vary based on the amount of charcoal used.

    Whether you’re hosting a haunted house or just craving something daring to sip, this Black Magic Margarita is the perfect crowd-pleaser. Its dark charm adds a mysterious edge that captures the essence of Halloween festivities. Cheers to making your celebration taste as enchanting as it looks.

    Remember, the key to mastering this drink is embracing the fun chaos of Halloween. Let your creativity run wild with fun garnishes or eerie edible accents. Enjoy the magic, and let each sip amplify the spooky spirit in the air.

  • The Untold Story of a Perfectly Rustic Chili

    The Untold Story of a Perfectly Rustic Chili

    Imagine a chili that echoes your childhood Sunday afternoons, simmering quietly on the stove with a rich aroma that wraps around you like a warm blanket. This recipe isn’t just about the spicy kick; it’s about the memories stirred up in each hearty spoonful. I’ve stripped away the usual culinary fuss to focus on honest, savory flavors that respect their humble roots.

    What makes this chili irresistible is its unpretentiousness. It’s a symphony of slow-cooked meat, fire-roasted tomatoes, and a whisper of smoked paprika. Perfect for cozy evenings or lazy weekends when comfort food feels like a necessity rather than a choice.

    Hearty Classic Beef Chili

    This chili is made by slow simmering ground beef, fire-roasted tomatoes, and aromatic spices to develop a rich, thick sauce. It results in a hearty, flavorful dish with a chunky texture and vibrant color, perfect for cozy gatherings or comforting weeknight dinners.
    Prep Time 15 minutes
    Cook Time 1 hour
    Total Time 1 hour 15 minutes
    Servings: 4
    Course: Main Course
    Cuisine: American
    Calories: 350

    Ingredients
      

    • 1 pound ground beef preferably lean
    • 1 can (14 oz) fire-roasted tomatoes
    • 1 medium onion diced
    • 3 cloves garlic minced
    • 2 tablespoons olive oil
    • 1 teaspoon smoked paprika
    • 1/2 teaspoon cumin
    • 1 teaspoon chili powder
    • Salt and pepper to taste

    Equipment

    • Large heavy-bottomed pot or Dutch oven
    • Wooden spoon or spatula

    Method
     

    1. Heat the olive oil in a large heavy-bottomed pot over medium heat until shimmering. Add the diced onion and cook, stirring frequently, until it becomes translucent and fragrant, about 5 minutes.
    2. Add the minced garlic to the pot and cook for another 30 seconds until it releases a savory aroma. Be careful not to burn it.
    3. Push the vegetables to the side of the pot and add the ground beef. Break it apart with your spoon or spatula, cooking until browned and no longer pink, about 8-10 minutes. Drain excess fat if necessary.
    4. Stir in the smoked paprika, cumin, chili powder, salt, and pepper. Cook for another minute, allowing the spices to toast slightly and develop their flavors.
    5. Pour in the fire-roasted tomatoes with their juices. Stir well to combine and bring the mixture to a gentle simmer.
    6. Reduce the heat to low, cover the pot loosely, and let the chili simmer gently for about 45 minutes, stirring occasionally until the sauce thickens and flavors meld together.
    7. Uncover and give the chili a final stir. Taste and adjust seasoning with additional salt or pepper if desired.
    8. Serve the hearty chili hot, garnished with your favorite toppings such as shredded cheese or chopped fresh herbs if desired.

    Notes

    For extra depth, consider simmering with a splash of beef broth or adding beans in the last 10 minutes of cooking.

    To me, this chili embodies the essence of home cooking—simple, truthful, and deeply satisfying. It’s a dish that welcomes tenderness and a touch of chaos, much like my kitchen itself.

    Whenever the weather turns chilly or life demands a little extra warmth, this chili stands ready. The smell alone has the power to brighten even the gloomiest days. It’s humble, heartfelt, and truly worth every simmered moment.

  • Unconventional Rum Slushie: A Chill Carnival in Your Glass

    Unconventional Rum Slushie: A Chill Carnival in Your Glass

    Imagine a winter evening wine with the unexpected twist of a tropical breeze. That0s what this rum slushie offers, blending cozy notes with a splash of island vivacity. It0s perfect for those who crave a taste of sunshine without leaving their living room.

    What makes this recipe stand out isn0t just its refreshing chill but its ability to turn any gathering into a lively celebration. The secret lies in an unusual ingredient that elevates the simple slushie into a conversation starter. It0s not just a drink, it0s an experience crafted from the most unlikely combination of flavors.

    Tropical Rum Slushie

    This rum slushie combines coconut, pineapple, and a splash of rum to create a frozen, refreshing beverage with a smooth, icy texture. It is made by blending ingredients until silky and served chilled, resulting in a vibrant, slushy consistency that evokes tropical island vibes. The addition of an unexpected ingredient adds a unique twist, making it both visually appealing and delightfully flavorful.
    Prep Time 10 minutes
    Total Time 10 minutes
    Servings: 4
    Course: Main Course
    Cuisine: Tropical
    Calories: 180

    Ingredients
      

    • 1 cup coconut milk chilled
    • 1 cup pineapple chunks frozen for best results
    • 1/2 cup white rum optional, for authenticity
    • 2 tablespoons maple syrup or honey, for sweetness
    • 1 teaspoon vanilla extract
    • 1 tablespoon banana adds creaminess
    • 1/2 teaspoon cotton candy flavoring unusual twist to elevate the flavor

    Equipment

    • Blender
    • Measuring cups and spoons

    Method
     

    1. Add the chilled coconut milk, frozen pineapple chunks, banana, and cotton candy flavoring into the blender.
    2. Pour in the white rum, then drizzle the maple syrup and vanilla extract over the ingredients.
    3. Secure the lid and blend the mixture on high until smooth, creamy, and with a uniform slushy texture, about 30-40 seconds. You should see it turn a pale, luscious color.
    4. Stop the blender and check the consistency; if it’s too thick, add a splash of coconut milk and blend briefly to loosen it up.
    5. Once blended to a silky, icy smoothness, pour the slushie into chilled glasses.
    6. Garnish each glass with a small pineapple wedge or a sprig of mint for a tropical presentation.

    Notes

    For an extra boost of flavor, add a splash of fresh lime juice before blending. Serve immediately for the best icy texture.

    As the ice begins to melt, the mingling scents of rum and citrus fill the air, reminding us that sometimes, the simplest pleasures are the most fleeting. This drink is a perfect way to wind down or kick off a party with a splash of unexpected delight.

    Whenever the world feels a little too serious, reaching for this cool concoction can instantly shift the mood to one of playful relaxation. It0s a reminder that sometimes, all you need is a little ice, a dash of rum, and a dash of daring to turn an ordinary day into something memorable.

  • Chili & Pumpkin Fusion: A Slow Cooker Fall Favorite

    Chili & Pumpkin Fusion: A Slow Cooker Fall Favorite

    As the leaves turn and a cool breeze stirs, I find myself craving the comforting warmth of a hearty chili, but with an unexpected twist—pumpkin. This recipe transforms a classic fall dish into a festival of flavors, combining smoky spices with the sweet earthiness of pumpkin. The slow cooker makes it effortless, letting the flavors meld into a rich, velvety sauce that fills the house with the scent of autumn.

    What excites me most is how this chili offers a cozy, nostalgic escape from the chaos of daily life. The pumpkin adds a subtle sweetness that balances the spicy heat of chili spices, creating a symphony of flavors in every spoonful. Plus, it’s easy enough to prepare on a busy weekday yet special enough to serve on a weekend gathering.

    Pumpkin Chili

    Pumpkin Chili is a hearty stew that combines tender chunks of pumpkin with ground meat, beans, and smoky spices. The dish is simmered slowly to develop rich, velvety flavors and has a thick, textured consistency with a deep orange hue from the pumpkin. It is often served with toppings like sour cream or shredded cheese for added creaminess.
    Prep Time 15 minutes
    Cook Time 1 hour
    Total Time 1 hour 15 minutes
    Servings: 4
    Course: Main Course
    Cuisine: American
    Calories: 350

    Ingredients
      

    • 1 pound ground meat (beef, turkey, or chicken) or plant-based substitute
    • 1 small onion diced
    • 2 cloves garlic minced
    • 2 cups cubed pumpkin peeled and seeds removed
    • 1 can (15 oz) black beans drained and rinsed
    • 1 can (14.5 oz) diced tomatoes with juices
    • 2 tablespoons chili powder
    • 1 teaspoon cumin
    • 1/2 teaspoon smoked paprika
    • to taste salt and pepper

    Equipment

    • Large skillet
    • Slow cooker
    • Wooden spoon

    Method
     

    1. Heat a large skillet over medium heat. Add the ground meat and cook until browned and crumbly, about 5–7 minutes, breaking it apart with a wooden spoon as it cooks.
      1 pound ground meat (beef, turkey, or chicken)
    2. Add chopped onion to the skillet and sauté until translucent and fragrant, about 3–4 minutes. Then, stir in the minced garlic and cook for another minute until it becomes aromatic.
      1 small onion, 2 cloves garlic
    3. Transfer the cooked meat mixture to the slow cooker. Add the cubed pumpkin, drained black beans, diced tomatoes with their juices, chili powder, cumin, smoked paprika, and season with salt and pepper.
      2 cups cubed pumpkin, 1 can (15 oz) black beans, 1 can (14.5 oz) diced tomatoes, 2 tablespoons chili powder, 1 teaspoon cumin, 1/2 teaspoon smoked paprika, to taste salt and pepper
    4. Stir all the ingredients well to combine, ensuring the pumpkin pieces are coated with the spices.
    5. Set the slow cooker to low and cook uncovered for 1 hour, stirring occasionally. This helps the pumpkin soften and flavors meld together.
    6. Cover the slow cooker with the lid and continue to cook on low for an additional 45 minutes to an hour, until the pumpkin is tender and the chili has thickened to your desired consistency.
    7. Once finished, give the chili a good stir, taste for seasoning, and adjust salt and spices if needed.
    8. Ladle the rich, velvety pumpkin chili into bowls and serve hot, garnished with your favorite toppings like sour cream, shredded cheese, or chopped cilantro if desired.

    This Slow Cooker Fall Chili with Pumpkin isn’t just a meal; it’s an experience of seasonal comfort. The blend of spices, pumpkin, and slow-cooked goodness makes every bite a reminder that simple ingredients can create something memorable.

    With its warm colors and inviting aroma, it’s perfect for chilly evenings or a casual family dinner. Plus, the leftovers taste even better the next day, a true testament to the magic of slow cooking. So, embrace the flavors of fall and let this dish bring a little extra cozy to your table.

  • Skeletons and Soil: Halloween Graveyard Pudding Cups to Spook Your Guests

    Skeletons and Soil: Halloween Graveyard Pudding Cups to Spook Your Guests

    As October chills settle in, I find myself craving something that captures the wild, eerie spirit of Halloween but also tickles my nostalgic side. These Graveyard Pudding Cups are not just treats—they’re miniature haunted landscapes, with chocolate cookie dirt, ghostly marshmallow bones, and dripping chocolate spider webs.

    Crafting these spooky cups feels like performing a tiny magic trick. The best part? They come together in under 20 minutes, making chaos in the kitchen practical and fun, especially when you’re inviting friends or family for a spooky get-together.

    Graveyard Pudding Cups

    Graveyard Pudding Cups are layered desserts featuring chocolate pudding topped with crumbled cookie dirt, marshmallow bones, and decorative, dripping chocolate spider webs. They have a rich, creamy texture contrasted with crunchy and chewy elements, resembling miniature haunted landscapes with spooky details.
    Prep Time 10 minutes
    Cook Time 5 minutes
    Total Time 15 minutes
    Servings: 4
    Course: Main Course
    Cuisine: Halloween
    Calories: 250

    Ingredients
      

    • 1 package chocolate instant pudding mix for creamy pudding
    • 2 cups milk to prepare pudding
    • 1 cup chocolate cookies for dirt layer, crushed finely
    • 1/2 cup mini marshmallows for bones, cut into small pieces
    • 1 square dark chocolate melted for web decoration
    • 2 tablespoons heavy cream to thin melted chocolate

    Equipment

    • Mixing bowls
    • Whisk
    • Pudding cups or small jars
    • Spoon or spatula
    • Baking sheet
    • Piping bag or plastic sandwich bag

    Method
     

    1. Whisk the chocolate pudding mix with milk in a bowl until well combined and smooth, about 2 minutes. Let it sit to firm up for 5 minutes.
    2. Spoon the pudding evenly into each serving cup, filling about three-quarters full.
    3. Crumble the chocolate cookies finely and sprinkle a layer on top of the pudding in each cup to resemble dirt.
    4. Arrange small pieces of marshmallow cut into bones or shapes on top of the cookie dirt to mimic skeletal remains.
    5. Melt the dark chocolate along with heavy cream in short bursts in the microwave, stirring after each, until smooth and glossy.
    6. Pour the melted chocolate into a piping bag or plastic sandwich bag, snip the tip, and pipe web-like patterns over the pudding cups for a spooky web effect.
    7. Chill the assembled pudding cups in the refrigerator for at least 10 minutes to set the webs and allow flavors to meld.

    Notes

    For more realistic webs, you can use a toothpick to drag the melted chocolate into web patterns after piping. Feel free to add candy eyes or other decorations for extra spookiness.
    This Halloween, let these graveyard pudding cups transform your dessert table into a mysterious patch of soil haunted by edible skeletons. Kids and adults alike will love digging into the layered flavors and uncovering the creepy surprises hidden beneath.

    Enjoy creating this playful dessert, knowing it’s perfect for spooking with style while still being delightfully simple to assemble. Capture the essence of Halloween’s fun and fright with each spoonful—good luck not giggling as you serve up these tiny tombstones of terror.