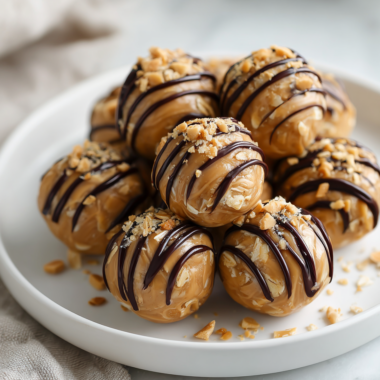
Blog

  • Chill with a Cherry: The Unexpected Magic of Frozen Fruit

    Chill with a Cherry: The Unexpected Magic of Frozen Fruit

    Delving into the world of frozen desserts reveals surprising possibilities beyond the usual scoop. I recently stumbled upon a cherry slushie that transformed my midday slump into a burst of nostalgia and refreshment. It’s not just about the cooling; it’s about rediscovering the joy of summer in every sip, even on chilly days.

    This recipe is a playful twist on traditional frozen drinks, crafted with ripe cherries and a hint of lime to elevate their natural sweetness. It’s perfect for lazy afternoons or spontaneous gatherings that demand something unexpectedly delightful. Plus, it’s so simple, I almost forgot I was making a fuss-free treat.

    Cherry Lime Slushie

    This cherry lime slushie is a frozen beverage made by blending ripe cherries with lime juice and ice until smooth and icy. It has a vibrant red color and a refreshing, slightly tangy flavor with a thick, slushy texture that’s perfect for hot days or spontaneous refreshment. The final drink is served cold and visually appealing, ideal for quick summer treats.
    Prep Time 5 minutes
    Total Time 5 minutes
    Servings: 2
    Course: Main Course
    Cuisine: none
    Calories: 150

    Ingredients
      

    • 1.5 cups fresh or frozen cherries pitted if fresh
    • 2 tablespoons lime juice freshly squeezed preferred
    • 1 cup ice cubes
    • 1 tablespoon honey or simple syrup optional for added sweetness

    Equipment

    • Blender
    • Measuring cups and spoons

    Method
     

    1. Add the cherries, lime juice, ice cubes, and honey to the blender.
    2. Secure the lid and blend on high until the mixture is smooth and slushy, about 30-45 seconds. The ice should be finely crushed, and the drink should be bright red with a frosty appearance.
    3. Stop the blender and check the consistency; if it’s too thick, you can add a splash of water or lime juice and blend briefly to loosen it. It should hold a thick, scoopable texture.
    4. Pour the cherry lime slushie into glasses, using a spoon to help transfer if necessary. The vibrant red color and icy texture should be immediately visible.
    5. Garnish with fresh cherries or a lime wedge if desired for presentation. Serve immediately while icy and refreshing.

    Notes

    For a smoother texture, you can strain out some of the cherry skins before blending. Adjust sweetness with honey or syrup as needed.

    This cherry slushie is a reminder that the simplest ingredients hold the most delightful surprises. As the weather warms up, I find myself craving more of these vibrant, fruity bursts of flavor. There’s something about that icy texture combined with the tangy cherry essence that instantly lifts my mood.

    Whipping up this recipe is a quick escape from the mundane, turning ordinary moments into festival-like festivities. It’s perfect for sharing with friends or simply savoring alone while listening to summer tunes. No matter how you enjoy it, this slushie promises a splash of joy in every glass.

  • Spooky Good! Halloween Pumpkin Cheesecake Bars with a Twist

    Spooky Good! Halloween Pumpkin Cheesecake Bars with a Twist

    Halloween is almost here, and I recently stumbled upon a curiosity—what if pumpkin cheesecake could meet crunchy, unexpected textures? This idea led me to craft bars that blend creamy pumpkin cheesecake with a crispy graham cracker crust and mischievous swirls of caramel. They’re a carnival of textures and flavors in every bite, perfect for your haunted gatherings.

    What makes these bars stand out isn’t just their hauntingly beautiful appearance—they harbor a secret ingredient that elevates traditional pumpkin desserts to a new haunting level. Plus, they’re surprisingly easy to make, even after a long day of costume planning. Just a few simple ingredients, and you’re transported to a fall festival of flavor.

    Pumpkin Cheesecake Bars with Crispy Graham Cracker Crust and Caramel Swirls

    These bars feature a creamy pumpkin cheesecake filling layered atop a crunchy graham cracker crust, with playful swirls of caramel throughout. The dessert combines smooth, dense filling with crisp edges and a caramelized topping for a delightful mix of textures and flavors. Finished bars are sliced into squares, showcasing the contrasting layers and inviting swirl patterns.
    Prep Time 20 minutes
    Cook Time 40 minutes
    Total Time 1 hour
    Servings: 12
    Course: Main Course
    Cuisine: American
    Calories: 350

    Ingredients
      

    • 1 1/2 cups graham cracker crumbs to form the crust
    • 1/4 cup granulated sugar
    • 1/2 cup unsalted butter melted
    • 16 oz cream cheese softened
    • 1 cup canned pumpkin
    • 3/4 cup granulated sugar
    • 3 large eggs
    • 1 teaspoon vanilla extract
    • 1/2 cup sour cream
    • 1/4 cup caramel sauce for swirl

    Equipment

    • 9×13 inch baking pan
    • Mixing bowls
    • electric mixer or whisk
    • Rubber spatula
    • Small saucepan
    • Measuring cups and spoons
    • Lined parchment paper

    Method
     

    1. Preheat your oven to 350°F (175°C). Line a 9×13 inch baking pan with parchment paper, leaving some overhang for easy removal.
    2. Combine the graham cracker crumbs and sugar in a mixing bowl. Pour in the melted butter and stir until the mixture resembles wet sand.
    3. Press the graham cracker mixture evenly into the bottom of the prepared pan to form a firm crust. Bake for 10 minutes until lightly golden.
    4. While the crust bakes, beat the softened cream cheese and sugar in a large bowl until smooth and creamy, about 2-3 minutes.
    5. Add the pumpkin, eggs, vanilla, and sour cream to the cream cheese mixture. Mix until well combined and smooth.
    6. Pour the pumpkin filling over the baked crust, smoothing the surface with a spatula.
    7. Dot the surface of the filling with small spoonfuls of caramel sauce. Use a toothpick or skewer to gently swirl the caramel into the pumpkin filling, creating a marbled effect.
    8. Bake the assembled bars for 40 minutes, or until the edges are set and a toothpick inserted near the center comes out clean.
    9. Allow the bars to cool completely in the pan on a wire rack, then refrigerate for at least 2 hours to set.
    10. Using the parchment overhang, lift the bars from the pan. Slice into squares and serve chilled or at room temperature.

    Halloween often calls for treats that are both festive and satisfying, and these cheesecake bars do just that. The mix of pumpkin spice, creamy cheesecake, and that crackly crust makes them an irresistible addition to any spooky soirée. They remind us that dessert can be playful, even a little daring.

    As the season shifts to cozy evenings, these bars provide a delightful way to indulge in fall’s bounty. Baking them fills the house with warm spices and the sweet aroma of pumpkin—perfect for creating new family memories or sharing with friends. Sometimes, the simplest pleasures are the most memorable.

  • Eerie Elegance: The Haunted Brain Jello Mold for a Spooky Feast

    Eerie Elegance: The Haunted Brain Jello Mold for a Spooky Feast

    Ever wondered how to turn a simple Halloween party into a memorable gore-fest? This Brain Jello Mold does more than just sit on the table; it demands attention with its realistic, squishy appearance. The secret lies in transforming fruit-flavored gelatin into a juicy, brain-like masterpiece that will make guests do a double take.

    What excites me most is the mix of chaos and precision it takes to craft this eerie dessert. It’s perfect for those who love a touch of creepy artistry on their spooky table. Plus, the process smells of sweet citrus and vanilla, filling the kitchen with a warm, inviting aroma amidst the fright.

    Brain Jello Mold

    This spooky dessert features fruit-flavored gelatin shaped to resemble a human brain, with a squishy, layered appearance. The preparation involves mixing, layering, and setting the gelatin to achieve a realistic, brain-like texture and look. It results in a vibrant, jiggle-finished centerpiece perfect for Halloween celebrations.
    Prep Time 20 minutes
    Cook Time 10 minutes
    Total Time 30 minutes
    Servings: 8
    Course: Main Course
    Cuisine: Halloween
    Calories: 150

    Ingredients
      

    • 1 package fruit-flavored gelatin (e.g., raspberry or cherry)
    • 1 1/2 cups hot water for dissolving gelatin
    • 1/2 cup cold water to reduce the mixture’s temperature
    • 1 can sweetened condensed milk for a creamy texture and opaque appearance

    Equipment

    • Saucepan
    • Mixing bowls
    • Silicone mold or brain-shaped container
    • Whisk
    • Measuring cups and spoons

    Method
     

    1. Begin by boiling water in a saucepan. Once it reaches a boil, remove from heat and stir in the fruit-flavored gelatin packet until fully dissolved and the mixture is smooth.
    2. Pour in the cold water and the sweetened condensed milk, whisking continuously to combine everything into a uniform, slightly thickened liquid with a vibrant color.
    3. Allow the mixture to cool slightly until it is warm but not hot, which helps it set properly without melting the previous layer.
    4. Pour the first layer of gelatin into a silicone brain mold or shaped container, filling it halfway. Place it in the refrigerator and let it set for about 30 minutes until firm.
    5. Once the first layer is solidified, gently pour a second layer of the gelatin mixture over it, aiming to build up the thickness of the “brain”. Refrigerate again until fully set, about another 30 minutes.
    6. Carefully unmold the gelatin from the mold once it feels firm and jiggles slightly when touched. Gently press on the mold to release the shape with minimal disturbance.
    7. Arrange the finished brain-shaped gelatin on a serving platter. For a more realistic look, you can carve slight grooves or add edible blood for extra creepiness.
    8. Serve your eerie brain jello alongside other spooky treats and enjoy the squishy, colorful spectacle.

    Notes

    Feel free to experiment with different fruit flavors and colors, or add edible glitter for extra spooky effect!

    Creating this Brain Jello Mold is a playful journey into the macabre that’s surprisingly easy to pull off. It’s a conversation starter and a visual marvel that adds a ghoulish twist to your Halloween spread. As the gelatin sets, the anticipation builds, promising a chilling delight that everyone will remember.

    This dessert isn’t just about the scare factor; it’s about the joy of crafting something uniquely unsettling and delicious. Perfect for a haunted gathering or a spooky family night, it reminds us that a little bit of macabre fun can turn any occasion into a memorable horror story.

  • Layered Comfort: The Magic of Lasagna Soup

    Layered Comfort: The Magic of Lasagna Soup

    In the chilly embrace of winter, I found myself craving more than just a warm drink or a hearty stew. I wanted something that brought together the familiar flavors of a lasagna in a form that was quick to serve and even quicker to devour. That’s when I discovered how layering the ingredients into a comforting soup could turn a classic Italian bake into an everyday miracle.

    This lasagna soup blends the richness of ricotta, the tang of marinara, and the meltiness of mozzarella into a single pot. It’s a dish that combines the best of both worlds: the indulgence of lasagna and the simplicity of a bowl of soup. Plus, it’s perfect for weeknights when time is tight but comfort food is non-negotiable.

    Each spoonful feels like a culinary hug, with textures and flavors dancing in harmony. I love how the fresh herbs and bubbling cheese create an irresistible aroma that fills my kitchen. It’s become my go-to, especially when I want a taste of nostalgia with a modern twist.

    Lasagna Soup

    Lasagna soup combines the hearty, layered flavors of traditional lasagna into a comforting, brothy dish. It features cooked pasta, marinara sauce, ricotta, mozzarella, and herbs, creating a rich yet soup-like texture with melted cheese topping. The final result is a colorful, savory bowl with bubbling cheese and a thick, flavorful broth.
    Prep Time 10 minutes
    Cook Time 30 minutes
    Total Time 40 minutes
    Servings: 4
    Course: Main Course
    Cuisine: Italian
    Calories: 350

    Ingredients
      

    • 1 tablespoon olive oil
    • 1 medium onion, chopped
    • 3 cloves garlic, minced
    • 1 can (28 oz) crushed tomatoes or marinara sauce for a smoother texture
    • 4 cups chicken or vegetable broth
    • 8 oz uncooked pasta (penne or rotini) add more if desired
    • 1 cup ricotta cheese
    • 1 cup shredded mozzarella cheese
    • Fresh basil or parsley chopped, for garnish optional
    • to taste salt and pepper

    Equipment

    • Large pot or Dutch oven
    • Wooden spoon or ladle

    Method
     

    1. Heat the olive oil in a large pot over medium heat. Add the chopped onion and sauté until translucent and fragrant, about 5 minutes.
    2. Add the minced garlic to the pot and cook for another 30 seconds until it becomes fragrant, stirring constantly to prevent burning.
    3. Pour in the crushed tomatoes and broth, stirring to combine everything evenly. Increase the heat to bring the mixture to a gentle boil.
    4. Add the uncooked pasta to the boiling broth. Reduce the heat to medium and cook according to the pasta package instructions, usually about 8-10 minutes, until al dente and tender.
    5. Stir in the ricotta cheese until it melts into the broth, giving it a creamy richness. Season with salt and pepper to taste.
    6. Sprinkle the shredded mozzarella cheese over the hot soup. Cover the pot briefly to allow the cheese to melt into the surface, creating a bubbling, cheesy topping.
    7. Garnish with freshly chopped basil or parsley for a fresh herbal aroma and vibrant color. Serve hot, with a spoon ready to scoop up the rich, cheesy broth and pasta.

    This lasagna soup isn’t just a meal; it’s a way to bring the cozy charm of Italian favorites into your busy life. The layers of flavor make each bowl feel special, even on the most chaotic days. It’s a reminder that comfort food can be simple, satisfying, and made in one pot.

    Next time you need a quick hug in a bowl, give this a try. The perfect combination of cheesy, savory, and tangy notes will warm both your heart and your kitchen. Sometimes, all it takes is a pot on the stove and the aroma of melting cheese to turn an ordinary moment into a celebration.

  • The Cozy Charm of One-Pan Fall Chicken Dinner

    The Cozy Charm of One-Pan Fall Chicken Dinner

    As the leaves turn fiery and the air takes on a crisp edge, I find myself craving dishes that mirror the season’s warmth. This one-pan fall chicken dinner combines hearty textures with seasonal flavors in a way that feels both rustic and refined. It’s perfect for those weekend nights when I want comfort without the chaos of multiple pots and pans.

    What sets this recipe apart is its ability to capture the essence of autumn in a single, savory skillet. Roasted vegetables, tender chicken, and fragrant herbs come together in a symphony of cozy aromas. It’s a celebration of fall’s bounty, all in one simple, fuss-free dish.

    One-Pan Fall Chicken Dinner

    This dish is a hearty baked chicken entrée that features tender chicken pieces roasted alongside seasonal vegetables and fragrant herbs. The ingredients are cooked together in a single skillet, resulting in a rustic yet refined dish with a combination of crispy edges and juicy interior textures, topped with caramelized vegetables and aromatic herbs.
    Prep Time 15 minutes
    Cook Time 40 minutes
    Total Time 55 minutes
    Servings: 4
    Course: Main Course
    Cuisine: American
    Calories: 520

    Ingredients
      

    • 4 pieces bone-in, skin-on chicken thighs or drumsticks
    • 2 cups brussels sprouts halved
    • 2 carrots large carrots sliced into thick rounds
    • 3 tablespoons olive oil
    • 1 teaspoon dried thyme or fresh thyme
    • 1 teaspoon paprika smoked or sweet
    • to taste salt and pepper
    • 3 cloves garlic minced

    Equipment

    • Skillet or ovenproof frying pan
    • Chef’s Knife
    • Cutting board
    • Mixing spoon or spatula

    Method
     

    1. Preheat your oven to 400°F (200°C). Pat the chicken thighs dry with paper towels, then rub them with a tablespoon of olive oil, thyme, paprika, salt, and pepper. Place them in the center of your skillet, skin side up.
    2. Arrange the halved Brussels sprouts and sliced carrots around the chicken, then drizzle everything with the remaining olive oil. Toss the vegetables gently to coat them evenly in the oil and seasonings.
    3. Sprinkle the minced garlic over the vegetables, ensuring it’s evenly distributed to release fragrant aroma during roasting.
    4. Transfer the skillet to the preheated oven and roast for about 35-40 minutes, until the chicken skin is golden and crispy, and the vegetables are tender and caramelized in spots.
    5. Remove the skillet from the oven and let the dish rest for a few minutes. The chicken juices will settle, and the vegetables will be beautifully roasted.
    6. Serve the fall chicken dinner directly from the skillet, garnished with additional herbs if desired, and enjoy the comforting aroma and crisp textures of this hearty, one-pan meal.
    This dish isn’t just about convenience—it’s about embracing the flavors of the season in their purest form. The warm spices and caramelized vegetables make every bite feel like a small dose of fall itself. It’s a little ritual I look forward to, season after season.

    As the chill settles in, this meal becomes a comforting constant. No matter how busy life gets, a one-pan fall chicken dinner offers a moment of peace, a flavor-filled pause to savor responsibly.

  • Monster Burgers to Spook Your Taste Buds!

    Monster Burgers to Spook Your Taste Buds!

    Every October, I love turning the usual burger into a spooky masterpiece that kids and adults alike will rave about. These Halloween Monster Burgers are not just fun—they7re a statement on your table, blending playful creativity with satisfying flavors. The kitchen smells of toasted buns and sizzling patties, punctuated by a hint of spooky decorations.

    What makes these burgers stand out is their quirky monster design, complete with funny eyes and gnarly teeth. It7s a perfect activity for a Halloween party or a themed family dinner. Each bite combines the smoky richness of grilled beef with the cheesy-y snacky accents reminiscent of childhood costumes and candy hunts.

    **WHY I LOVE THIS RECIPE?**

    • Creates hilarious edible art that sparks joy and chaos at the dinner table.
    • Transforms a simple meal into a memorable Halloween tradition.
    • Allows playful experimentation with toppings and faces—no rules, just fun!
    • Perfect for involving kids in the kitchen with little monster faces.
    • Quick to assemble, giving you more time for spooky movie marathons later.

    **AVOID MY DISASTER (You7re Welcome)**

    • FORGOT to preheat the grill; burger stuck, fix by oiling the grates to prevent sticking.
    • DUMPED too much ketchup; overflowed and spoiled the look. Use a small spoon for neat designs.
    • OVER-TORCHED cheese; melted into a crispy mess. Cover promptly with foil to stop burning.
    • SPILLED toppings on the floor; the chaos distracted kids and spoiled the fun. Keep toppings ready on a tray.

    **QUICK FIXES THAT SAVE YOUR DAY**

    • When buns are soggy, splash with a little crisped-up butter to refresh texture.
    • Patch over a burger with a fresh bun slice if the top gets too smushed.
    • Shield your design from the grill’s heat with foil if it starts to burn.
    • When cheese overflows, quickly smear it back with a spatula for a tidy look.
    • If burnt, quickly scrape off char and add a fresh layer of cheese or toppings.

    Halloween Monster Burgers

    Halloween Monster Burgers are fun, creatively decorated beef patties served on toasted buns, topped with cheese, vegetables, and playful toppings to resemble silly monsters. The burgers are grilled until smoky and juicy, with detailed edible faces adding a whimsical touch. Final presentation features colorful eyes, gnarly teeth, and quirky expressions that make the dish both eye-catching and satisfying.
    Prep Time 20 minutes
    Cook Time 15 minutes
    Total Time 35 minutes
    Servings: 4
    Course: Main Course
    Cuisine: American
    Calories: 650

    Ingredients
      

    • 1 lb ground beef preferably 80/20 for flavor
    • 4 pieces burger buns scored for toasting
    • 4 slices cheddar cheese cut into fun shapes if desired
    • 1 cup lettuce shredded
    • 1 large tomato sliced into rounds
    • 1/2 cup onion sliced or diced
    • 2 pieces eggs for decorating eyes
    • 4 pieces black olives sliced for pupils
    • 4 slices pickles cut into teeth shapes
    • to taste salt and pepper for seasoning

    Equipment

    • Grill or stovetop pan
    • Tongues or spatula
    • Cooking brush
    • Knife
    • Cutting board
    • Baking sheet (for buns)

    Method
     

    1. Preheat your grill or stovetop pan over medium-high heat. Lightly oil the grates or pan to prevent sticking. Form the ground beef into four evenly-sized patties, handling gently to keep them tender.
    2. Place the patties on the grill or pan. Cook for about 4–5 minutes per side, until they develop a good sear and reach your preferred level of doneness. During the last minute, place a slice of cheese on each patty to melt.
    3. While the burgers cook, slice the burger buns in half and toast them lightly on a baking sheet or on the grill until golden and crispy. Remove and set aside.
    4. Slice the tomato, shred the lettuce, and prepare the onions. Set all toppings nearby for easy assembly. Slice the eggs and olives for decorating the eyes, and cut pickles into fun shaped teeth.
    5. Assemble each burger by placing a lettuce leaf on the bottom bun, followed by the grilled beef patty with melted cheese. Top with tomato slices and onions, then add playful features such as eyes made from sliced eggs with olives as pupils, and teeth cut from pickles.
    6. Place the decorated patties onto the toasted buns. Add extra toppings or creative faces if desired, using additional ingredients like ketchup or mustard for fun details. Cover with the top bun and press slightly to set the design.
    7. Serve the Halloween Monster Burgers immediately with sides of your choice. They are ready to impress both kids and adults with their spooky and playful appearance.

    Notes

    Use small spoons for neat placement of eyes and small toppings. Feel free to get creative with facial expressions and monster features for extra fun!
    These Halloween Monster Burgers are a delightful way to add a little playful chaos to your festive table. They remind us that cooking can be a creative escape, especially during the spooky season when fantasy becomes reality. With just a few tricks and treats, your table transforms into a Halloween scene everyone will remember.

  • Spooky Delight: The Mesmerizing Vampiric Punch for Halloween

    Spooky Delight: The Mesmerizing Vampiric Punch for Halloween

    As the leaves turn crisp and the nights grow darker, there’s a certain thrill in crafting a Halloween party that bursts with eerie charm and vivid color. This year, I decided to go beyond the usual pumpkin spice and add a splash of daring with a hauntingly red Vampire Punch. It’s not just a drink; it’s a visual and taste adventure that transforms any gathering into a spectral celebration.

    The secret lies in choosing a vibrant red juice that glows under dim lighting. Pair that with spooky, floating eyeball garnishes and a spritz of black edible glitter for a shimmering, blood-like effect. Guests won’t only sip; they’ll be mesmerized by the macabre beauty of this bubbling potion.

    Vampire Punch

    Vampire Punch is a vibrant red beverage made primarily from fruit juices and sparkling soda, designed to resemble a bubbling, blood-like potion. The drink is served chilled, often garnished with floating eyeball candies and sprinkled with edible glitter for a spooky visual effect. Its smooth, effervescent texture and striking appearance make it a perfect centerpiece for Halloween celebrations.
    Prep Time 10 minutes
    Total Time 10 minutes
    Servings: 8
    Course: Main Course
    Cuisine: Halloween
    Calories: 120

    Ingredients
      

    • 2 cups Red Fruit Juice (e.g., cherry, cranberry) provides the main blood-red color
    • 1 cup Sparkling Lemon-Lime Soda adds effervescence and sparkle
    • 1/4 cup Black Edible Glitter for shimmer and a spooky, blood-splash effect
    • 8 pieces Gummy Eyes or Floating Eyeball Candies for garnish

    Equipment

    • Large Pitcher
    • Stirring spoon

    Method
     

    1. Pour the red fruit juice into a large pitcher, filling it about three-quarters full.
    2. Add the sparkling lemon-lime soda to the pitcher, then gently stir to combine. Watch as the mixture begins to fizz and swirl, creating a bubbling effect reminiscent of a spooky potion.
    3. Sprinkle the black edible glitter over the top of the punch while stirring slowly. This creates a shimmering, blood-like effect with sparkling specks floating throughout the drink.
    4. Place floating eyeball candies gently into the punch, making sure they rest on the surface for a haunting visual effect.
    5. Serve the Vampire Punch chilled in glasses or cups, optionally garnished with additional eyeball candies or black straws for a more theatrical presentation.

    This Vampire Punch captures the magic and chaos of Halloween in a single glass. It’s perfect for those sudden costume parties or a cozy night with friends who love to indulge in themed festivities. The bold, fruity flavors and playful presentation make every sip a delightful scare.

    In the end, the true joy is watching friends’ wide eyes as they try to decipher the mysterious crimson beverage. It’s a reminder that some of the best holiday memories come from embracing the whimsy and wild spirit of the season, one chilling sip at a time.

  • Enchanted Halloween Witch Finger Cookies Your Kids Will Love

    Enchanted Halloween Witch Finger Cookies Your Kids Will Love

    Halloween baking is all about transforming the ordinary into the extraordinary, and this year, I decided to craft something truly spooktacular—Witch Finger Cookies. These creepy treats look just like tiny, gnarled witch fingers, with wrinkled skin and a hauntingly realistic almond nail. They’re as much fun to make as they are to scare friends and family with at the little pumpkin party.

    The secret is in the details: a slightly crumbly cookie base topped with a dusty, almost rotten-looking red hue, finished with an almond for that perfect nail. The scent of vanilla and almond wafts through the kitchen as you shape each finger, turning simple ingredients into a mysterious Halloween spectacle. Perfect for parties, or just a wickedly fun baking project to get into the spirit of the season.

    Witch Finger Cookies

    These Witch Finger Cookies are shortbread-style treats shaped to resemble creepy, gnarled fingers, complete with wrinkled skin and almond nails. They feature a crumbly texture with a dusted red hue, finished with a realistic almond for the fingernail. The cookies are aromatic with hints of vanilla and almond, making them both spooky and delicious for Halloween festivities.
    Prep Time 20 minutes
    Cook Time 15 minutes
    Total Time 35 minutes
    Servings: 12
    Course: Main Course
    Cuisine: Halloween
    Calories: 150

    Ingredients
      

    • 1 cup unsalted butter softened
    • 1 cup granulated sugar
    • 1 teaspoon vanilla extract
    • 2 cups all-purpose flour
    • 0.5 cup almond meal or finely chopped almonds
    • 12 almond nails whole blanched almonds, for nails
    • 1 cup powdered sugar for dusting
    • 1 tablespoon red food coloring for dusting

    Equipment

    • Mixing bowls
    • Baking sheet

    Method
     

    1. Preheat your oven to 350°F (175°C) and line a baking sheet with parchment paper.
    2. In a large mixing bowl, beat the softened butter and granulated sugar together until the mixture is light, fluffy, and pale, about 2-3 minutes. This creates a creamy base for your cookies.
    3. Stir in the vanilla extract until fully incorporated, then gradually add the all-purpose flour and almond meal. Mix until a soft, cohesive dough forms.
    4. Divide the dough into 12 equal portions and roll each into a slender, finger-like shape about 4 inches long. Slightly taper the ends to resemble knuckles and skin wrinkles.
    5. Place the shaped cookies onto the prepared baking sheet, spacing them out to allow for slight spreading.
    6. Bake the cookies in the preheated oven for about 12-15 minutes, or until they are lightly golden and slightly cracked to resemble wrinkled skin.
    7. Allow the cookies to cool on the baking sheet for a few minutes before transferring to a wire rack to cool completely.
    8. In a small bowl, mix the powdered sugar with a few drops of red food coloring to create a dusty, blood-like hue. Lightly dust the cooled cookies with this mixture for a spooky effect.
    9. Pick up one cookie and gently press a whole almond in the middle of the top to resemble a fingernail, pressing it in firmly but naturally.
    10. Optionally, use a bit of the red dust or a little red food coloring directly to add tiny ‘scars’ or ‘wrinkles’ around the knuckles for extra realism.
    11. Once all the nails are attached and details added, your Witch Finger Cookies are ready to serve—perfectly creepy and whimsically delicious for Halloween! Enjoy their crumbly texture and spooky appearance.

    These witch finger cookies aren’t just a treat—they’re a little piece of Halloween magic that sparks giggles and awe. The best part is how quickly they come together, transforming a simple baking session into a spooky adventure. Perfect for making new holiday traditions with a dash of chaos.

    As the season deepens, these macabre morsels remind us to keep the magic playful. They bring a touch of whimsy and fright into our kitchens, turning good ingredients into wildly memorable moments. Nothing beats the joy of pulling out these creepy little fingers right before the house fills with ghostly giggles.

  • Autumn Harvest: Fall Turkey Chili with Sweet Potatoes That Comforts and Thrills

    Autumn Harvest: Fall Turkey Chili with Sweet Potatoes That Comforts and Thrills

    As the leaves turn fiery shades of orange and crimson, I find myself craving more than just pumpkin spice lattes. I want something hearty, with rich earthiness, and a touch of sweet to warm my hands and soul. This Fall Turkey Chili with Sweet Potatoes is my secret weapon against chilly evenings and busy nights.

    This recipe is a celebration of the season’s bounty. Juicy ground turkey, tender sweet potatoes, and a smoky spice blend come together in one pot, filling the kitchen with inviting aromas. It’s simple, satisfying, and just different enough to turn an ordinary weekday into a cozy, festive escape.

    Fall Turkey Chili with Sweet Potatoes

    This hearty chili combines ground turkey, tender sweet potatoes, and a smoky spice blend in a thick, flavorful stew. The dish is simmered until the ingredients meld together, resulting in a comforting, rustic chili with a slightly chunky texture and vibrant seasonal colors.
    Prep Time 15 minutes
    Cook Time 40 minutes
    Total Time 55 minutes
    Servings: 4
    Course: Main Course
    Cuisine: American
    Calories: 350

    Ingredients
      

    • 1 lb ground turkey lean preferably
    • 2 large sweet potatoes peeled and diced
    • 1 medium yellow onion chopped
    • 3 cloves garlic minced
    • 1 can (14 oz) diced tomatoes
    • 2 tsp smoked paprika
    • 1 tsp cumin
    • 1/2 tsp cayenne pepper optional for heat
    • 1 cup chicken broth
    • 2 tbsp olive oil
    • to taste Salt and pepper

    Equipment

    • Large pot or Dutch oven
    • Sharp knife

    Method
     

    1. Heat the olive oil in a large pot over medium heat until shimmering. Add the chopped onion and cook, stirring occasionally, until translucent and fragrant, about 5 minutes.
    2. Add the minced garlic and cook for another 30 seconds until aromatic, being careful not to burn it.
    3. Add the ground turkey to the pot, breaking it apart with a spoon. Cook until browned and cooked through, about 7-9 minutes, until it’s no longer pink.
    4. Stir in the smoked paprika, cumin, cayenne pepper, salt, and pepper to coat the meat evenly with spices.
    5. Add the diced sweet potatoes and diced tomatoes (with juices) to the pot. Stir everything together so the flavors combine.
    6. Pour in the chicken broth and bring the mixture to a gentle boil over high heat.
    7. Reduce the heat to low, cover the pot, and let the chili simmer for about 30 minutes until the sweet potatoes are tender and the flavors meld, stirring occasionally.
    8. Uncover and taste the chili. Adjust seasoning with salt and pepper as desired, simmering for another 5 minutes if needed for flavor to develop.
    9. Serve the hearty chili hot, garnished with your favorite toppings such as chopped cilantro, shredded cheese or a squeeze of lime for added brightness.

    Notes

    For a thicker chili, mash some of the sweet potatoes after cooking or simmer uncovered for an additional 10 minutes.

    In these hurried days, this chili offers a break—a slow simmer that rewards with every spoonful. The balance of savory meat, sweet potatoes, and a gentle kick makes it a dish to look forward to, not just during fall, but whenever you need a warm hug of flavor. It’s a reminder that sometimes, comfort is best served in a bowl.

    So, next chilly night, embrace this recipe and let the smells take you home. It’s perfect for sharing with loved ones or enjoying solo with a good book on the side. Whatever the occasion, this chili promises a taste of fall in every bite.

    ,

  • Hidden Gem: Roasted Butternut Squash Soup with a Twist

    Hidden Gem: Roasted Butternut Squash Soup with a Twist

    Cooking as a form of meditation has taken on new meaning for me, especially when it’s about transforming simple ingredients into comfort in a bowl. This roasted butternut squash soup isn’t just a cozy autumn dish; it’s a mindful ritual that invites you to slow down and relish every step. The caramelized flavors from roasting transform the squash into something that smells like fall itself, filling the kitchen with sweet, nutty aroma.

    Every spoonful is a reminder that sometimes, the most unassuming ingredients hold the greatest magic. I love the way the velvety texture of this soup contrasts with the slight crunch of toasted seeds on top. It’s perfect for those moments when life feels busy but you still want to nurture your soul and satisfy your hunger.

    Roasted Butternut Squash Soup

    This roasted butternut squash soup features tender, caramelized squash blended into a smooth, velvety texture. It is made using roasting and blending techniques, with a final appearance of creamy orange soup topped with toasted seeds for added crunch.
    Prep Time 15 minutes
    Cook Time 45 minutes
    Total Time 1 hour
    Servings: 4
    Course: Main Course
    Cuisine: Autumn
    Calories: 180

    Ingredients
      

    • 1 small butternut squash peeled, seeded, and cubed
    • 2 tbsp olive oil for roasting
    • 1 small onion chopped
    • 2 cloves garlic minced
    • 4 cups vegetable broth or chicken broth
    • 1/2 cup coconut milk for creaminess (optional)
    • to taste salt and pepper for seasoning
    • 1/4 cup pumpkin seeds toasted

    Equipment

    • Baking sheet
    • Blender

    Method
     

    1. Preheat your oven to 400°F (200°C). Spread the cubed butternut squash on a baking sheet, drizzle with olive oil, and toss to coat evenly.
    2. Roast the squash in the oven for about 25-30 minutes, until tender and caramelized around the edges, which fills the kitchen with a sweet, nutty aroma.
    3. While the squash roasts, sauté chopped onion and minced garlic in a large pot with a splash of olive oil over medium heat until fragrant and soft, about 5-7 minutes.
    4. Add the roasted squash to the pot, then pour in the vegetable broth. Bring the mixture to a gentle simmer and cook for 10 minutes to blend flavors.
    5. Use an immersion blender or transfer the mixture carefully to a blender and blend until silky smooth, achieving a velvety texture.
    6. Stir in the coconut milk for added creaminess, then season with salt and pepper to taste, adjusting the flavor as needed.
    7. While the soup is heating through, toast the pumpkin seeds in a dry skillet over medium heat until golden and fragrant, about 3-4 minutes, shaking the pan frequently.
    8. Pour the hot soup into bowls and sprinkle generously with toasted pumpkin seeds for crunch and a nutty finish.
    This soup has become my go-to comfort during chilly evenings, especially when I want something nutritious yet effortless. The warmth it provides is as much a mental solace as it is a physical one. Plus, its adaptability means I can toss in a dollop of cream or sprinkle cheese on top for added indulgence.

    Sharing this recipe warms my heart, knowing it brings calm and flavor to others’ kitchens. It’s a reminder that sometimes, the simplest ingredients, when prepared with care, create the most meaningful dishes. In these busy days, I treasure recipes like this that make every moment of cooking feel like a small celebration.