This no-bake date bar recipe is a little nod to my childhood, when sneaking a sticky, sweet date from my grandma’s jar felt like discovering treasure. It’s honest, simple, and doesn’t need much more than a few ingredients and a bit of patience while they set up. I love that it’s a treat you can whip up quickly, especially when the craving hits and you want something comforting without turning on the oven.
There’s something about the caramel-like chewiness of dates combined with nuts and a hint of vanilla that just hits differently. It’s the kind of recipe that’s forgiving—no fancy skills, no fuss, just good ingredients coming together to make a little moment of joy. Perfect for those times when you want a homemade snack that’s both satisfying and honest, no pretense involved.
This recipe is inspired by my childhood memory of sneaking bites from my grandma’s jar of dates, feeling the sticky sweetness and imagining I’d found treasure. It’s a simple, honest treat that doesn’t need ovens or fancy ingredients, just good intentions and a little patience while the bars set.
The story behind this recipe
One rainy afternoon, I found myself rummaging through my pantry, craving something sweet but quick. The idea of combining sticky dates with crunchy nuts hit me out of nowhere, nostalgic for childhood snack times. I wanted a treat that was honest, no fuss, just pure, straightforward comfort. So I threw together these no-bake date bars on a whim, and they’ve been a little secret of mine ever since.
Key ingredients and tips
- Medjool dates: They’re sticky, caramel-sweet, and almost jammy—perfect for binding. If yours are dry, soak briefly in warm water to soften.
- Rolled oats: They give a chewy texture and nutty flavor. For a finer crunch, pulse in the food processor before mixing.
- Nuts (almonds or walnuts): I love their crunch and richness. Toast them lightly for extra flavor, or skip if you prefer a softer bite.
- Butter or coconut oil: Adds a bit of richness and helps everything stick together. If you want dairy-free, use coconut oil but expect a slightly different melt-in-your-mouth feel.
- Vanilla extract: It brightens the sweetness and adds depth. Use a splash—don’t overdo it, or it can overpower the dates’ natural caramel notes.
- Sea salt: Just a pinch enhances all the flavors and keeps the sweetness in check. Sprinkle lightly—you can add more after if needed.
- Optional add-ins (chocolate chips, dried fruit): For bursts of flavor or texture, fold in at the end. Just don’t go overboard—balance is key.
Spotlight on key ingredients
Medjool dates:
- Their sticky, caramel-sweet interior almost melts in your mouth, binding everything together with a rich, jammy feel. If yours seem dry, soaking briefly in warm water makes them easier to blend and intensifies their sweetness.
- Dates are naturally oozy and intensely sweet, with a deep caramel aroma. They act as the glue in these bars, so quality and softness matter for that perfect chewy bite.
Nuts (almonds or walnuts):
- Nuts (almonds or walnuts): They add a satisfying crunch and a toasty, nutty aroma. Toast them lightly to amplify their flavor and get that aromatic crackle when you bite into the bars, or skip to keep it softer and milder.
- Nuts bring texture contrast and richness. Their oils seep out slightly when toasted, adding depth and a subtle smoky note that balances the sweetness of the dates.
Notes for ingredient swaps
- Dairy-Free: Swap butter for coconut oil or a neutral oil. Expect a slightly softer texture and a subtle coconut aroma.
- Nut Variations: Use cashews or pistachios instead of almonds or walnuts for different flavor profiles and crunch.
- Sweetener Switch: Add a touch of honey or maple syrup in place of some dates for a different sweetness and moisture.
- Gluten-Free: Ensure oats are certified gluten-free if you have gluten sensitivities—flavor stays nutty and chewy.
- Flavor Boost: Mix in a pinch of cinnamon or cardamom with the dates for a warm, aromatic twist.
- Texture Play: Include shredded coconut or sesame seeds for extra chewiness or crunch, depending on your mood.
- Add-ins: Fold in dried cranberries or chopped dried apricots for tartness and colorful bites.
Equipment & Tools
- Food processor: To finely chop dates and pulse oats for better texture.
- 8×8 inch baking dish: To press and set the mixture into bars.
- Spatula: To press down and smooth the mixture evenly.
- Knife: To cut bars after they’ve set.
- Measuring spoons: To measure vanilla and salt precisely.
- Pan (for toasting nuts): To lightly toast nuts to enhance flavor.
Step-by-step guide to no-bake date bars
- Gather all your ingredients and tools. Line up your dates, nuts, oats, butter, vanilla, and a baking dish (8×8 inch works well).
- Chop the dates into small pieces. If they seem a bit dry, soak them in warm water for 5 minutes, then drain thoroughly.
- Toast the nuts lightly in a dry skillet over medium heat (about 3-4 minutes) until fragrant and slightly golden, then let cool.
- In a food processor, pulse the oats a few times to break them down slightly—this helps with texture, not too fine.
- Add the chopped dates, toasted nuts, butter (melted), vanilla, and a pinch of sea salt into a large mixing bowl or directly into the processor if it fits. Mix until the mixture is sticky and well combined.
- Press the mixture firmly into the prepared baking dish. Use the back of a spatula or your hands (dampened if sticky) to smooth out the surface evenly.
- Place the dish in the fridge for at least 2 hours. This is key for the bars to set properly and become chewy.
- Once set, lift the mixture out of the dish using the edges of parchment paper, then cut into bars or squares with a sharp knife.
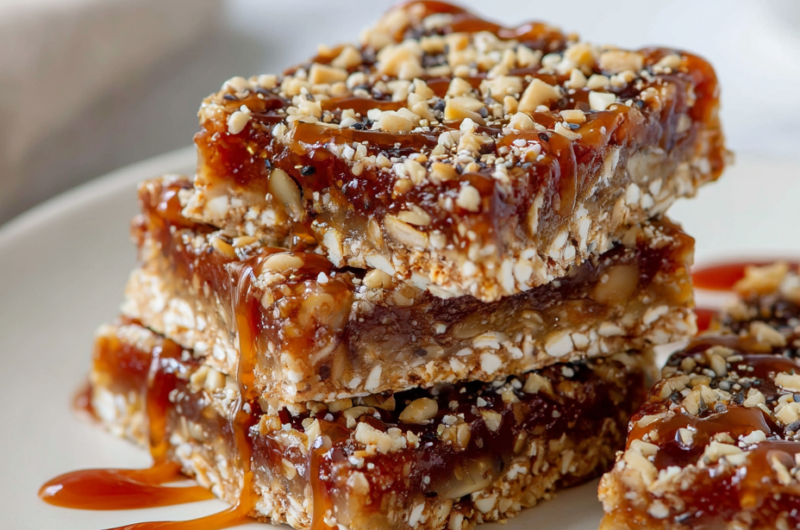
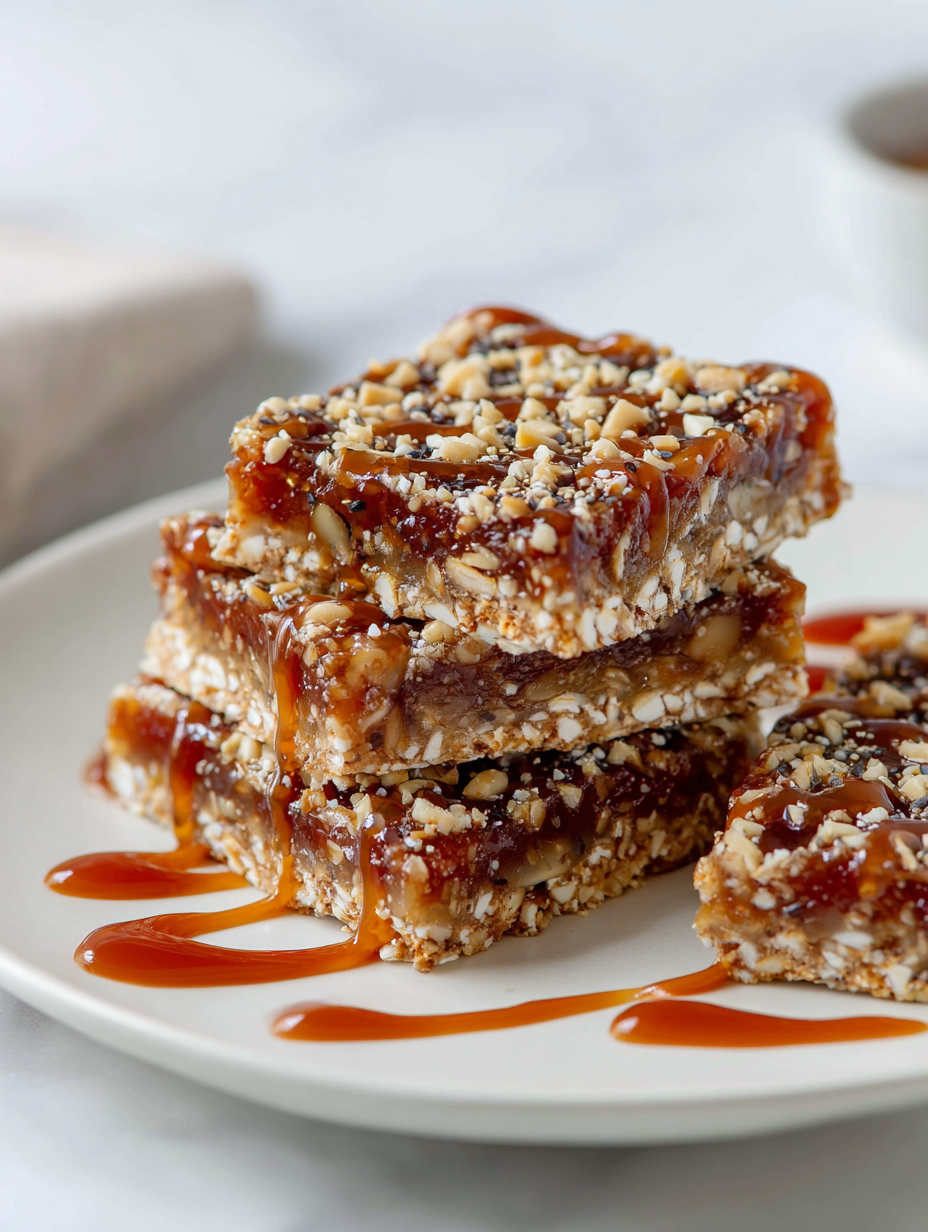
- Optional: Drizzle with melted chocolate or sprinkle a little flaky sea salt on top before serving for extra flair.
- Serve immediately or store in an airtight container in the fridge for up to a week. For longer storage, freeze for up to a month.
Once pressed into the dish, chill in the fridge for at least 2 hours. Then, lift out with parchment edges, cut into bars, and serve. Keep leftovers in an airtight container in the fridge for up to a week or freeze for longer storage.
How to Know It’s Done
- The mixture sticks together when pressed; it should hold shape without crumbling.
- The bars are firm but slightly chewy after resting in the fridge.
- Nuts are toasted and fragrant, adding depth to each bite.
No-Bake Date Bars
Ingredients
Equipment
Method
- Chop the medjool dates into small pieces. If they seem dry, soak them in warm water for about 5 minutes, then drain thoroughly. Meanwhile, toast the nuts in a dry skillet over medium heat for 3-4 minutes until fragrant and golden, then let them cool.
- In a food processor, pulse the oats a few times until slightly broken down, helping improve the texture. Add the chopped dates, toasted nuts, melted butter or coconut oil, vanilla extract, and a pinch of sea salt. Process everything until the mixture becomes sticky, well combined, and cohesive.
- Transfer the mixture to an 8x8 inch baking dish lined with parchment paper. Use a spatula or damp hands to press the mixture firmly into the dish, smoothing out the surface for an even layer.
- Place the dish in the refrigerator and chill for at least 2 hours, allowing the bars to set and become chewy. The mixture will firm up and hold together well after chilling.
- Once set, lift the entire block out of the dish using the parchment paper edges. Use a sharp knife to cut into 12 bars or squares, wiping the knife clean between cuts for neat slices.
- Enjoy the bars immediately, or store them in an airtight container in the fridge for up to a week. For longer storage, wrap individually and freeze for up to a month.
Pro tips for perfect no-bake bars
- Bolded tip: Use slightly warm dates to make blending smoother and help the mixture come together more easily.
- Bolded tip: Toast your nuts until fragrant and golden; it amplifies their flavor and creates a delightful crunch.
- Bolded tip: Press the mixture firmly into the dish; the more compact it is, the chewier and more cohesive your bars will be.
- Bolded tip: Chill the bars for at least 2 hours; patience here ensures they set properly and slice cleanly.
- Bolded tip: If the mixture feels too sticky to press, dampen your hands slightly to help shape the bars without mess.
- Bolded tip: For an extra flavor boost, sprinkle a pinch of sea salt on top before chilling—balances sweetness beautifully.
- Bolded tip: When cutting, use a sharp knife and wipe it clean between cuts for neat, tidy bars with minimal crumbling.
Common mistakes and how to fix them
- FORGOT to soften dates: Soak in warm water 5 minutes, then drain thoroughly.
- DUMPED nuts into mixture: Toast nuts first for flavor and crunch, then fold in.
- OVER-TORCHED the mixture: Stir continuously over low heat to prevent burning.
- SKIPPED chilling time: Chill at least 2 hours for proper setting and chewy texture.
Quick fixes and pantry swaps
- If/When mixture feels too sticky → dampen hands slightly to press firmly.
- Splash a few drops of hot water on dates → soften for easier blending.
- Patch over cracks in chilled bars → press firmly and chill longer.
- Shield edges from freezer burn → wrap bars tightly before freezing.
- DUMPED too many nuts → toast them first for better flavor and crunch.
Prep, store, and reheat tips
- Prepare the mixture and press into the dish a day in advance; it firms up better overnight, making slicing easier and cleaner.
- Store the bars in an airtight container in the fridge for up to a week; the cool environment keeps them chewy and fresh, with dates mellowing into a richer sweetness.
- For longer storage, freeze the bars for up to a month; wrap individually in plastic wrap to prevent freezer burn, then thaw in the fridge before serving.
- Refrigerated bars are best enjoyed chilled but can be left at room temperature for 10-15 minutes to soften slightly, releasing a warm, caramel aroma when you break into them.
- If reheating slightly, warm in a low oven (about 90°C/200°F) for 5 minutes, just enough to enhance softness without melting. Sensory cue: a faint, toasted nuttiness and sticky warmth.
Top questions about no-bake date bars
1. How do I soften dry dates?
Medjool dates are naturally sticky and sweet, acting as the glue in these bars. If yours are dry, soaking them in warm water for 5 minutes makes them easier to blend and intensifies their caramel flavor.
2. How do I cut clean bars?
Use a sharp knife to cut the bars, and chill them beforehand to make slicing easier and neater. If they crumble, pop them back in the fridge for a bit.
3. What if the mixture is too sticky?
If your mixture is too sticky to press into the pan, dampen your hands slightly. This helps shape the bars without sticking too much.
4. How long should I chill the bars?
Chill the bars for at least 2 hours in the fridge. This allows them to set properly, becoming chewy and holding together better when sliced.
5. How do I toast nuts properly?
To toast nuts, heat them in a dry skillet over medium heat for about 3-4 minutes until fragrant and golden. This enhances their flavor and adds a delightful crunch.
6. How should I store the bars?
Store leftovers in an airtight container in the fridge for up to a week. For longer storage, freeze them in individual portions for up to a month.
7. Can I reheat the bars?
Reheat in a low oven (around 90°C/200°F) for about 5 minutes if you want them softer. Expect a gentle warming aroma and slightly gooey texture.
8. Can I make these dairy-free?
You can swap butter for coconut oil or neutral oil for a dairy-free version. Expect a slightly softer, more coconut-scented bar.
9. Can I add spices?
Adding a pinch of cinnamon or cardamom with the dates gives a warm, aromatic twist that pairs beautifully with the caramel notes.
10. My mixture is crumbly, what do I do?
If your mixture feels too dry, add a tiny splash of water or a few more chopped dates to moisten and help it come together.
These no-bake date bars are a little reminder that simple ingredients can create something deeply satisfying. They’re perfect for when you want a quick treat that feels honest and homemade, no oven required. Honestly, I find myself reaching for them when I need a moment of comfort without fuss.
In a world that moves fast, a little sweet, chewy bite like this can slow things down just enough to appreciate the small, honest pleasures. They’re a reminder that sometimes, the best things are the simplest—just dates, nuts, and a bit of patience in the fridge.

Hi, I’m Grace Morgan, and welcome to my kitchen. This is a space shaped by family meals, curious hands reaching for snacks, paws under the table, and recipes that come together in the middle of real life. I’m a food blogger, a mother, and a passionate pet keeper. Most days, I’m cooking with one eye on the stove and the other on someone who needs me, whether that’s a child asking for a taste or a dog hoping something might fall.


