These no-bake chocolate almond bars are my go-to when late-night cravings hit and I want something quick, rich, and satisfying without firing up the oven. There’s something about the cool, fudgy texture paired with the crunch of toasted almonds that just hits the spot, especially in summer heat when turning on the stove feels like too much. Plus, they come together in no time, which is a real relief when I’m short on patience or energy.
I’ve made these bars countless times, tweaking the ratio of chocolate to almonds, trying to make them just a little more decadent or a little more crunchy. They’re messy in the best way—sticky, oozy, and perfectly imperfect. It’s honestly a small act of rebellion to whip these up instead of reaching for store-bought sweets, and I love how adaptable they are to whatever ingredients I’ve got on hand.
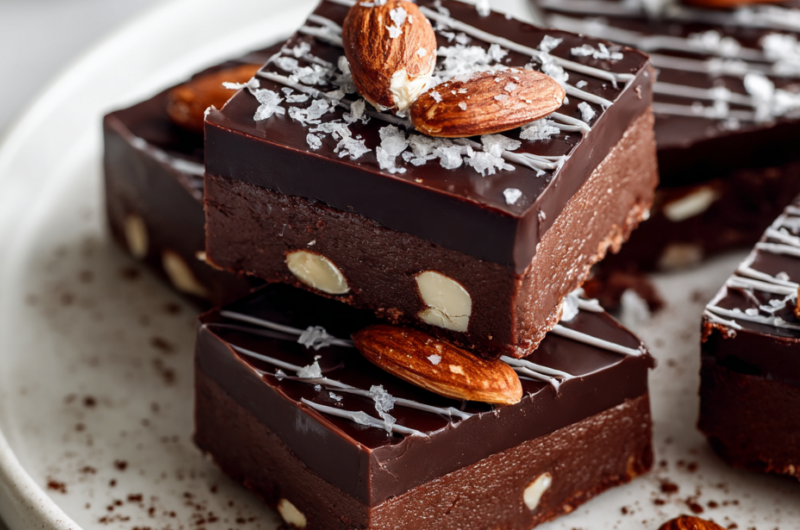
Focusing on how these bars serve as a quick, satisfying fix for late-night sweet cravings, especially when you want something homemade but don’t want to turn on the oven in the heat.
The story behind this recipe
- This recipe was born out of a messy kitchen moment. I had a handful of almonds and a sudden craving for something sweet, no oven in sight, and no time to fuss. The idea of a simple, no-bake bar came from wanting something that’s both satisfying and honest—no tricks, just good ingredients and a little patience while it sets.
- I remember the first batch I made in a rush, melting chocolate over a double boiler in the tiniest kitchen I’ve ever had. The smell of toasted almonds mingling with rich, melted chocolate was pure comfort. Since then, these bars have been my quick fix after long days, sneaking in moments of simple joy when I need it most.
- story_type
Key Ingredient Tips
- Dark chocolate: I prefer a good quality 70% cocoa bar, it melts smoothly and gives that rich, slightly smoky flavor. Swap for milk chocolate if you want it sweeter and creamier—just expect a less intense cocoa hit.
- Almonds: Toasted almonds add crunch and a nutty aroma that really lifts the bars. Raw almonds work fine, but toasting them beforehand amplifies that warm, roasted scent and makes the texture more satisfying.
- Butter: I use unsalted because I like control over the saltiness, but salted butter can add a subtle savory note. Melted butter makes the mixture glossy and easy to spread—skip this step if you’re dairy-free and use coconut oil instead, though it’ll be a bit firmer.
- Sweetener: Honey or maple syrup brings a gentle sweetness and helps everything stick together. If you want a more neutral flavor, a bit of agave works, but these natural syrups also add a faint floral note that’s lovely.
- Vanilla extract: Just a splash enhances the chocolate and nuts, making the flavors more layered. Skip it if you’re out, but don’t underestimate how much depth it adds—sometimes it’s the little things.
- Sea salt: A pinch on top balances the sweetness and intensifies the chocolate flavor. For a salted caramel vibe, sprinkle extra before chilling. Use coarse sea salt for a satisfying crunch in each bite.
- Optional add-ins: Dried cherries, shredded coconut, or a sprinkle of flaky sea salt can turn these bars into a personalized treat. Just fold in at the end for that extra pop of flavor or texture.
Spotlight on key ingredients
Dark chocolate:
- I prefer a good quality 70% cocoa bar, it melts smoothly and gives that rich, slightly smoky flavor. Swap for milk chocolate if you want it sweeter and creamier—just expect a less intense cocoa hit.
- Almonds: Toasted almonds add crunch and a nutty aroma that really lifts the bars. Raw almonds work fine, but toasting them beforehand amplifies that warm, roasted scent and makes the texture more satisfying.
Almonds:
- Toasted almonds add crunch and a nutty aroma that really lifts the bars. Raw almonds work fine, but toasting them beforehand amplifies that warm, roasted scent and makes the texture more satisfying.
- Toasted almonds add crunch and a nutty aroma that really lifts the bars. Raw almonds work fine, but toasting them beforehand amplifies that warm, roasted scent and makes the texture more satisfying.
Notes for ingredient swaps
- Dairy-Free: Swap butter for coconut oil or vegan margarine. Expect a slightly different, more tropical aroma and a firmer texture.
- Sweetener: Use maple syrup or agave instead of honey for a different floral or neutral sweetness. Both will slightly alter the chewiness.
- Chocolate: Replace dark chocolate with milk chocolate for a sweeter, creamier taste. Expect a less intense cocoa flavor.
- Nuts: Substitute almonds with toasted walnuts or pecans for a different nuttiness and slightly softer crunch.
- Add-ins: Incorporate dried cherries, shredded coconut, or sea salt flakes to customize flavor and texture. These extras can boost the overall bite.
- Binder: Use a mashed banana or date paste instead of honey for a fruitier, softer result, but expect a different flavor profile.
- Salt: Omit or reduce sea salt if you prefer a less salty finish or want to highlight other flavors.
Equipment & Tools
- 20cm (8-inch) square dish: to hold and shape the bars
- Parchment paper: to prevent sticking and make removal easier
- Microwave-safe bowl: for melting chocolate evenly
- Spatula: to mix and spread the mixture smoothly
- Baking sheet: to toast almonds evenly
- Sharp knife: to cut bars cleanly
Step-by-step guide to bars
- Equipment ready: line a 20cm (8-inch) square dish with parchment paper, have a mixing bowl, spatula, and a microwave-safe bowl on hand. Purpose: ensures smooth assembly and easy cleanup.
- Melt chocolate: chop 200g of dark chocolate and microwave in 30-second bursts, stirring each time until smooth. Heat until just melted, about 1-2 minutes total. Purpose: creates a glossy, fluid chocolate base.
- Toast almonds: spread 1 cup of almonds on a baking sheet, toast at 180°C (356°F) for 8-10 minutes. Stir halfway through. Purpose: enhances flavor and crunch. Let cool slightly.
- Mix ingredients: in the bowl, combine melted chocolate, 2 tbsp butter, 2 tbsp honey, 1 tsp vanilla, and a pinch of sea salt. Stir until smooth and glossy.
- Add almonds: fold in toasted almonds until evenly coated. Purpose: distributes crunch and flavor.
- Transfer to dish: pour mixture into prepared dish, use spatula to spread evenly, pressing down gently. Purpose: ensures compact, even layer. Chill for at least 2 hours.
- Set and firm: after chilling, check if bars are firm and shiny. If not fully set, refrigerate for another 30 minutes. Purpose: achieves the right texture.
- Cut into bars: lift out using parchment, then slice into 8-10 rectangles with a sharp knife. Purpose: clean, precise edges for serving.
- Finish and serve: dust with extra sea salt or chopped almonds if desired. Serve directly from the fridge for best texture. Purpose: adds visual appeal and flavor contrast.
Chill the bars in the fridge for at least 2 hours until firm. Once set, lift out using parchment and slice into neat rectangles. Serve immediately or store in an airtight container in the fridge for up to a week.
How to Know It’s Done
- Chocolate is fully melted and glossy before mixing.
- Mixture is evenly spread and pressed into dish without air pockets.
- Bars are firm but not brittle after chilling, with a shiny surface.

No-Bake Chocolate Almond Bars
Ingredients
Equipment
Method
- Line the square dish with parchment paper, leaving some overhang for easy removal.
- Chop the dark chocolate into small pieces and microwave in short bursts, stirring each time, until smooth and glossy.
- Spread the almonds on a baking sheet and toast in a preheated oven at 180°C (356°F) for 8-10 minutes until fragrant and golden. Let cool slightly.
- In a bowl, combine the melted chocolate, butter, honey, vanilla extract, and a pinch of sea salt. Stir until smooth and well incorporated.
- Fold in the toasted almonds until evenly coated with the chocolate mixture.
- Pour the mixture into the prepared dish, spreading it evenly with a spatula and pressing down gently to compact.
- Press extra sea salt on top if desired, then refrigerate for at least 2 hours until firm and glossy.
- Once set, lift the bars out of the dish using the parchment overhang and cut into 8-10 rectangles with a sharp knife, warming the blade slightly for clean cuts.
- Serve immediately or store in an airtight container in the fridge for up to a week. Enjoy the rich, fudgy crunch!
Tips for perfect bars
- Bolded mini-head: Use high-quality chocolate for a smoother melt and richer flavor—avoid chalky or waxy bars.
- Bolded mini-head: Toast almonds until fragrant and golden—this heightens their aroma and adds a satisfying crunch.
- Bolded mini-head: Melt chocolate in short bursts, stirring in between—this prevents burning and keeps it glossy.
- Bolded mini-head: Press mixture firmly into the dish to eliminate air pockets—use the back of a spatula for even pressure.
- Bolded mini-head: Chill the bars completely until firm—wait at least 2 hours, or overnight for best texture.
- Bolded mini-head: For cleaner cuts, warm the knife slightly—dip in hot water and wipe dry before slicing.
- Bolded mini-head: Add a pinch of sea salt or flaky salt on top—this enhances the chocolate’s deep, complex notes.
Common mistakes and how to fix them
- FORGOT to temper chocolate → Melt fully, then stir until smooth and shiny.
- DUMPED almonds too early → Toast until golden, then cool before mixing.
- OVER-TORCHED chocolate → Remove from heat immediately when melted and glossy.
- FAILED to line dish → Use parchment for easy removal and clean edges.
Quick fixes and pantry swaps
- If chocolate seizes, splash in a few drops of hot milk and stir gently.
- When nuts stick to the pan, sprinkle with a little sea salt to release them.
- Patch over cracks with melted chocolate for a seamless look and added flavor.
- Splash a tiny bit of warm water when mixture is too thick to spread smoothly.
- Shield the bars from moisture by wrapping tightly if refrigerating overnight.
Make-Ahead and Storage Tips
- Prepare the mixture and line the dish the night before; it firms up better overnight, making slicing easier.
- Store the bars in an airtight container in the fridge for up to a week; the cool temp keeps them firm and fresh.
- For longer storage, freeze the bars up to 3 months; wrap tightly to prevent freezer burn and preserve flavor.
- Reheat by letting the bars sit at room temperature for 10–15 minutes or briefly warming in the microwave at low power; expect a soft, melty texture and rich aroma.
Top questions about no bake bars
1. How do I prevent the chocolate from seizing when melting?
Use high-quality dark chocolate for a smooth, shiny melt that sets perfectly. Cheaper chocolates may seize or be waxy.
2. How can I toast almonds evenly without burning them?
To toast almonds, spread them on a baking sheet and bake at 180°C (356°F) for 8-10 minutes until fragrant and golden.
3. How long should I chill the bars to set properly?
Chill the assembled mixture in the fridge for at least 2 hours until firm. For a quicker set, freeze for 30 minutes, but check frequently.
4. What if my mixture is too soft to spread?
If the mixture is too runny, add a bit more melted chocolate or a small handful of crushed almonds to firm it up.
5. How do I get clean cuts on the bars?
Use a sharp, warm knife to cut clean slices. Wipe the blade after each cut for neat edges.
6. Can I make these bars dairy-free?
For dairy-free options, substitute butter with coconut oil. Expect a slightly firmer texture and a coconut aroma.
7. Should I add salt to the bars?
Add a pinch of sea salt or flaky salt on top before chilling to enhance chocolate flavor and add contrast.
8. How should I store these bars?
Store leftovers in an airtight container in the fridge for up to a week or freeze for longer storage. Thaw in fridge before serving.
9. How do I melt chocolate without burning it?
When melting chocolate, do it in short bursts and stir often. This prevents burning and keeps it glossy.
10. What can I do if the chocolate becomes too thick?
If the chocolate thickens during mixing, add a teaspoon of warm milk or coconut oil to loosen it up.
These bars are a little act of rebellion—no oven, no fuss, just good ingredients put together quickly. They feel like a small victory in the middle of a busy day, with that perfect balance of rich chocolate and crunchy almonds lingering long after the first bite.
In a season when fresh, simple treats are what I crave most, these bars fit right in. They’re honest, satisfying, and remind me that sometimes, the best things come together with a little patience and a lot of flavor.

Hi, I’m Grace Morgan, and welcome to my kitchen. This is a space shaped by family meals, curious hands reaching for snacks, paws under the table, and recipes that come together in the middle of real life. I’m a food blogger, a mother, and a passionate pet keeper. Most days, I’m cooking with one eye on the stove and the other on someone who needs me, whether that’s a child asking for a taste or a dog hoping something might fall.


