This recipe is about reclaiming simplicity and honesty in my kitchen, using only five ingredients that I always have on hand. It’s a reminder that sometimes, the best treats come from minimal fuss and pure, natural flavors. No bake, no pretenses—just honest, nourishing bites that connect me back to my roots.
Making these coconut date bites feels like a small act of kindness—for myself and whoever I share them with. There’s a certain satisfaction in blending sticky dates with the sweet, tropical aroma of coconut. It’s a quick fix when cravings hit or when I want something genuinely good without the fuss of typical baking.
This recipe is about reclaiming simplicity and honesty in my kitchen, using only five ingredients that I always have on hand. It’s a reminder that sometimes, the best treats come from minimal fuss and pure, natural flavors. No bake, no pretenses—just honest, nourishing bites that connect me back to my roots.
A Sweet, Honest Bite
- These bites remind me of childhood afternoons spent sneaking sweet snacks from the kitchen.
- I love how adaptable this recipe is—sometimes I toss in a splash of vanilla or a pinch of sea salt.
- Sharing these simple treats with friends feels like passing along a small piece of comfort.
The story behind this recipe
I stumbled upon this idea during a busy week when I needed something quick, nourishing, and honest. The simplicity of blending sticky dates with coconut reminded me of childhood snacks, but with a grown-up twist that makes it feel a little more special. It’s become my go-to for those moments when I want something sweet without fuss or guilt. Plus, the scent of toasted coconut and ripe dates filling the kitchen is a small, grounding pleasure that keeps me coming back to this recipe.
Trivia and Cultural Roots
- These no-bake bites draw inspiration from traditional energy balls, but focus on minimal ingredients and natural sweetness.
- Dates have been a staple sweetener across Middle Eastern cultures for centuries—known for their rich, caramel-like flavor.
- Coconut, once a symbol of tropical trade routes, became a popular ingredient in quick, wholesome snacks in the modern health movement.
- This recipe taps into the current trend of simple, fuss-free treats that emphasize natural ingredients over processed sugars.
Ingredient breakdown: key components
- Dates: I love how sticky and caramel-sweet they are, giving these bites their natural sweetness. If you want less chewiness, try soaking them in warm water first.
- Coconut: The toasted aroma and chewy bits add depth. Use unsweetened shredded coconut for a purer flavor, or sweetened if you prefer a sweeter finish.
- Nuts (optional): I sometimes toss in chopped almonds or cashews for crunch. Skip if you want a smoother texture or have nut allergies—just add a few more dates.
- Salt: Just a pinch enhances the sweetness and brings out the coconut flavor. If you’re salty-sensitive, reduce or omit.
- Vanilla extract: A splash adds warmth and complexity. Skip if you want a more straightforward, minimalist bite—sometimes less is more.
- Cocoa powder (optional): I like a dusting for a bitter contrast, but it’s totally fine to leave it out for a pure coconut-date flavor.
Spotlight on key ingredients
Dates:
- I love their sticky, caramel-like sweetness that transforms these bites. If they feel too dry, soaking them briefly in warm water makes blending easier and gives a softer texture.
- Dates tend to be naturally oozy when blended, creating that luscious, cohesive paste. For a less sticky result, chop finely and process in pulses.
- Their rich, deep flavor is the backbone of these bites, bringing a gentle sweetness that’s almost smoky if you use Medjool dates.
Coconut:
- The toasted aroma and chewy bits add a nutty, tropical punch. Use unsweetened shredded coconut for a purer flavor, or lightly sweetened for extra sweetness.
- When toasted, coconut turns golden and fragrant, adding a slight crunch and depth to each bite. Keep a close eye to avoid burning—it can go from toasted to charred fast.
- The coconut’s natural oils make the bites feel rich and chewy, with a smoky, nutty undertone that balances the sweetness of the dates.
Notes for ingredient swaps
- Sweetener: Use dried apricots instead of dates for a tangy, less caramel-like sweetness, or try honey for a more liquid, floral note.
- Coconut: Swap shredded coconut for chopped pistachios or walnuts for crunch, or use coconut flour for a finer texture—just reduce the amount.
- Nuts (optional): Chopped almonds or cashews add crunch, but if allergic, skip or add more dried fruit for chewiness.
- Salt: Sea salt enhances sweetness—reduce if sensitive, or try smoked salt for a smoky depth.
- Vanilla: Extract adds warmth, but almond or coconut extract can boost flavor, or omit for a purer taste.
- Cocoa powder (optional): Dust with cacao for bitterness or omit for a clean coconut-date flavor—try cinnamon instead for warmth.
Equipment & Tools
- food processor: Blend dates into a sticky paste and combine ingredients evenly.
- baking sheet: Toast coconut for added aroma and depth.
- parchment paper: Line trays for easy cleanup and to prevent sticking.
- measuring cups: Ensure accurate ingredient portions.
- spoon or scoop: Help portion and shape the bites.
Step-by-step guide to no bake bites
- Gather your equipment: a food processor, a baking sheet, and parchment paper. The processor will blend the dates smoothly, while the baking sheet is for toasting coconut if you choose to do so.
- Pit the dates if they have pits. Measure out about 1 cup, roughly chopped for easier processing. Set aside.
- If you like toasted coconut aroma, spread 1 cup of shredded coconut on a baking sheet. Toast at 170°C (340°F) for 3-5 minutes, stirring once. Keep an eye out for golden edges and a fragrant smell.
- Place the chopped dates in the food processor. Blend until they form a sticky, cohesive paste, about 1-2 minutes. If they’re too dry or crumbly, add a teaspoon of warm water and pulse again.
- Add 1 cup of shredded coconut (toasted or raw), a pinch of salt, and a teaspoon of vanilla extract to the processor. Pulse until well combined, about 30 seconds. The mixture should stick together when pressed.
- If desired, fold in a handful of chopped nuts for crunch. Don’t over-process; keep some texture.
- Using your hands, roll the mixture into bite-sized balls, roughly 1 inch in diameter. Place them on a parchment-lined tray. Repeat until all mixture is used.
- For a more uniform shape, gently press each ball to flatten slightly. Chill in the fridge for at least 30 minutes to firm up.
- Once set, these bites can be stored in an airtight container in the fridge for up to a week or frozen for longer storage. Keep an eye out for moisture; if they seem soft, give them a quick freeze.
Chill the bites in the fridge for at least 30 minutes until firm. Serve directly from the fridge for best texture. They keep well in an airtight container for up to a week.
How to Know It’s Done
- The mixture is sticky and holds together when pressed.
- Coconut is golden and fragrant if toasted.
- Bites are firm but not hard after chilling.

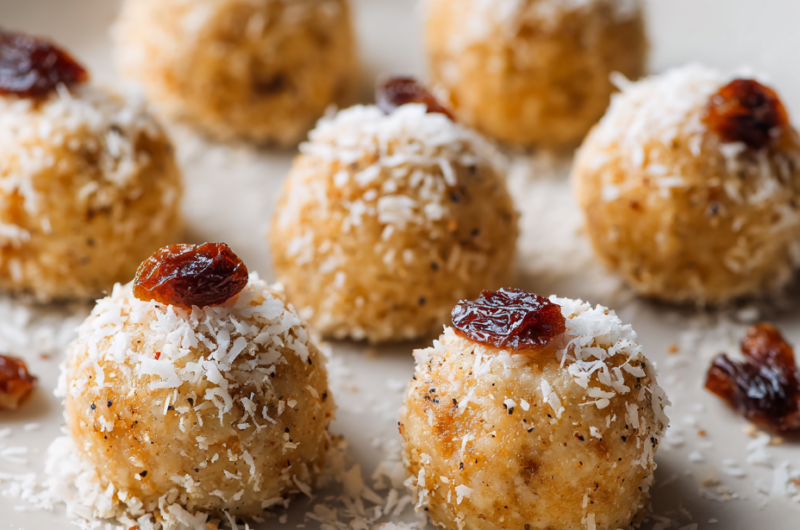
Coconut Date Bites
Ingredients
Equipment
Method
- Spread the shredded coconut evenly on a baking sheet and toast in a preheated oven at 170°C (340°F) for 3-5 minutes, stirring once, until golden and fragrant. Keep a close eye to prevent burning.
- Place the pitted dates into a food processor and blend until they form a sticky, cohesive paste, about 1-2 minutes. If they seem dry, add a teaspoon of warm water and pulse again to loosen the mixture.
- Add the toasted shredded coconut, a pinch of sea salt, and vanilla extract to the food processor. Pulse a few times until everything is well combined, and the mixture sticks together when pressed.
- If desired, fold in chopped nuts for extra crunch. This step adds texture and flavor but can be skipped for a smoother bite.
- Using clean hands or a small scoop, portion out the mixture and roll it into 1-inch diameter balls. Place each ball on a parchment-lined tray, gently pressing them to flatten slightly if you like.
- Refrigerate the bites for at least 30 minutes to allow them to firm up and become chewy. Once chilled, they are ready to enjoy, with a dense, chewy texture and a tropical coconut aroma.
Notes
Tips and tricks for perfect bites
- Chill for firmness: Always refrigerate the bites for at least 30 minutes so they hold their shape.
- Toast coconut lightly: Keep a close eye during toasting; it turns quickly from golden to burnt and smoky.
- Pulse in bursts: When blending dates, pulse in short bursts to avoid over-processing and achieve a sticky, manageable dough.
- Add warm water: If the mixture feels too dry or crumbly, a teaspoon of warm water can help it come together smoothly.
- Use wet hands: Keep your hands slightly damp when rolling for less sticking and smoother bites.
- Taste before chilling: If you want a touch more sweetness or salt, adjust the seasoning before the bites set.
- Store in airtight container: Keep in the fridge for up to a week, or freeze for longer storage—thaw before serving for best texture.
Common mistakes and how to fix them
- FORGOT to toast coconut? Toast it again until golden and fragrant, then re-chill before mixing.
- DUMPED too many dates? Use a splash of warm water to loosen the mixture and re-blend.
- OVER-TOASTED coconut? Discard burnt bits, and lightly toast fresh coconut for better flavor.
- MISSED check for firmness? If bites are soft after chilling, freeze briefly to set properly.
Quick fixes and pantry swaps
- When mixture is crumbly, splash warm water and pulse again.
- If coconut burns, immediately remove and toast fresh coconut.
- Splash a little more water if dates are too dry to blend smoothly.
- When bites are too soft, freeze briefly to firm up quickly.
- Splash a bit of vanilla or salt if flavors need balancing.
Prep, store, and reheat tips
- Prepare the mixture ahead by blending dates and coconut; it firms up better when chilled thoroughly, making rolling easier.
- Store the assembled bites in an airtight container in the fridge for up to a week, the flavors deepen slightly, and they stay chewy and fresh.
- For longer storage, freeze the bites in a single layer on a tray, then transfer to a bag; they keep for up to a month and thaw quickly in the fridge.
- Refrigerate or freeze the bites, and let them sit at room temperature for a few minutes before serving for a softer, more melting texture. Expect a fragrant coconut aroma and chewy bite upon reheat.
Top questions about coconut date bites
1. Can I substitute dates in the recipe?
Yes, you can replace dates with dried apricots for a tangy twist, but expect a different texture and flavor.
2. Can I swap the coconut for other nuts or ingredients?
Absolutely, use toasted coconut for a nuttier flavor or unsweetened shredded coconut for a milder taste.
3. Can I add nuts or other mix-ins?
Yes, adding chopped nuts gives extra crunch. If allergic, skip or try dried fruits instead.
4. Can I sweeten the bites further?
Yes, if you prefer a sweeter bite, add a drizzle of honey or a sprinkle of cinnamon before shaping.
5. What if the mixture is too crumbly?
If the mixture is too dry, a teaspoon of warm water will help it come together better during processing.
6. How should I store the bites?
Store these bites in an airtight container in the fridge for up to a week, or freeze for longer storage.
7. How long do I need to chill the bites?
Chill the bites for at least 30 minutes before serving to ensure they hold their shape and are chewy.
8. Can I toast the coconut?
Yes, you can toast the coconut for a few minutes at 170°C (340°F) until golden and fragrant for extra flavor.
9. What if the bites are too soft?
If the bites are too soft after chilling, put them in the freezer for 10-15 minutes to firm up quickly.
10. Can I enhance the flavor with other ingredients?
For a richer flavor, add a splash of vanilla or a pinch of sea salt before processing the mixture.
These no-bake coconut date bites are more than just a quick treat—they’re a reminder to keep things simple and honest in the kitchen. When I make them, I feel grounded, reconnecting with natural flavors and minimal fuss. They’re perfect for moments when I crave something sweet but want to stay true to my pantry staples.
Sharing these bites feels like passing along a small piece of comfort, especially now when we need easy, nourishing options. They’re a little act of kindness for my busy days, and a gentle nudge to trust the simple ingredients that always hold up. Sometimes, the best treats are right in front of us, waiting to be rediscovered.

Hi, I’m Grace Morgan, and welcome to my kitchen. This is a space shaped by family meals, curious hands reaching for snacks, paws under the table, and recipes that come together in the middle of real life. I’m a food blogger, a mother, and a passionate pet keeper. Most days, I’m cooking with one eye on the stove and the other on someone who needs me, whether that’s a child asking for a taste or a dog hoping something might fall.


