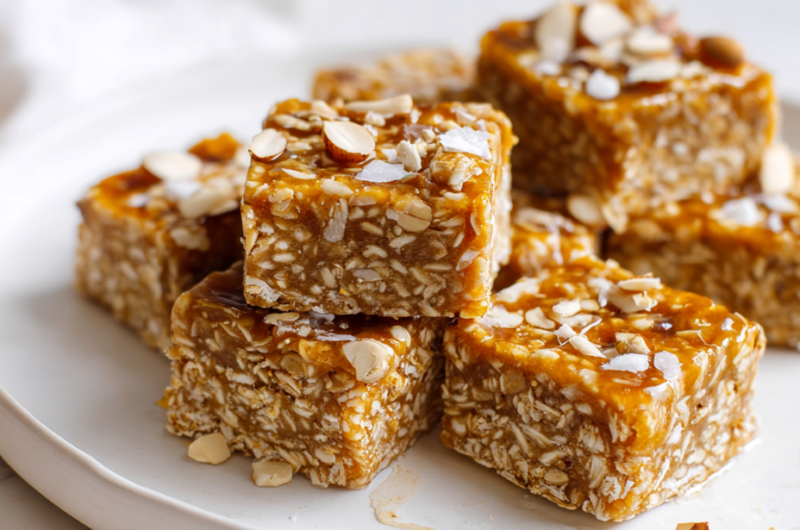
Some mornings just don’t leave room for a sit-down breakfast. I’ve found that no-bake oat squares are my secret weapon for those rush hours, offering a quick dose of sweetness and energy without the fuss of cooking. It’s a simple, honest recipe that feels like a small act of kindness to myself before the chaos begins.
What I love most is how adaptable it is—throw in whatever nuts, dried fruit, or seeds you have lying around. These squares are more than just a snack; they’re a tiny moment of calm amid a hectic day, made in minutes and packed with familiar, comforting flavors. They’ve become my go-to when mornings spin out of control but I still need something nourishing.
Focusing on how no-bake oat squares became my go-to remedy for those hectic mornings when breakfast feels like a luxury I can’t afford, yet I crave something hearty and sweet that I can whip up in minutes without turning on the stove.
The story behind this recipe
- This recipe was born out of late nights when I needed something sweet but didn’t want to turn on the oven. One evening, I threw together some oats, honey, and whatever nuts and dried fruit I had. The result was shockingly good—crispy edges, chewy center, and that satisfying oatmeal flavor. It’s become my go-to for busy mornings or unexpected guests who pop by without warning.
- I remember the first time I shared these with friends, they couldn’t believe they were no-bake. It’s the kind of thing you make in a rush but feels special enough to serve. Over the years, I’ve tweaked the ratios, added a pinch of sea salt, and tried different dried fruits, but the core still feels like that simple, honest comfort I crave after a long day.
- heading
- story_type
Ingredient breakdown: key components
- Old-fashioned oats: I love the chewiness they bring, like a gentle hug for your teeth. You can swap in quick oats, but expect a slightly softer bite.
- Honey or maple syrup: I use honey for its rich sweetness and sticky texture that helps everything hold together. Maple syrup works too, adding a smoky, caramel note—just watch the moisture level.
- Nut butter: I prefer almond or peanut butter for that creamy, slightly salty punch. If you’re allergic, coconut or sunflower seed butter gives a similar texture without the nutty flavor.
- Dried fruit: I often toss in chopped dates or cranberries, which add a chewy burst of sweetness. Dried apricots or figs are great alternatives, just chop them small so they blend nicely.
- Nuts and seeds: I like walnuts or sunflower seeds for crunch. Toast them lightly beforehand if you want a richer, nuttier aroma—just keep an eye so they don’t burn.
- Optional mix-ins: I sometimes add chocolate chips or coconut flakes for extra flavor. Mix in at the end so they don’t melt completely, but still add a little surprise in every bite.
- Salt: Just a pinch of sea salt enhances all the flavors. Skip it if you want a more subdued sweetness, or add a tiny dash of flaky sea salt on top after pressing.
Spotlight on key ingredients
Oats & Sweetener:
- Old-fashioned oats: I love the chewiness they bring, like a gentle hug for your teeth. You can swap in quick oats, but expect a slightly softer bite.
- Honey or maple syrup: I use honey for its rich sweetness and sticky texture that helps everything hold together. Maple syrup works too, adding a smoky, caramel note—just watch the moisture level.
Notes for ingredient swaps
- Sweeteners: Maple syrup or agave nectar can replace honey, adding different nuances—maple offers a smoky sweetness, agave is milder and more neutral.
- Nut butters: Cashew or sunflower seed butter work well if you’re avoiding peanuts or almonds; expect a slightly different flavor and creaminess.
- Oats: Steel-cut oats won’t work here; stick to old-fashioned or quick oats for the right texture and binding.
- Add-ins: Chocolate chips can be swapped for dried cherries or coconut flakes—try what you love or have on hand for varied bites.
- Seeds: Chia or flaxseeds can replace sunflower seeds, boosting nutrition and adding a slight crunch or chewiness.
- Fats: Coconut oil can be used instead of nut butter for a richer, tropical flavor—just reduce the sweetener slightly to balance.
- Salt: Flaky sea salt on top adds a burst of flavor; skip or reduce if you prefer a more subdued sweetness.
Equipment & Tools
- Mixing bowl: To combine dry ingredients evenly.
- Saucepan: To gently melt honey and nut butter.
- Spatula: For mixing and pressing down the mixture.
- 9×9-inch pan: To set and shape the squares.
- Parchment paper: For easy removal and cleanup.
- Knife: To cut the set squares.
Step-by-step guide to no bake oat squares
- Gather all your ingredients and equipment. Line a 9×9-inch pan with parchment paper for easy removal.
- In a large mixing bowl, combine 2 cups of old-fashioned oats, 1/2 cup chopped nuts, and 1/4 cup dried fruit. Mix well.
- In a small saucepan over low heat, melt 1/2 cup honey and 1/4 cup nut butter. Stir until smooth and combined. (about 2-3 minutes, smell that toasty aroma)
- Pour the warm honey-nut mixture over the dry ingredients. Use a spatula to thoroughly coat everything. The mixture should be sticky but manageable.
- Transfer the mixture to the prepared pan. Press down firmly with the back of a spatula or your hands to create an even layer. (listen for a slight crackle as it compresses)
- Refrigerate uncovered for at least 2 hours, or until firm. For quicker setting, pop it in the freezer for about 1 hour. (check for a firm, slightly shiny surface)
- Once set, lift out the block using the parchment paper. Cut into squares or bars as desired. Serve immediately or store.
Refrigerate for at least 2 hours, uncovered, until firm. Use parchment to lift out and cut into squares. Serve straight from the fridge for best texture, or store in an airtight container.
How to Know It’s Done
- Edges are firm and hold shape when pressed.
- Oats are glossy and coated, no dry patches visible.
- Color is golden and slightly darker at the edges, with a sweet aroma.
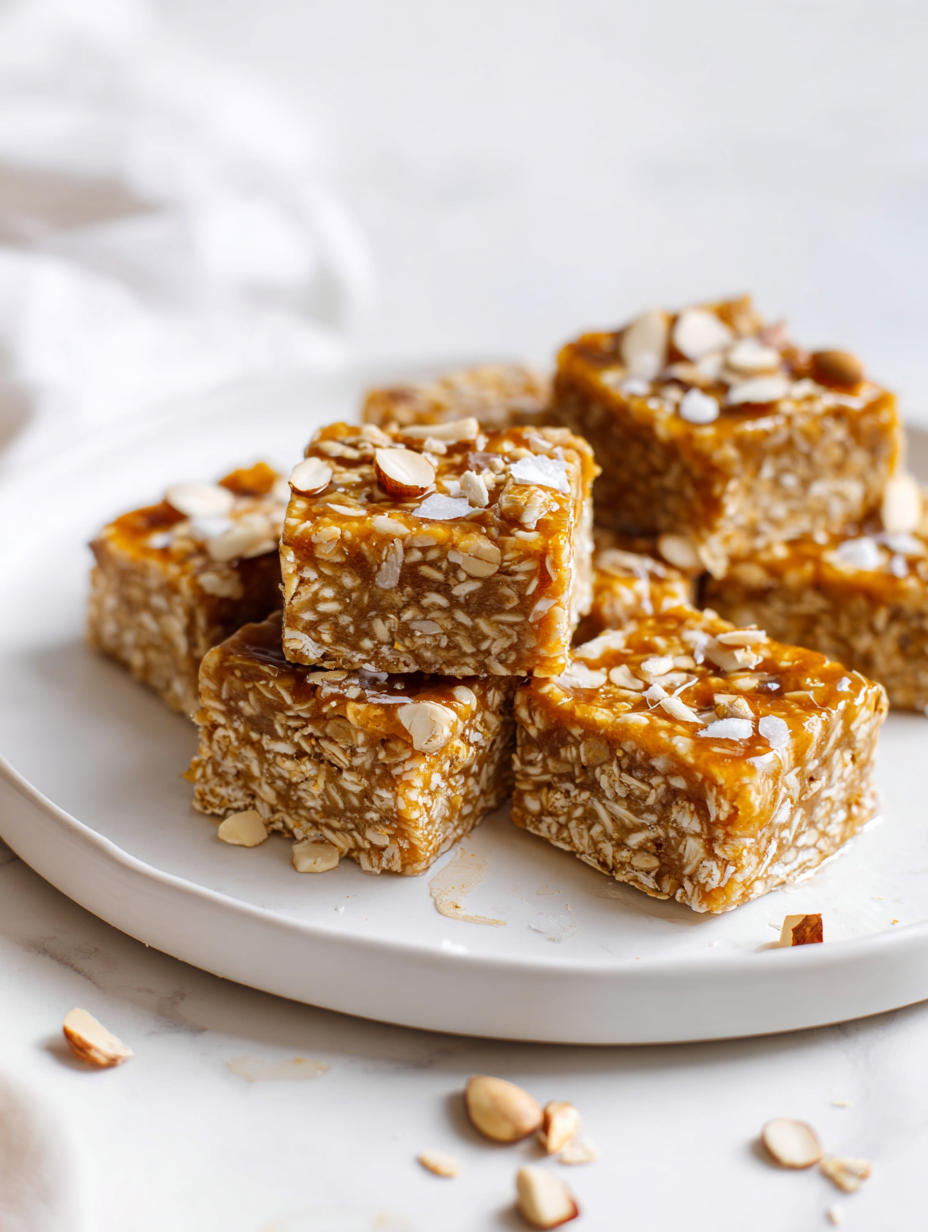
No-Bake Oat Squares
Ingredients
Equipment
Method
- Line your 9x9-inch pan with parchment paper to make removing the squares easier later on.
- In a large mixing bowl, combine the oats, chopped nuts, and dried fruit. Stir everything together so the ingredients are evenly distributed.
- In a small saucepan over low heat, gently warm the honey and nut butter, stirring until smooth and just combined. Let the mixture bubble gently and smell that toasty aroma.
- Pour the warm honey-nut mixture over the dry ingredients. Use a spatula to fold everything together, making sure all the oats and nuts are coated and sticky.
- Transfer the mixture into the prepared pan. Press down firmly with the spatula or your hands to create an even, compact layer. You should hear a slight crackle as you press.
- Refrigerate the pan uncovered for at least 2 hours, or until the mixture is firm and set. For quicker results, pop it in the freezer for about 1 hour.
- Once set, lift out the block using the parchment paper. Use a sharp knife to cut into squares or bars, pressing down firmly to get clean edges.
- Serve immediately or store the squares in an airtight container in the fridge for up to a week. They stay chewy, with a pleasant nutty aroma and just the right amount of sweetness.
Tips & Tricks for Perfect Squares
- Chill before cutting: Press mixture firmly into the pan and refrigerate at least 2 hours for neat, clean squares.
- Mix quickly: When combining honey and nut butter, work swiftly to prevent the mixture from thickening or setting too soon.
- Toast nuts lightly: Give your nuts a quick toast beforehand for added aroma and crunch—just keep an eye so they don’t burn.
- Press evenly: Use the back of a spatula or even a glass to press the mixture flat—consistent pressure ensures even texture.
- Adjust sweetness: Taste the melted honey and nut butter blend before mixing—add more if you want a sweeter bite, or less for subtlety.
- Use parchment paper: Line your pan with it for easy removal and minimal sticking—no messy clean-up needed.
- Add mix-ins last: Fold in chocolate chips or dried fruit at the end to prevent melting or uneven distribution.
Common mistakes and how to fix them
- FORGOT to evenly press mixture → press firmly to prevent crumbling.
- DUMPED too much honey → reduce amount for better binding and texture.
- OVER-TORCHED nuts → toast lightly, watch closely to avoid bitterness.
- MISSED the chill time → refrigerate until set for clean cuts and firm texture.
Quick fixes and pantry swaps
- When mixture is too sticky, splash a little warm water to loosen it.
- If squares crumble, patch with a tiny drizzle of honey and press again.
- Splash a pinch of salt if flavor feels dull or bland.
- Patch cracked edges by pressing gently and chilling for 10 minutes.
- Shield burnt nuts with a quick scrape and toast anew, smelling the smoky aroma fade.
Prep, store, and reheat tips
- Prep the mixture ahead by measuring out dry ingredients and melting honey and nut butter. Keep refrigerated overnight for easy assembly.
- Store leftover squares in an airtight container in the fridge for up to a week. They stay chewy with a slight caramel aroma, perfect for grabbing on busy mornings.
- Freeze individual squares wrapped in parchment for up to 3 months. Thaw at room temperature for 10–15 minutes, noticing the crunch as they soften.
- Reheating isn’t really necessary, but if you like them warmer, microwave for 10 seconds until just slightly warmed—smells like toasted oats and honey.
- For best flavor, serve directly from the fridge or freezer. The cold enhances that chewy, firm texture and intensifies the sweet, nutty aroma.
Top questions about no bake oat squares
1. How do I know when they’re set?
You want a firm, chewy texture with a slightly glossy surface, not sticky or crumbly.
2. How should I cut the squares?
Use a sharp knife to cut clean squares, pressing down firmly and chilling beforehand.
3. How long do they last?
Store in an airtight container in the fridge for up to a week for best freshness.
4. Can I freeze these?
They can be frozen for up to 3 months; thaw at room temp, noticing the crunch return.
5. Can I use a different sweetener?
Yes, you can swap honey for maple syrup or agave nectar, but expect a slightly different flavor.
6. Can I change the nuts?
Use natural, unsalted nuts; roasting them lightly enhances aroma but watch so they don’t burn.
7. How can I add more crunch?
For a richer flavor, toast nuts lightly before mixing; for crunch, add extra seeds or chopped nuts later.
8. My mixture is too sticky, what now?
If mixture feels too sticky, add a bit more oats or a tiny splash of water to loosen it.
9. How long should I chill it?
Chill the mixture in the fridge for at least 2 hours for clean, firm squares.
10. Can I add extras like chocolate?
Yes, you can add chocolate chips or dried fruit for extra flavor and texture variation.
These no-bake oat squares are more than just a quick snack; they’re a reminder that simplicity can be satisfying in the chaos of a busy day. When I make them, I’m often struck by how little effort yields such a comforting, familiar flavor, almost like a warm hug in a bite.
They’re perfect for grabbing on mornings when time slips away or when I need a little sweet something to ground me. No matter the season, they bring a bit of calm and a lot of good memories—sometimes that’s exactly what I need.

Hi, I’m Grace Morgan, and welcome to my kitchen. This is a space shaped by family meals, curious hands reaching for snacks, paws under the table, and recipes that come together in the middle of real life. I’m a food blogger, a mother, and a passionate pet keeper. Most days, I’m cooking with one eye on the stove and the other on someone who needs me, whether that’s a child asking for a taste or a dog hoping something might fall.


